Composting Leaves for Beginners

Today, I’m sharing gardening tips on composting leaves for beginners. Fall is a great time to start preparing  garden compost for backyard vegetable gardens.  Having rich soil is essential in for growing flowers and vegetables.  I started composting several years ago, so I could have readily available compost for my veggies.  

I started c0mposting with 2 compost bins that I use for kitchen scraps, yard cuttings, grass etc.  The compost bins weren’t breaking down fast enough for me, so I started composting my neighbor’s leaves.  I’m not sure that I will return to the compost bins after seeing the results of the composted leaves. I love how the leaves break down and how fast they return black gold to me.  The leaves are easier to compost, and they don’t require any work unlike the compost bins.


composting leaves for beginners


Composting leaves is simple, just leave the leaves in lawn bags and let them do their thing.  My neighbor brings me 15 – 20 bags each fall. However, there are other uses for the leaves too.  For example, the top picture is a bag that I use around my garden plants as mulch.  This year I created paths in the garden to keep the weeds down with them. Normally I use straw, but I didn’t purchase any this year so I had to use my leaves.


composting leaves for beginners


The above bag of leaves is in the mist of breaking down.  You can see where the leaves are decomposing in the bag.  Because I have 5 – 10 bags of black gold for the next year’s garden, the other bags can sit and decompose throughout the year.  So, stop burning those leaves and find a spot for them to decompose.  It’s easy!

Tips for Composting Leaves for Beginners:

1.  Remove large sticks, pine cones etc. from the leaves.
2.  Use inexpensive lawn bags to house them.  I purchase cheap ones from the Dollar Store.
3.  Crumble the leaves as much as you can before placing them in the bag.  Because my neighbor gives me her leaves, I have to open the bags and crumble them myself.  If you have kids let them crumble them.  It gets them involved in gardening. Or, use a weed wacker to break up the leaves.
4.  Wet the crumbled leaves thoroughly, seal the bag and place it in a spot where they won’t be disturbed. I use a stick and punch a few small holes in the bag so it will get water from the rain and snow during the winter months.


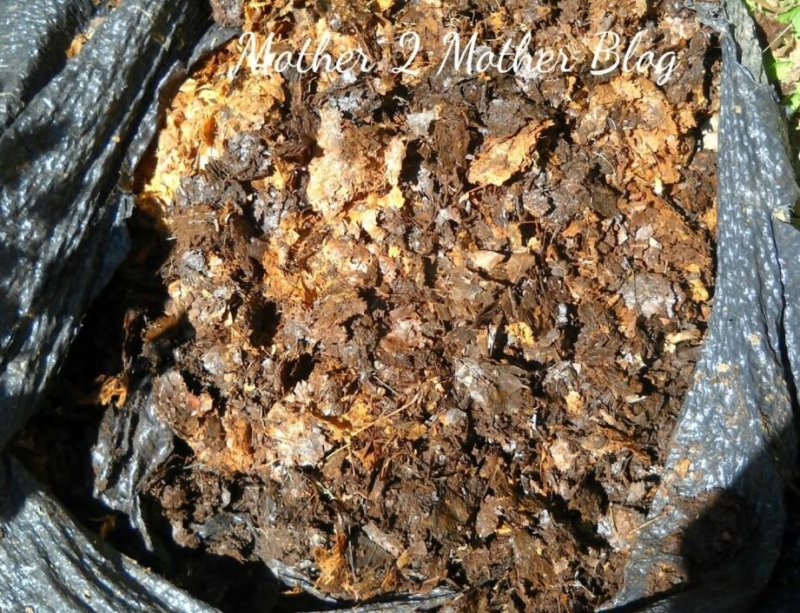
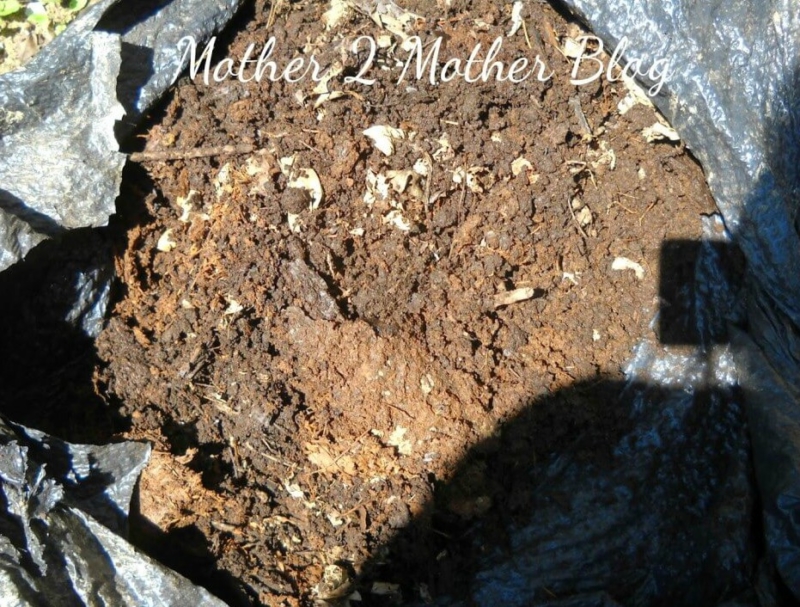
The picture below is a bag of leaves that have completely broken down into what gardeners call black gold. Every gardener wishes for black gold. This bag is beautiful and full of worms. It took a few years for the leaves to break down to this state, but it is so worth it. The compost in the bins isn’t close to being this rich.  I must say that I have not given the bins the attention that they require.

Compost bins must be heated up by using a certain amount of greens and browns, such as cuttings from the lawn, leaves, kitchen scrapes, newspaper, etc. It also requires water and turning.  My bags of leaves just require storage space, and nature does its thing.  I hide my bags behind one of my storage buildings.  The longer you leave them, the more they break down.  I love composting tips for beginners that are easy.  I thought you would feel the same.


composting leaves for beginners
 

Composted leaves will enrich your soil and help produce beautiful flowers and vegetables.  You can either till it into the garden or place a scoop into the hole before adding your plant. I also add a scoop around the base of my plants.  Simply use a small hand trowel to place the compost around the plant. Most importantly, the compost is organic and it’s free.

So, once the leaves have been raked and bagged it’s time to do fall lawn care.  Fall lawn care should include aerating the soil, fertilizing, over seeding and continuing weed control.  Aerating the soil is important, especially if you intend to overseed your lawn.  Aeration allows water, nutrients, and oxygen to get to the root of your lawn.  As a result, it also allows seeds to touch the soil and receive water when you overseed.

Finally, fertilizing your existing lawn is a step you should take in the fall.  The moisture on the lawn in the morning helps to absorb the fertilizer.  The fertilizer in turn, helps with the roots of the lawn.  Additionally, strong roots will produce a lush, green lawn in the spring.   We hope you found my composting leaves for beginners beneficial.

Using Eggshells In The Garden

Stop, don’t throw those eggshells away.  Today, I’m sharing tips on using eggshells in the garden.  Yes, eggshells are beneficial in the backyard garden.  So, add eggshells to your list of backyard vegetable gardening items needed this growing season. Your tomato and pepper plants will thank you.  So, grab a container and start saving them throughout the year.  Ask your family members or neighbors to save them for you too.  Especially, if you don’t consume a large quantity of eggs.  Explain that using eggshells in the garden will benefit the tomatoes they will receive in exchange.  This will give them an incentive to save the shells for you.  


using eggshells in the garden


Before using the eggshells in the garden take these steps:

  • Rinse the eggshells thoroughly
  • Dry the eggshells on low temperature in the oven or microwave them.  (You want the shells to be brittle)


using eggshells in the garden


Once are cool, crush them and put them in a plastic bag or container. You can store them in your refrigerator if you don’t have counter space.  A rolling pin or wooden spoon is a good way to crush the eggshells.  Turn this task over to the kids.

So, when garden season arrives place a generous dose of the crushed eggshells in the hole when you plant your tomatoes.  They are a great source of calcium for the plants.  Furthermore, I also sprinkle the shells around the plant once I get the tomatoes in the ground.  I actually do this throughout the growing season.  The eggshells will help give your tomatoes a calcium boost, and help fight off blossom end rot.


how to use eggshells in the garden


Secondly, I mix the crushed eggshells in with my birdseed.  Bluebirds, Baltimore Orioles, Scarlet Tanagers and Barn Swallows love eggshells too.  You can spread the eggshells on a log or on the ground if you don’t have a platform feeder.  We hope that you enjoyed our tips on using eggshells in the garden, and you will start recycling your eggshells.  You may also like 20 Flowers to Use in a Wildflower Garden.

10 Benefits of Vegetable Gardens

Today, I’m sharing gardening tips on the benefits of vegetable gardens.  Backyard gardening is a rewarding experience.  And, there’s nothing better than fresh vegetables in the summer and throughout the winter months.  My grandfather had huge gardens when I was growing up. He planted enough vegetables for his kids and their kids. There was a catch, the grandchildren had to help weed the field, I mean garden.  It looked like a field and felt like one when we had to walk it and pull weeds. But, backyard kitchen gardening becomes a part of your soul.  You connect with nature and the earth.  


benefits of vegetable gardens


I remember the garden holding tons of tomato plants, green beans, peas, onions, corn, greens and the list goes on. The garden became a part of my soul. For as long as I can remember, I thought about my own vegetable garden.  I decided to finally put one in several years ago, and I look forward to digging in the dirt each spring.

It’s time for me to decide what I want to grow this season.  I planted garlic in the fall, and I saw green sprouts yesterday.  I was unsuccessful last year, so I’m really excited.  My freezer is full of squash, peppers and, zucchini now, so I was thinking that I wouldn’t plant any. It dawned on me that others aren’t as fortunate, they would love to have fresh veggies this summer.  So, for the veggies that I don’t use or give to my family, I can take to a food bank.


benefits of vegetable gardens


Benefits of Vegetable Gardens:

  1. Saving on your food bill.
  2. Having delicious vegetables for summer gatherings and snacking.
  3. Making your own tomato sauce for pizza and pasta.
  4. Freezing vegetables for use during the winter.
  5. Sharing your bounty with neighbors, family and friends.
  6. It’s a great way to exercise and get fresh air.
  7. It’s a great way to relieve stress.
  8. Learning to grow a variety of vegetables is educational.
  9. Provides an opportunity to bond with my grandchildren.
  10. Growing produce from seed is challenging and rewarding.


Finally, Urban Gardening has become popular too. So, growing fresh vegetables in small places is possible.  A little creativity, and you can have fresh garden vegetables at your door. Fresh vegetables are being grown on decks, patios and balconies. How you ask?  In containers.  Furthermore, the containers can be paint buckets from Lowe’s or Home Depot, planters, or old whiskey barrels. Use your imagination.  Grow lettuce, peppers, tomatoes or herbs.  Herbs can be grown in small flower pots and don’t take up much space.  You can place these in your kitchen window, and they really enhance dishes.  Start small, but start growing your own greens.  See my post on vertical gardening.


Using the Winter Sowing Method for Seeds

Today, I’m going to share gardening tips on winter sowing vegetable seeds.   Check out my other backyard vegetable gardening tips before you leave too.  I have the winter blues!  So, I decided to start my vegetable seeds for my spring and summer garden.  Planning my garden takes the blues away and gives me a head start on growing strong, healthy veggie plants. 

For the past several years, I have started my seedlings using heat mats and grow lights.  I have about a 90% germination rate with what I sowed.  However, it takes a lot of time and space to nurture the seedlings. Using the winter sowing method eliminates the heat mats, grow lights and chances of growing leggy vegetable seedlings.  You simply place your containers in a location where they will get sunlight and rain water and let them go until spring.  


gardening tips


I decided to use the winter sowing method for the past few years.  It’s much easier than setting up the mats and grow lights.  As a result, I’ve been saving plastic liter bottles as well as  juice and milk bottles.  Anything that I can cut and punch holes in the bottom for drainage is fair game.  I started about 20 bottles over the week-end.  Tomatoes, dill, zucchini, squash, sunflowers and petunias. Yes, you can winter sow flowers too.  I love that dill and petunias reseed for several years after planting.  

I will sow a few tomatoes inside under grow lights, but I’m sold on the winter sowing method.  And, it’s doubtful that I will ever return to to a full fledged indoor sowing setup again.


winter sowing vegetable seeds


Winter Sowing Vegetable Seeds:


  • Wash your bottles in hot soapy water and rinse well.
  • Allow bottles to dry.
  • Use a box cutter to cut around the bottles.  Leave an inch on the bottle for a hinge.
  • Add drainage holes in the bottom of your bottle.  To accomplish this, I used a hot glue gun on the bottom of the milk bottles.  However, I was unsuccessful using the glue gun on the liter and juice bottles.  The glue gun wouldn’t penetrate.  So, I used the box cutter to make slits on the bottom.  You could also use a drill on the bottom.  If you have another method of punching holes, bring out your equipment and punch holes in the bottom of your bottles.


winter sowing method


Next prepare your seed starter mix:


  • Mix your seed starting mix as directed on the package.  I use warm water when mixing the soil Mix it thoroughly.  You want it wet; however, not soggy.
  • Add 2 – 3 inches of the mix to the bottom of each of the bottles or container.  I use Miracle Gro Seed Starting Mix.  I have a great germination rate each year with the mix.   I have also used Miracle Grow potting soil, and my seeds germinated as well.
  • Plant your vegetable or flower seeds according to the directions on the package.  Once you have the seed planted, wrap the bottle with duct tape.  I purchased my duct tape from the Dollar Store.
  • Mark the bottles with a permanent marker, which I also purchased from the Dollar Tree.
  • You can discard the bottle tops.  I moved the bottles and containers to my deck to ensure they get rain. Let them go until spring.  At that time you should have sprouts that will need water.  As they grow, you will have to remove the top of the bottles. Just remove the duct tape and remove the top.  You can use a pair of scissors to cut the hinge on the bottle.
  • You can place your bottles in trays for a little more organization, but it’s not necessary.  My are placed randomly on my deck.  Once I remove the tops, I organize them so I can tgrans
  • Your seedlings will already be hardened off.  Which is a step you will have to take if you start seedlings indoors.


Finally, if you are a gardener and use the winter sowing method, please share your experience.  You may also like My Winter Sow Seed List.