Preschool Educational Activity Color Matching

Today, I’m sharing parenting tips on preschool educational activity. My grandchildren loved playing this game.  So, I thought I would share it with you.  Its a great way to teach children their colors as well as match items.  Preparing preschoolers for kindergarten is essential.  So is preparing kindergarten for first grade.  The earlier we start teaching our children the more advanced they become in their education.

Furthermore, parents must stop waiting for schools to completely educate our children.  Giving them extra assignments and spending time teaching them is a great bonding experience.  Just as important, you as the parent can assess your child’s skills rather than waiting for a progress report.  Trust me, their teachers will appreciate your efforts.  It also gives you some insight when you have a parent teacher conference.  You’re actually speaking from a first hand perspective.


preschool educational activity


Benefits of Preschool Educational Activities:

  • Develops fine motor skills
  • Improves memory
  • Improves the ability to distinguish similarities and differences
  • Visual memory
  • Improves attention to detail
  • Great for cognitive development


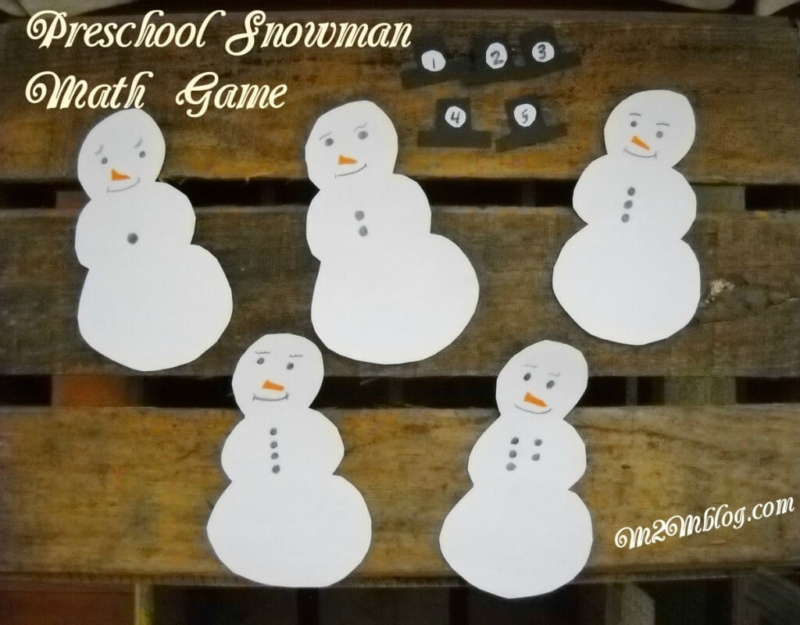
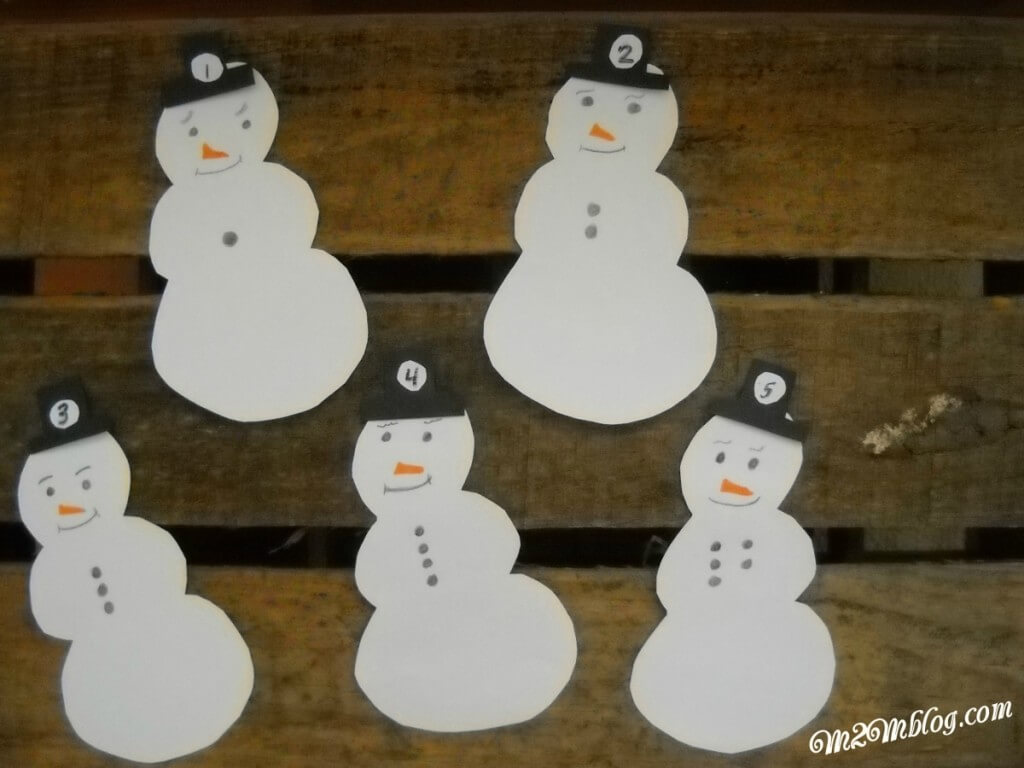
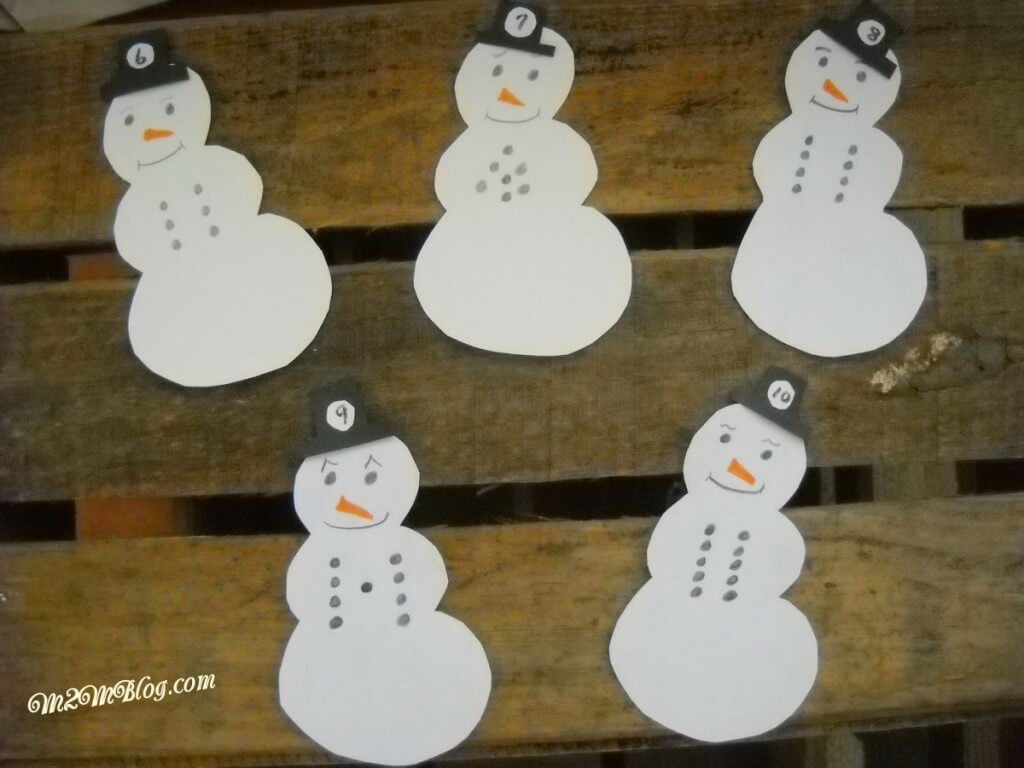
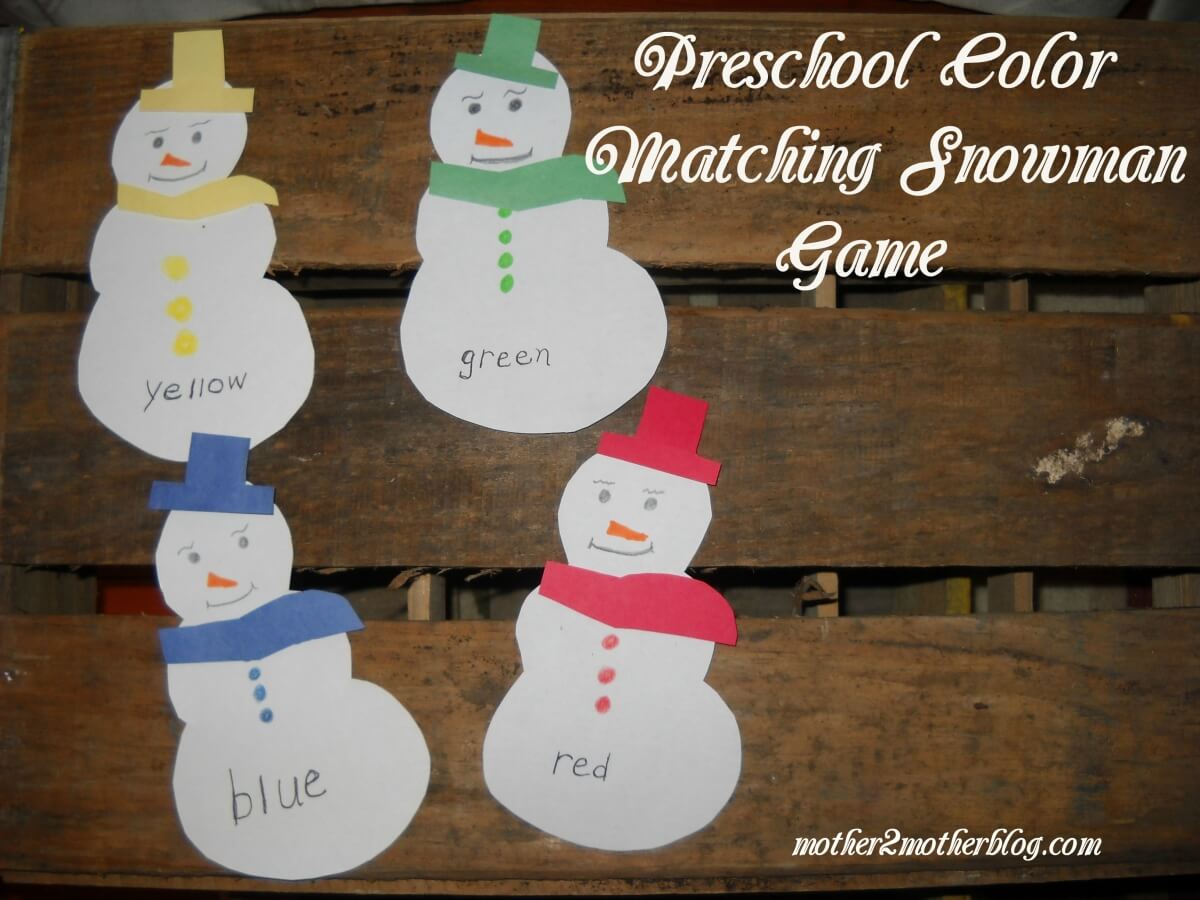
My granddaughter is adamant that playing matching games helps improve memory.  She is quite astute when she is playing games that require memory skills. My preschool educational activity will help to enhance your child’s ability to recognize colors.  Simply match the scarf and hat with the same color dots on the snow man.  They can also enhance their vocabulary by learning how to pronounce the colors and learning how to spell each color.

Kindergarten Match Game


First, you will need the following items to make these adorable snowmen:

  • white construction paper or cardstock for the body of the snowman
  • color construction paper or cardstock for the hat and scarf
  • colored pens or crayons to match the hat and scarf
  • scissors
  • pencil for tracing

Note:  I used copier paper for the snowman and construction paper to make the hat and scarves.


Step 1 –  I found it easier to make a sample snowman. Next, I folded a sheet of construction paper in half and than folded it again. I placed the sample snowman on top of the folded sheet and cut around it.  I was able to create 4 snowmen at once using this method. This step really cuts down on time.

Step 2 – Select various colors of construction or cardstock for the hat and scarfs.  I cut these out free hand.  As you can see from the picture, they are not uniform.  The goal is have a variety of colors for the match.

Step 3 – Make faces for the snowmen as shown with a black crayon or pen.  Or,  get creative and come up with your own style.

Step 3 – Make the buttons on the snowman the same color as the top hat and scarf.  You can use crayons or pens for this step.  ( I found the pens to be easier to use). Once the buttons are made, print the color the button, top hat and scarf on the bottom of the snowman as shown.


Last, I hope you enjoyed my preschool educational activity.  You may also like:  Snowman Preschool Math Game – Mother 2 Mother Blog


13 Fun and Frugal Christmas Gift Wrap Ideas

Tired of the same boring gift wrap in stores?  Today, I’m sharing fun and frugal gift wrap ideas.  We have the solution, you just have to choose what you love. We’re sure you can find a few Christmas gift wrap ideas from our suggestions below. Included are a Santa theme, snowman, dried fruits, race car and more. So, grab a cup of coffee or a glass of wine or eggnog and check them out!


Christmas Gift Wrapping Ideas


Check out our Christmas Gift Wrap Ideas:


Christmas Gift Wrap Ideas


These adorable Santa inspired gift bags and gift boxes say that and more.  Unfortunately, there were no instruction on how to create these.  But, don’t be intimidated.  Get creative!  Plain red wrapping paper and gift bags, faux fur, buttons  and labels.  Hit the craft stores like Michaels and Hobby Lobby.  You can find the accessories there.


How fun is this frosty the snowman siting by the tree waiting to be opened.   It’s simple, use white craft paper, black and orange construction paper for the buttons and nose. Find a scarf in your closet or the kid’s and you’ll be admiring this guy in no time.


Christmas gift wrap idea

A Christmas gift wrapped in Christmas lights.   What sets this gift wrap apart from the others is the lights made by little ones finger prints.  Also, check out my Kindergarten/First Grade Christmas Lights Crafts.  You’ll need brown Craft Paper, a black marker and washable craft paint.  Make it a family project.


I love this idea.  Instead of using gift tags, use one of your favorite photos of the gift recipients.  Brown Craft Paper, twine/string and a great photo is all that is needed.


Word Search gift wrap.  I love word search puzzles.  I even have my grandson hooked on them.  This idea is perfect for small gift boxes.  You create the word search puzzle and than print it on 12 by 12 paper.  Find the words that you want to highlight and than wrap your gift.  Merry Christmas baby!


Brown Craft Paper seems to be the way to go with gift wrap.  It’s inexpensive and can go a long way when wrapping gifts.  Personalize it with stenciled names on the gifts and a ribbon.  You can find stencils here.  Unfortunately, I was unable to find the original post on this idea.  The idea was picked up on Pinterest.


Christmas gift wrap ideas


I love to stencil.  So, I thought stenciling a Christmas design on brown Craft Paper would be fun.  It adds a perfection touch to brown background.  Many craft stores have Christmas stencils, brushes/sponges and paint.  Get creative.  You can do the ornaments as shown, reindeer, or whatever suits you.  Check these Christmas stencils too. However, I would stay with the white paint.  It looks amazing on the craft paper.  You can find the paint and stencil brushes at Michaels or other craft stores.


A Newspaper Christmas on gift wrapped in brown Craft Paper or any plain colored wrapping paper will work.  Simple, but makes a statement.  If you’re not the greatest artist, purchase stars from your local craft store.  Another idea, print The Night Before Christmas poem and make the tree from it.


Christmas gift wrap ideas


I love recycling old things.  Wrapping a gift in newspaper is something that I would do.  Somewhere doing my browsing a blogger suggested that if you have a sports fan use the sports section.  There’s the comics, style, real estate and the ideas go on.  Finish it with a nice bow.


Christmas Gift Wrap Ideas


Also, Polka dot gift wrap is what’s happening here.  Brown Craft Paper, white ink pad and pencil with a clean eraser.  Finish the gift with a bow.  You can also do a Let it Snow theme.  Don’t cover the gift entire with the dots.  I would place them a various degrees to make it look their the dots are falling.


Christmas Gift Wrap Ideas


Next, I thought this gift wrap was a perfect idea for the race car lover.  My grandson loves Hot Wheels and still does.  He’s 10. Wrap the gift with brown gift wrap, use black construction paper for the track and a white paint pen for the road markings.  The Dollar Tree, Dollar General and/or Big Lots has a nice selection of Hot Wheels that won’t break the bank.  So, get creative!


Furthermore, using dried fruits on gift wrapped boxes is a great idea.  This blogger used dried oranges, but apple slices would work too.  Check out my post on drying orange slices here.  You can add cinnamon sticks and/or miniature pinecones.  Most importantly, a glue gun should be your friend for this project.  You will want your fruit and other accessories to stay on the gift.


Christmas Gift Wrap Ideas


Last, this is one of my favorite gift wraps.  Wrapping gifts in sheet music.  Get creative, this blogger used a full sheet of music to wrap gifts as well as strips of the music sheet.  Furthermore, google free sheet music or check your local music store for a deal. Finish it with a bow, string or greenery from your local Dollar Store.

So, we hope that you found a few Christmas gift wrap ideas that have inspired you.  You may also like 15 Festive Christmas Cookie Ideas.

Kindergarten Christmas Craft: Christmas Lights

Today, I’m sharing parenting tips on Kindergarten Christmas Craft ideas.  This finger print Christmas lights artwork is sure to be a hit.  The project is easy, fun and messy, which your child will love, with a bright and colorful end.  It’s the perfect way to capture memories of those precious little fingers. Tis the season and Fa La La La!  So, lets get those little ones in the holiday spirit.


kindergarten Christmas craft


Kindergarten Christmas Crafts


Here’s what you will need:

  • Washable paints of various colors  (I purchased mine from Michaels).
  • black marker to make the dots on the lights and wire
  • wet paper towels or a towel for cleaning messy fingers
  • White cardstock


Be sure to have plenty of wet paper towels or an old wet cloth on hand.  You will want to wipe the child’s fingers before dipping them in the next shade of paint.  Lets get this project started:

  1. – Dust off those adorable little fingers.
  2. – Next, have the children dip their index finger(s) into the paint.
  3. – Press their index finger onto the white paper.
  4. – Repeat Step 3 until you have a string of lights  as shown.
  5. – Be sure to allow the paint to dry thoroughly before you proceed.
  6. – Make dots on each of the lights with the black marker.  (Place several places of paper under your sheet before you use the black marker to avoid bleeding on your table or work area.)  Unfortunately, I learned this lesson the hard way.
  7. – Use a pencil and lightly draw a curved line to connect the dots.  Also, write the child’s name on the paper.  Allow them to trace it with a crayon.
  8. – If you have older children allow them to trace the curved lines with the black marker.  Otherwise, you can complete the project or help the smaller children with this step.

We hope you enjoy this colorful kindergarten Christmas craft.   You may also like our Kindergarten Christmas Tree Card.


Kid’s Christmas Craft: Christmas Tree

Today, I’m sharing parenting tips on a kid’s Christmas crafts.  It’s easy and would be perfect for little hands.  It makes a beautiful Christmas card for parents or grandparents.  Furthermore, it is also a great project for first or second grade students. 


Kid’s Christmas craft:


kindergarten Christmas crafts


  • Cardstock or construction paper  (I purchased a pack of construction paper from Dollar Tree)
  • green washable paint  (I purchased the paint from Michaels)
  • brown washable paint
  • glitter (optional)
  • gold or silver star


Kindergarten Christmas crafts


Step 1 – Fold your stock card in half.  Use any color that will make your days jolly and bright.  Just make sure that you Christmas tree will show well on whatever color you choose.

Step 2 – Next place a few dots of brown paint on a paper plate.  Add green paint to your plate as well.  Instead of making a circle, you will need to form a straight line on the plate.  You will be dipping the toothbrush in the green paint, so you will need the line long enough so you can cover the toothbrush bristles.

Step 3 – For your information, I found it easier to draw the tree truck on the cardstock in pencil.  It’s easier for the kids to try to paint inside established lines rather than trying to paint the tree truck freehand.  You can sharpen the outline of the tree truck with a small brush once the kids finish painting it.

Step 4 – Allow the tree trunk to dry completely before you proceed.  It should take approximately 10  – 15 minutes.

Step 5 – Once the trunk has dried, dip the toothbrush into the green paint.  Help the children move the toothbrush up the paper to make strokes for the tree branches.  Dip the brush back into the green paint and move the toothbrush down the opposite side of the card to make a branch.


Step 6 – Repeat Step 5 until the tree is complete.  Allow the paint to dry completely.

Step 7 – Once the tree is dry, add a star to the top.  (This step is optional).

Step 8 – Add glitter to the branches (This step is also optional).


We hope our kid’s Christmas craft will be a fun family activity.  Last older children can write a message inside the Christmas card wishing mommy and daddy or their grandparents a Merry Christmas.  Let the smaller children write a message or their name as well.  Most importantly, they will be sure to put a smile on the recipient’s face.


Snowman Preschool Math Game

Today, I’m sharing parenting tips on creating our preschool math game.  This week we have a snowman preschool math game that will help your preschooler and or kindergartener count from 1 – 20.  The game helps the student learn by counting the buttons on the snowmen and learn number recognition by placing the correct hat on the snowman’s head.


preschool math activity sheet


How to Create the Snowmen:

First, you will need the following items to make these adorable snowmen:

  • black and white construction paper or cardstock
  • black marker or pen
  • scissors
  • pencil for tracing
  • orange marker

First, I found it easier to make a sample snowman and top hat to trace and cut around.  I used construction paper from the dollar store to make the snowmen or printer paper will work too.  Next, I folded a sheet of construction paper in half and than folded it again. I placed the sample snowman on top of the folded sheet and cut around it.  I was able to create 4 snowmen at once using this method.  Since you will need 20 snowmen, this method cuts down on time.

Additionally, it was easier to use the cardstock for the top hat and cut out each one individually.  You will need a circle for each hat so you can write the number on it.  I suggest cutting out the small circles for the hat individually.  Afterwards, glue the circle on the hat and than allow it to dry before writing the number on the hat.

While the glue is drying, make the faces and draw the buttons on the body of the snowmen from 1 -10 or 1 – 20, depending on how many you wish to make.  My 9 year old grandson helped draw the faces and make the buttons on each snowman. Once the bodies are made, write the numbers on the hats.

preschool games, numbers games for preschoolers, winter activites, winter games


Image-Snowman-Counting-Game-6-10


Last, teaching your child to count using this snowman preschool math game is not only educational, it will be fun.  Making education fun should be the goal. The goal is to count the buttons and than match the hat to the coordinating snowman.  If you have an older child like my 9 year old, let them count with your preschooler or kindergarten.  Finally, it’s a great way to teach them to count without getting bored.  So, stayed turned to our next snowman game.  You may also like Kid’s Winter Crafts for Kids.


How To Make a Grapevine Wreath Snowman

winter crafts, snowman crafts, grapevine wreaths


I love crafts, and when you’re buried under 3 feet of snow they sure keep you from going insane.  This grapevine wreath snowman was put together in about 30 minutes during our latest blizzard.  I know the storm was heading our way, so I headed to one of my favorite places for bargains, The Goodwill.  I purchased the 2 grapevine wreaths, mittens, matching hat and scarf for $5.59.  Afterwards, I headed to Michaels and nabbed the letter for $1.50 from the Bargain Ben.  It was the perfect size and blended well with the accessories. Score!

You will need:

  • 2 or 3 grapevine wreaths small to large (Check thrifts for bargains.  Michaels is a good resource too. Print your 40% off coupon.)
  • accessories (Dollar General or Family Dollar are good inexpensive resources too.)
  • Letter (Optional)
  • craft wire

Here’s the steps for making the snowman:

The grapevine wreaths that I used are the same size.  For $2.00, I decided that I would make it work. I laid the wreath on newspaper before working. Grapevine wreaths are known to drop leaves and small pieces. I connected the 2 wreaths with the craft wire.  I wrapped the wire around the two wreaths tightly to ensure they fit together nicely.  Before taking any additional steps, I also added wire to the top so I could hang it.  This is important.

I opted not to hot glue the mittens and hat to the wreath because the set is in excellent shape.   So, I’ll donate them back to the Goodwill undamaged.  Instead of using hot glue, I placed a piece of the thin craft wire carefully through the tops of each of the mittens.  Next, I wrapped the ends of the wire that I threaded through the mittens around the wreath one at a time.  Allow the top mitten to cover the wire from the second mitten.

Fortunately, the letter had a ribbon at the top.  As a result, I cut it and tied it to the wreath so it would hide the craft wire on the top mitten.  Next I tied the scarf around the section where the two wreaths meet. This scarf is silk, I plan to wear it in the summer and fall.  You can use a wool scarf as well.

Adding the hat was tricky.  I opened the hat and placed it over the wreath as best I could.  Once I had the hat in place, I sprayed it with spray starch to help stiffen it so it would keep its shape.  I allowed it to dry and sprayed it again and again.  Once the hat was dry and stiff, I hung the wreath and added the twig arms.

Finally, you can make a cardboard top hat if this type proofs to be difficult and glue it to the wreath.  Paint the cardboard hat either black or red and allow it to dry before placing it on the snowman. I love it, how about you.

17 Winter Snowman Craft Ideas For Kids

winter crafts for kids, snowman crafts, kids snowman crafts

Image-Kids-Winter-Crafts-Roundup2


Soon snow will be falling and we all know what that means.  School closures for days and kids who will be stuck in the house.  But, don’t fret.  We did a round up that will help make those snow days less hectic.  Most importantly, these crafts don’t require electronics.

So, I love snowmen.  As a result, I gathered a variety of crafts that feature snow and/or snowmen.  Most use items that moms have around the house or they can purchase from the dollar store.  Here’s my snowman craft ideas for kids roundup:

  1.  Footprint Snowman from My Life of Travel and Adventures
  2. Craft Sticks Snowman from Cindy Derosier
  3. Q-Tip Snowman from Mess For Less
  4. Craft Sticks Hot Chocolate from Glued To My Crafts
  5. Mason Jar Snowman from I Dig Pinterest
  6. S is for Snowman from Crafty Morning
  7. Paper Plate Polar Bears from Artsy Momma
  8. Paper Bag Snowmen from I Heart Crafty Things
  9. Memory Mittens from The Classroom Creative
  10. Q-Tip Snowflakes from Babble
  11. Let It Snow Snowglobe from Teacher Pop
  12. Photo Snowflake from Crafting Chicks
  13. Plastic Bag Snowman from Crafts n Coffee
  14. Paper Plate Frosty from Crafty Morning
  15. Snow Covered Tree from The Imagination Box
  16. Mason Jar Candle from Family Focus Blog
  17. Hand Snowflake from The Pinterested Parent


Last, I hope that you have been inspired by one or two of our snowman craft ideas.  After the kids are exhausted from sled riding and building snowmen, pull out our snowman craft ideas.  Our activities will keep them busy for hours.  Be sure to stock up on supplies before the winter storm hits.  Which of our winter crafts is your favorite?

Finally, you may also like:  30+ Rich and Delicious Hot Chocolate Recipes.  This roundup is filled with fun and creative hot chocolate recipes that any kid will love.


Painted Pine Cones Crafts

painted pine cones


First, I love using pinecones for crafts and decorating.  I think they make the room festive during the holidays.  Most importantly, they bring a touch of nature into your décor.  I’m laughing as I’m writing this post, I’m remembering my grandson seeing the pine cone one day.  He opened the back door and threw them out.  In his mind, pine cones belonged outside.  I think he may have been 3 or 4 at the time.

However, if you have pine trees on your property, gather a few to add your Christmas décor or to use them in other  crafts. I love free, and I love recycling items.

So, I decided to paint a few of the pine cones to use as a center piece during the holidays.  I needed to give my table a pop of color,  and I thought they would be fun.  And, I really love how the painted pine cones turned out.  I displayed them on an antique milk glass cake plate.  But, the possibilities are endless.  So, find some inspiration and get creative.  For example, you can fill a basket or glass container with the painted pine cones.  Paint them in your favorite colors, and display them on the mantel for a fall or winter display.  Or paint them in spring colors for Easter.

You will need the following items:

  • craft paint brushes
  • craft paints in your favorite colors
  • paper plate
  • newspaper to paint on
  • container for display

Next, I found it easier to just pour a dab of paint onto a paper plate.  I painted the edges of the pine cone with a small paint brush.  Use your favorite colors or you can paint the entire pine cone.  Afterwards, allow the painted pine cones to dry. Drying time is quick for this project.  Around 30 minutes should definitely be sufficient.  Once dry, display in your favorite place.

Last, this is a fun project to do with the kids.  You can expose them to nature by gathering the pine cones on a nature trip.  Afterwards you can paint them as a family project.