Kid’s Christmas Craft: Christmas Tree

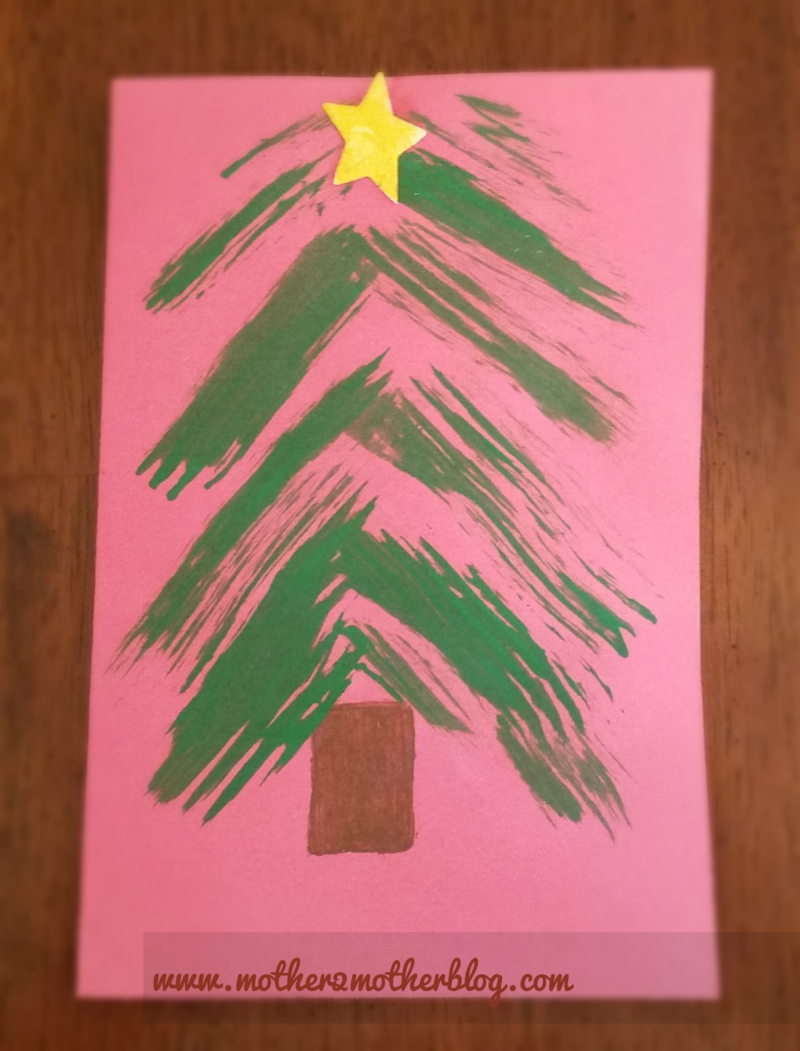
Today, I’m sharing parenting tips on a kid’s Christmas crafts.  It’s easy and would be perfect for little hands.  It makes a beautiful Christmas card for parents or grandparents.  Furthermore, it is also a great project for first or second grade students. 


Kid’s Christmas craft:


kindergarten Christmas crafts


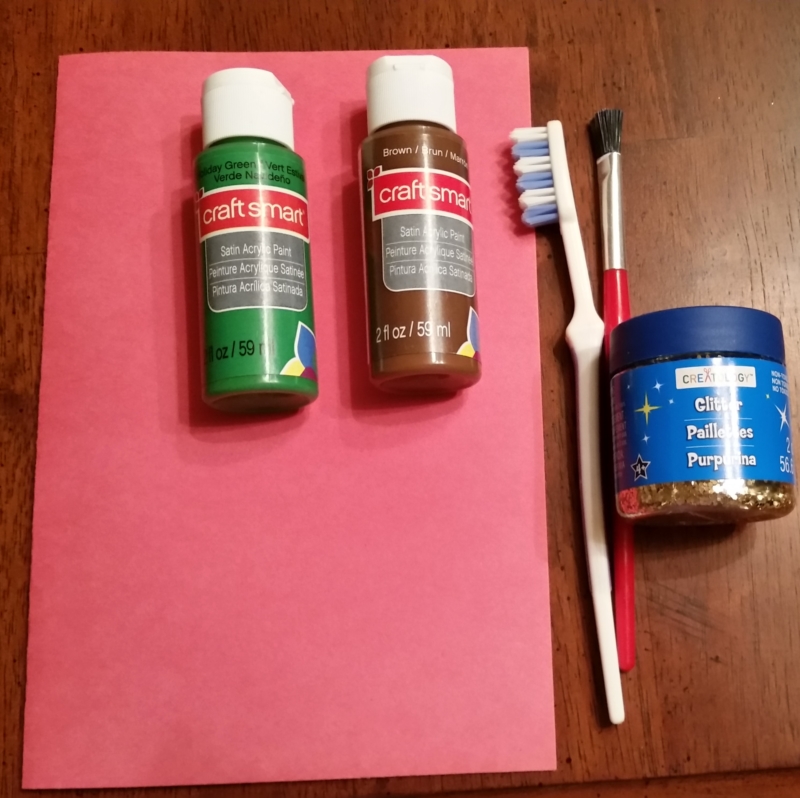
  • Cardstock or construction paper  (I purchased a pack of construction paper from Dollar Tree)
  • green washable paint  (I purchased the paint from Michaels)
  • brown washable paint
  • glitter (optional)
  • gold or silver star


Kindergarten Christmas crafts


Step 1 – Fold your stock card in half.  Use any color that will make your days jolly and bright.  Just make sure that you Christmas tree will show well on whatever color you choose.

Step 2 – Next place a few dots of brown paint on a paper plate.  Add green paint to your plate as well.  Instead of making a circle, you will need to form a straight line on the plate.  You will be dipping the toothbrush in the green paint, so you will need the line long enough so you can cover the toothbrush bristles.

Step 3 – For your information, I found it easier to draw the tree truck on the cardstock in pencil.  It’s easier for the kids to try to paint inside established lines rather than trying to paint the tree truck freehand.  You can sharpen the outline of the tree truck with a small brush once the kids finish painting it.

Step 4 – Allow the tree trunk to dry completely before you proceed.  It should take approximately 10  – 15 minutes.

Step 5 – Once the trunk has dried, dip the toothbrush into the green paint.  Help the children move the toothbrush up the paper to make strokes for the tree branches.  Dip the brush back into the green paint and move the toothbrush down the opposite side of the card to make a branch.


Step 6 – Repeat Step 5 until the tree is complete.  Allow the paint to dry completely.

Step 7 – Once the tree is dry, add a star to the top.  (This step is optional).

Step 8 – Add glitter to the branches (This step is also optional).


We hope our kid’s Christmas craft will be a fun family activity.  Last older children can write a message inside the Christmas card wishing mommy and daddy or their grandparents a Merry Christmas.  Let the smaller children write a message or their name as well.  Most importantly, they will be sure to put a smile on the recipient’s face.


Fun Halloween Crafts and Gifts for Children

halloween crafts, halloween


Now we are into the month of September; things are starting to look much more like fall. The kids are back at school, and the weather is starting to get a little cooler. The full season of fall will be here before we know it! There are so many fun things that you can do as a family during the season. It is a lovely time, where you can get snuggled with hot cocoa or bake lots of pumpkin spice treats. Of course, the exciting and fun time of Halloween will soon be upon us too. I don’t think that it is ever too early to start planning for Halloween. There are plenty of crafts that you can do with the kids, as well as give Halloween gifts. So if you are looking for some inspiration, you have come to the right spot.

halloween crafts, halloween gifts

image

Halloween Gift Ideas for Your Kids

Let’s face it; they will get plenty of candy when they visit neighbors or go trick or treating. So it might be nice to give them some things that aren’t candy related. I’m sure their dentist will be thankful! You could get some craft things for them together and create some cute labels. You could get some play dough and remove the normal label. There are lots of printables online, or you could always make your own. It could be a label to say something like ‘Boo Dough’ or ‘Witches Putty.’ If you choose the Halloween style colors, then it would make it even better. So look for orange, black or green dough.

You could even create some slime or putty of your own for them. The options are quite endless with this. It could be orange and pumpkin spice scented slime, or green witch or monster slime. There are lots of different recipes that you can find online. They are all quite straightforward to make and don’t need any crazy ingredients. Just pop it in a mason jar and print out a cute little label. It is a perfect gift for any elementary schoolers that you have. Who wouldn’t like some Halloween slime?!


halloween party ideas, halloween drinks

image

If you are a little short on time, then it might be easier to just get them a fall or Halloween themed gift from the store. How about a Halloween jigsaw puzzle from Stave, or a pumpkin scented candle or an actual pumpkin itself? Then they can spend time carving it or drawing funny faces on it. Instead of carving, you can also get some stickers or pins for pumpkins. Then they just stick things into and on the pumpkin. A bit safer for little ones, rather than having to get knives out to carve. Glow sticks are also a fun idea to put inside Jack o’lanterns, instead of candles. Much safer for our little ones.

Halloween Crafts for Your Kids

One fun little thing, which is still edible, though, could be making some sugar cookies. Get some leaf or Halloween shaped cookie cutters and then your kids can decorate them as they would like. It could be something that you give to friends or neighbors if you’d rather have someone else eat them!

I don’t know many children that don’t enjoy getting messy with paint. If you have got some green paint, then you can make some Frankenstein cards or decorations. Use the paint on feet and then print the feet onto cardstock. It is fun for everyone to get involved in. Then using some black finger paints, they can draw on some eyes, mouth, nose and of course, Frankenstein’s neck bolts. Then just cut them out to make some ‘bunting’ to display around the house.

Other crafts could be making some pasta skeletons. Glue dried pasta onto black paper or cardstock. They can make the skeleton bones with pasta, so get the penne style pasta or they could just use spaghetti. Quite a cheap but very fun activity. If your children are a little bit older, then making some pumpkin or ghost pompom could be a neat idea. You just get some cardboard in a circle, with a hole in the middle, to use as a frame. Then using the right color of wool, you can loop the wool through it. Keeping looping and pulling it tight. Then carefully cut around the middle of the loop, tie it up and you’ve got a pompom! Just stick on some eyes and it would make the perfect decoration this fall.

Have you got any favorite things to do with your little ones during fall?

Dollar Store Easter Mantel

Easter decorating ideas, budget decorating


I finally got my mantel decorated for Easter.  I decorated it with Dollar Store items. It’s nothing spectacular, but it feels like spring and the kids love the eggs and bunny.  To them that means Easter Bunny will be hoping down the bunny trail soon. Colored eggs, marshmallow peeps, baby chicks, chocolate bunnies, egg hunts and a family feast are forthcoming.  Excitement is in the air.


Easter budget decorating, spring decoratiing ideas Dollar Store decorating ideas


I made the wreath from Dollar Store Items last year.  You can check out My Frugal Easter Wreath here.  Additionally, I purchased the small buckets and plastic eggs from the Dollar Store.  The Spring sign is from Target’s bargain bins.  I actually purchased the buckets to house my herb plants this summer, however, I didn’t see the point of them just sitting around until summer.  I loved the color, and they matched the Spring sign from Target.

Also, I had planned to paint the sign white, but decided to leave everything as it was and use the painted white branches in the orange buckets to offset some of the bright colors. The branches had been used in my winter mantel scene previously.


frugal decorating, Easter decorating, Easter wreath ideas


Now to put everything together. I thought I would keep the Easter egg theme going in the wreath.  So, I decided to use the branches for egg trees.  Furthermore,  I also reuse the decorative grass from year to year.  When Easter is over, I just scoop it up and put it in a grocery bag to store.  I placed a layer over the mantel. Than I placed the Dollar Store gravel that I had used for another project in the pails and arranged the branches.  They were perfect for making the egg trees.


Easter egg trees, egg trees


I used ribbon to hang the eggs on the branches/twigs. I have yards of ribbon stored away to hang the eggs. You can use twine, yard or whatever you have on hand. I cut pieces about 6 inches long and hot glued them onto the eggs. Make sure you’re happy with the length, you will bending it in half to glue onto the egg. Glue one end to the egg and than glue the other end to the piece on the egg. Note: I tried using craft glue, it didn’t work very well.  I love my hot glue gun. The scattered flowers fall off a wreath.  Rather than gun them back on, I saved them with good intentions. Glad I did, because they make a great accent to the spring mantel.


Easter Bunny, Easter decorating ideas


I picked up this adorable bunny at Michael’s for 50% off.  Bargains at 70% off are usually what I wait for, but they only had one so I grabbed it.  Isn’t it adorable?  I plan to fill the bucket, a Goodwill find for $1.25, with bunny treats. Stay tuned for that post.  What are some of your favorite Easter decorating items?


Snowman Preschool Math Game

Today, I’m sharing parenting tips on creating our preschool math game.  This week we have a snowman preschool math game that will help your preschooler and or kindergartener count from 1 – 20.  The game helps the student learn by counting the buttons on the snowmen and learn number recognition by placing the correct hat on the snowman’s head.


preschool math activity sheet


How to Create the Snowmen:

First, you will need the following items to make these adorable snowmen:

  • black and white construction paper or cardstock
  • black marker or pen
  • scissors
  • pencil for tracing
  • orange marker

First, I found it easier to make a sample snowman and top hat to trace and cut around.  I used construction paper from the dollar store to make the snowmen or printer paper will work too.  Next, I folded a sheet of construction paper in half and than folded it again. I placed the sample snowman on top of the folded sheet and cut around it.  I was able to create 4 snowmen at once using this method.  Since you will need 20 snowmen, this method cuts down on time.

Additionally, it was easier to use the cardstock for the top hat and cut out each one individually.  You will need a circle for each hat so you can write the number on it.  I suggest cutting out the small circles for the hat individually.  Afterwards, glue the circle on the hat and than allow it to dry before writing the number on the hat.

While the glue is drying, make the faces and draw the buttons on the body of the snowmen from 1 -10 or 1 – 20, depending on how many you wish to make.  My 9 year old grandson helped draw the faces and make the buttons on each snowman. Once the bodies are made, write the numbers on the hats.

preschool games, numbers games for preschoolers, winter activites, winter games


Image-Snowman-Counting-Game-6-10


Last, teaching your child to count using this snowman preschool math game is not only educational, it will be fun.  Making education fun should be the goal. The goal is to count the buttons and than match the hat to the coordinating snowman.  If you have an older child like my 9 year old, let them count with your preschooler or kindergarten.  Finally, it’s a great way to teach them to count without getting bored.  So, stayed turned to our next snowman game.  You may also like Kid’s Winter Crafts for Kids.


How To Make a Grapevine Wreath Snowman

winter crafts, snowman crafts, grapevine wreaths


I love crafts, and when you’re buried under 3 feet of snow they sure keep you from going insane.  This grapevine wreath snowman was put together in about 30 minutes during our latest blizzard.  I know the storm was heading our way, so I headed to one of my favorite places for bargains, The Goodwill.  I purchased the 2 grapevine wreaths, mittens, matching hat and scarf for $5.59.  Afterwards, I headed to Michaels and nabbed the letter for $1.50 from the Bargain Ben.  It was the perfect size and blended well with the accessories. Score!

You will need:

  • 2 or 3 grapevine wreaths small to large (Check thrifts for bargains.  Michaels is a good resource too. Print your 40% off coupon.)
  • accessories (Dollar General or Family Dollar are good inexpensive resources too.)
  • Letter (Optional)
  • craft wire

Here’s the steps for making the snowman:

The grapevine wreaths that I used are the same size.  For $2.00, I decided that I would make it work. I laid the wreath on newspaper before working. Grapevine wreaths are known to drop leaves and small pieces. I connected the 2 wreaths with the craft wire.  I wrapped the wire around the two wreaths tightly to ensure they fit together nicely.  Before taking any additional steps, I also added wire to the top so I could hang it.  This is important.

I opted not to hot glue the mittens and hat to the wreath because the set is in excellent shape.   So, I’ll donate them back to the Goodwill undamaged.  Instead of using hot glue, I placed a piece of the thin craft wire carefully through the tops of each of the mittens.  Next, I wrapped the ends of the wire that I threaded through the mittens around the wreath one at a time.  Allow the top mitten to cover the wire from the second mitten.

Fortunately, the letter had a ribbon at the top.  As a result, I cut it and tied it to the wreath so it would hide the craft wire on the top mitten.  Next I tied the scarf around the section where the two wreaths meet. This scarf is silk, I plan to wear it in the summer and fall.  You can use a wool scarf as well.

Adding the hat was tricky.  I opened the hat and placed it over the wreath as best I could.  Once I had the hat in place, I sprayed it with spray starch to help stiffen it so it would keep its shape.  I allowed it to dry and sprayed it again and again.  Once the hat was dry and stiff, I hung the wreath and added the twig arms.

Finally, you can make a cardboard top hat if this type proofs to be difficult and glue it to the wreath.  Paint the cardboard hat either black or red and allow it to dry before placing it on the snowman. I love it, how about you.

17 Winter Snowman Craft Ideas For Kids

winter crafts for kids, snowman crafts, kids snowman crafts

Image-Kids-Winter-Crafts-Roundup2


Soon snow will be falling and we all know what that means.  School closures for days and kids who will be stuck in the house.  But, don’t fret.  We did a round up that will help make those snow days less hectic.  Most importantly, these crafts don’t require electronics.

So, I love snowmen.  As a result, I gathered a variety of crafts that feature snow and/or snowmen.  Most use items that moms have around the house or they can purchase from the dollar store.  Here’s my snowman craft ideas for kids roundup:

  1.  Footprint Snowman from My Life of Travel and Adventures
  2. Craft Sticks Snowman from Cindy Derosier
  3. Q-Tip Snowman from Mess For Less
  4. Craft Sticks Hot Chocolate from Glued To My Crafts
  5. Mason Jar Snowman from I Dig Pinterest
  6. S is for Snowman from Crafty Morning
  7. Paper Plate Polar Bears from Artsy Momma
  8. Paper Bag Snowmen from I Heart Crafty Things
  9. Memory Mittens from The Classroom Creative
  10. Q-Tip Snowflakes from Babble
  11. Let It Snow Snowglobe from Teacher Pop
  12. Photo Snowflake from Crafting Chicks
  13. Plastic Bag Snowman from Crafts n Coffee
  14. Paper Plate Frosty from Crafty Morning
  15. Snow Covered Tree from The Imagination Box
  16. Mason Jar Candle from Family Focus Blog
  17. Hand Snowflake from The Pinterested Parent


Last, I hope that you have been inspired by one or two of our snowman craft ideas.  After the kids are exhausted from sled riding and building snowmen, pull out our snowman craft ideas.  Our activities will keep them busy for hours.  Be sure to stock up on supplies before the winter storm hits.  Which of our winter crafts is your favorite?

Finally, you may also like:  30+ Rich and Delicious Hot Chocolate Recipes.  This roundup is filled with fun and creative hot chocolate recipes that any kid will love.


My Winter Mantel


winter mantel ideas, winter ideas, snow mantel ideas
The Christmas Tree is down and all the decorations have been boxed and stored.  That doesn’t mean that I can’t keep a winter theme going.  I love snowmen and snowflakes so I pulled out some of my winter items and went to work on my Let It Snow theme.  I used a bag of cotton/fluff that I purchased from the Dollar Store on clearance last year and created a snowy effect on the mantel. I wanted to add some height to the display so I headed outside and picked a few twigs from my Dogwood tree and painted them white.  I love to display branches in their natural state as well, but I wanted
a snowy feel for the mantel so they received a coat of white craft paint.  I purchased the  vintage pie crust table years ago. It’s housing painted pine cones on an antique milk glass cake stand.  I found the Let it Snow chalkboard sign in the clearance isle at Big Lots for $4.00.


winter decorating, painted branches, snowy branches


I placed the painted twigs in two glass vases that I purchased from Michaels. I love that store.  I had white gravel that I purchased from the Dollar Tree so I used it to hold the painted branches in place. I added a painted pine cones to each vase for affect.  I’m a collector of snowmen. I purchased the two wooden snowmen years ago at a craft fair. I love those little guys. The reindeer was purchased from the clearance isle at Walgreens. I snatched him up. They had a clear glass reindeer that I passed up, now I’m sorry  I didn’t get it too.


snowmen, winter decorating,

I’m also a collector of quilts. I purchased this antique quilt and pillow at an auction on a Mennonite farm.  I spotted it and my heart skipped a beat. There was history behind, but without the owners I would never know what it was.  I do know that it was made with love and care. It was made in the crazy quilt pattern and has a matching pillow. The pillow is dated 1897, so I’m assuming the quilt was made during the same time period. It is unbelievable how heavy this quilt is and the stitching is impeccable.  I love pulling the quilt out during the winter and sitting by the fire reading a good book.  It is not only heavy, but the backing is made from fleece making it warm and cozy.


antique quilts, quilts Mennonites, crazy quilt


I purchased the oil lamp, dough bowl and miniature chair at various antique auctions years ago.  The lamp has the original wick, it was never used. I love the shape of this dough bowl. I actually have 3, the other 2 are round.


Image-winter-mantel5

I hope my winter mantel has inspired you.  Do you decorate your mantel or accessorize rooms according to the holiday or seasons?  Leave me a comment, I’ll stop by and gather a few ideas.

How To Dry Orange Slices

dried oranges, dried fruit, Christmas displays
I love for my house to smell good all year.  During the holiday season, I love drying oranges and apples.  I love burning candles and making displays in my home with natural materials.  They usually include orange or apple slices and cinnamon sticks.  Today I’ll show you how to dry orange slices.   It’s easy and they look and smell great in display.

You will need the following:

  • oranges (use large or medium oranges, the slices will shrink)
  • cinnamon sticks

The first step is to preheat your oven to its lowest setting.  Mine is 170 degreesSlice your oranges medium to thick,  you don’t want them to be  too thin.  You also don’t want the slices to be too small.  The slices will shrink as they’re drying and will fall through the cracks of your racks.  If you have a large cookie cooling  rack you can layer your slices on the cooking rack.   Otherwise your oven rack will work just as well.   A cookie sheet will also do. 

drying orange slices, dried orange slices


Allow the slices to dry for 2-3 hours. 
I usually dry my slices on a Saturday when I don’t have to rush or run errands. I set the timer for 2 hours and determine if they’re dry enough or if I want them to dry longer.  If so, I set the timer for another 15 – 30 minutes.

Once I’m satisfied with the texture of the slices I add cinnamon and or cloves.  You can also add fresh greenery.  Spruce, Pine or Cyprus will work great.  You can also add cinnamon pine cones.  Be creative and enjoy this wonderful smell.  The slices will darken as time goes on.  Also the longer you leave them in the oven, the darker they will get.


dried fruits, Christmas greenery, dried orange slices

Painted Pine Cones Crafts

painted pine cones


First, I love using pinecones for crafts and decorating.  I think they make the room festive during the holidays.  Most importantly, they bring a touch of nature into your décor.  I’m laughing as I’m writing this post, I’m remembering my grandson seeing the pine cone one day.  He opened the back door and threw them out.  In his mind, pine cones belonged outside.  I think he may have been 3 or 4 at the time.

However, if you have pine trees on your property, gather a few to add your Christmas décor or to use them in other  crafts. I love free, and I love recycling items.

So, I decided to paint a few of the pine cones to use as a center piece during the holidays.  I needed to give my table a pop of color,  and I thought they would be fun.  And, I really love how the painted pine cones turned out.  I displayed them on an antique milk glass cake plate.  But, the possibilities are endless.  So, find some inspiration and get creative.  For example, you can fill a basket or glass container with the painted pine cones.  Paint them in your favorite colors, and display them on the mantel for a fall or winter display.  Or paint them in spring colors for Easter.

You will need the following items:

  • craft paint brushes
  • craft paints in your favorite colors
  • paper plate
  • newspaper to paint on
  • container for display

Next, I found it easier to just pour a dab of paint onto a paper plate.  I painted the edges of the pine cone with a small paint brush.  Use your favorite colors or you can paint the entire pine cone.  Afterwards, allow the painted pine cones to dry. Drying time is quick for this project.  Around 30 minutes should definitely be sufficient.  Once dry, display in your favorite place.

Last, this is a fun project to do with the kids.  You can expose them to nature by gathering the pine cones on a nature trip.  Afterwards you can paint them as a family project.


Fall Craft Ideas: Fall Leaf Frame


fall craft ideas


Are you searching for fall craft ideas?  I love making crafts with natural items, especially in the fall.  Making a leaf frame with a few of the pressed leaves that I had stored was at the top of my craft list.   Don’t you love how it turned it out. It was a perfect project to do while sipping a cup of coffee and listening to the morning news.

Spend an afternoon with the kids or grandkids searching for fall leaves.  Place them between 2 sheets of wax paper and leave them in a heavy book to dry.  Once they are dry, they’re ready for this project.

Here’ what you will need:

  • Pressed leaves in various colors and sizes
  • Frame with flat sides (I forgot to take  picture of the actual frame that I used. The one below is just to show you the type needed).
  • Mod Podge  (I have seen miniature bottles at Five and Below for a $1.50, which will be sufficient for this project).
  • A brush or sponge


modge podge projects, fall picture frames


Creating your frame is simple.  However, the hardest part is waiting for it to dry so you can add your favorite fall picture. If you don’t have pressed leaves available, set a day aside to go on a nature hunt.  Collecting leaves with your children or grandchildren is the perfect fall activity.

Once you gather the leaves and other materials here are your next steps:

  • Start at the bottom and place your leaves around the frame so you can get a feel of where you want them before you coat them.
  • Once you’re satisfied with the placement, coat the front and back of each leaf and place it where you want it on the frame.
  • When all of the leaves are in place, cover all of them with a good coat of Mod Podge.
  • Allow the frame to dry about an hour.
  • Add your favorite fall photo.


leaf frames, fall decorating, fall crafts


If you’re looking for fall craft ideas, we hope you will consider our fall leaf frame.  It was a fun activity, and I’m sure your littles one will enjoy creating a frame and placing their favorite picture in the frame too.  You may also like:  Fall Kindergarten Activity Pack.