Foraging for Purple Dead Nettle for Beginners

Today, I’m sharing gardening tips on foraging for Purple Dead Nettle for beginners. My yard is filled with it. It can found in the front yard, along my back property line as well as in my vegetable garden. I bet you can find some in yours too.

So, I became interested in medicinal herbs when I was enrolled in my master gardening course.  I had already incorporated kitchen garden herbs into my life.  But, learning about medicinal herbs and how to use them was a new experience. I was amazed at the wild/medicinal herbs that I had growing in my own backyard.


foraging purple dead nettle


First, many herbs that people forage are known as weeds to many.  They don’t realize that our ancestors used wild herbs for food, medicine, salves and more.  Sadly, I was new to wild herbs so I was hesitant about ingesting and using wild herbs when I first started foraging too.

Fortunately, Purple Dead Nettle is packed with Vitamin C, iron, antioxidants, and fiber. It’s an herb worth foraging. I love making infused oil with it. It’s great as a salve for dry skin or skin irrigations.


Foraging for Purple Dead Nettle:


Here’s a few uses for Purple Dead Nettle:

  • Salve
  • Astringent
  • Culinary (Salads)
  • Smoothies with bananas
  • Pollinators
  • Spring bouquets
  • Diuretics
  • Laxative
  • Tea
  • Pesto
  • Garnishes
  • Spring Bouquet


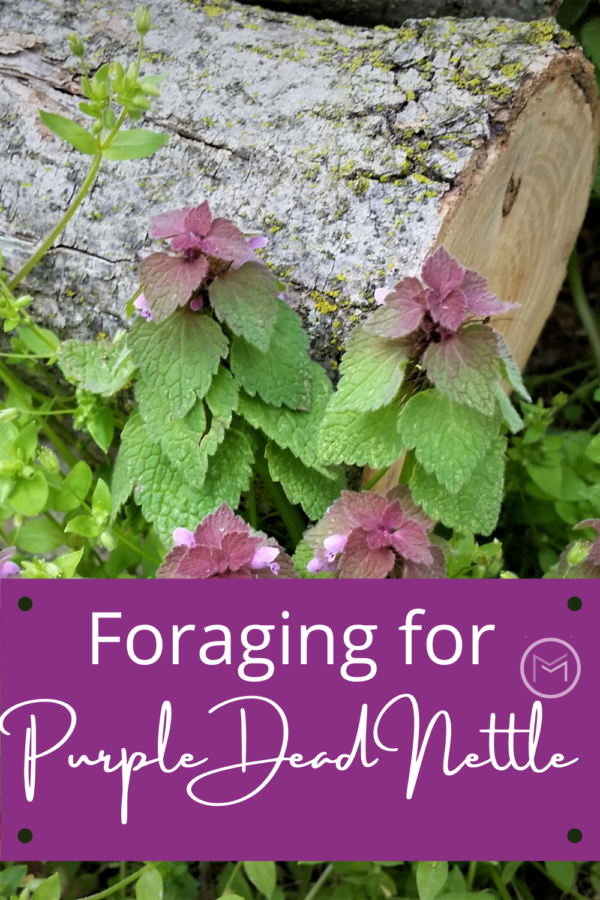
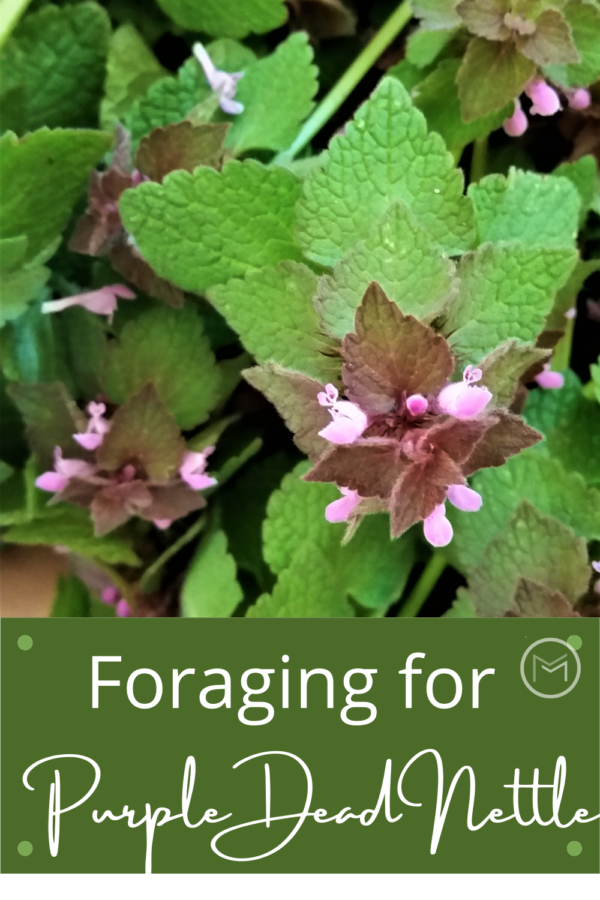
So, Purple Dead Nettle is a member of the mint family. You can tell that it’s a member by the square stem.  It originated in Europe and Asia.  Mint is consider an invasive plant.  However, Purple Dead Nettle grows outside so let it grow.  Also, it grows about  8 – 10 inches high and boasts delicate purple or pink flowers.  The darker the leaf on the plant the sweeter it’s taste. In addition to the purple and/or pink flowers, the stem on the Purple Dead Nettle is square giving it a unique appearance.  Also, the leaves are fuzzy rather than smooth.


foraging for purple dead nettle


Look for Purple Dead Nettle in the spring. In the summer, it has a tendency to falter.  As a result, stock up in the spring.  You can always dry and store it for use in tea and making infused oils.

First, here’s a few pictures on what you should look for when foraging Purple Dead Nettle.  Dead Nettle doesn’t sting, but the wild herb Nettle does sting. Study the pictures.  I guarantee, you have plenty growing on your property or can find some on one of your walks.  All of these pictures are from my yard.


foraging for purple dead nettle


Foraging for Purple Dead Nettle:

  • Take a pair of scissors or garden shears
  • Bring a basket or container
  • Take a few pictures
  • Know that they house ants
  • Ants carry the seeds to their colony
  • Use the shears or scissors to cut the plant
  • Shake your plants to dislodge ants.  They are there, trust and believe that.


Last, if you have decent weather I would suggest that you dry your newly harvested plants outside.  If you don’t have an herb drying tray, use an old towel.  Actually, if I’m drying the herb inside I prefer using an old towel. I pick up the harvested Purple Dead Nettle, and drop them numerous times on the towel.  The ants will scatter.  Do this several times a day for several days to dislodge all of the ants.  Take your towel outside and shake it vigorously to get rid of the ants.

If I’m drying the herbs outside, I take the same steps.  Remove the herbs, turn the tray over, and tap the bottom until the ants are removed.

Finally, have fun foraging this valuable herb.  Once you start foraging for one, you won’t want to stop.  You may also like The Benefits of Lavender and Lamiyum Purpureum (the scientific name for Purple Dead Nettle).

Homemade Fertilizer for Tomatoes and More

Today, I’m sharing gardening tips on using homemade fertilizer for tomatoes. Using these household items will help you grow bigger, juicy, disease free tomatoes this season.  First, I’ve been using these household items in my backyard vegetable garden for years.  I’ve had success with all of them.  So, I’m thrilled to be sharing these gardening tips with you.

Homemade fertilizers will give your plants the boost they need to grow and produce delicious fruit.  Most importantly, homemade fertilizers can be made organically.  You can add in products that will boost calcium, iron, potassium, sulfur, magnesium etc.  


homemade fertilizer for tomatoes


Homemade Fertilizer for Tomatoes:


Eggshells – I save eggshells throughout the year so I can use in my garden.  I wash them, dry them thoroughly and crush them to plant with my tomatoes.  Check out my post Using Eggshells in the GardenEggshells provide calcium for tomato plants.  Tomato plants need calcium need to produce large fruit.

Aspirin – Furthermore, you can use expired aspirins if you have them or purchase a cheap bottles from your local pharmacy to make a spray for your plants.  One bottle can go a long way.  Add 1 – 2 aspirins to a gallon of water.  Spray on your tomato plant throughout the growing season.


homemade tomato fertiizer


Coffee – Next, I brew coffee every morning, so I have plenty of coffee grounds to use in my garden. I simply put a scoop of coffee grounds in the hole with your plant and sprinkle a scoop of coffee grounds around each of your tomato plants.  Coffee grounds provide nitrogen to plants.  

Epsom Salt – You can also add 2 tablespoons of Epsom Salt to a gallon of water.  Spray your tomatoes plants with the Epsom Salt mixture once a month. Epsom Salt has Magnesium, which helps plants to absorb nitrogen and phosphorus.

Banana Peels – So, there’s lots of bananas in my kitchen.  I love them in my smoothies, and they’re great to take on the go.  So, rather than throw the peels in the trash, I recycle them.  I dry banana peels to use in the garden, a banana peel tea or use the peels directly in the planting hole.  Banana peels provide minerals to plants.  


Freeze Banana Peels


  • Begin my cutting your peels into strips.
  • Place them in a freezer bag and than freeze them.  Once you have 15 – 20 peels, it is time to  dry them.


Dry Your Banana Peels


  • Turn your oven on the lowest setting
  • Place your banana peels on a cookie sheet.  Be sure they are not touching.  You need the air to circulate.
  • Leave your oven door ajar.
  • Allow the peels to dry.  They are ready when they become brittle.
  • Use your chopper to cut up the peels.
  • Place them in an airtight container until they are ready to be used.


Finally, if growing bigger and healthier tomatoes is your goal; I hope you will make a mixture of homemade fertilizer for tomatoes.  Your tomatoes will love you for the added boost.  And, you will love your big, juicy, delicious tomatoes all summer.  Also, providing one of these fertilizers will help with preventing blossom end rot.  

You can also use the fertilizers:

  • Peppers
  • Carrots
  • Broccoli
  • Lettuce
  • Spinach
  • Celery
  • Asparagus   


You may also like homemade garden fertilizers.


Reasons To Garden In Your Backyard

Today, I’m sharing gardening tips on reasons to garden in your backyard. I started gardening years ago, and it quickly became a passion.  Planting a vegetable garden was something that I always wanted to do, but never made the time.  I love fresh vegetables, especially tomatoes.  The taste and price of tomatoes in my local grocery store sent me into high gear.  They were expensive, hard, and tasted like cardboard.  


reasons to garden


My grandfather had a garden when I was growing up. Picking weeds out of his garden was an expectation when I was visiting.  I also remember all of his children being supplied with fresh vegetables during the summer, and the week-ends spent canning the harvest.  Fortunately, I decided to grow my own vegetables, and I’m so glad I did.  I look forward to each growing season now.  


Reasons to Garden: 


  1. It’s so relaxing. And I’ve learned to appreciate the open country and the quiet that it brings. 
  2. My land wasn’t being using to its full potential.  
  3. Store brought fruits and vegetables are expensive.
  4. I love working with my hands, and making things grow. 
  5. Saving money on my grocery bill is a plus. 
  6. Provides an opportunity to connect with other gardeners.  Connecting with others who grow fresh vegetables and flowers provides an opportunity to learn different techniques and make new friendships.  
  7. My vegetables are better than the stores.  I love walking by the produce in the grocery store smiling because I know mine is better.   
  8. I’ve learned to grow my vegetables from seed.
  9. I love having fresh vegetables, homemade salsa and sauce during the winter.   
  10. I love sharing my harvest with family and friends and the local food banks.
  11. Great exercise without leaving home.  


reasons to garden


Yes, gardening is time consuming, but it’s so rewarding.  It’s a great way to get out of the house and get moving.  I sleep so much better after a day of working in my yard. Furthermore, involve your children.  They can get a sense of how food grows and will make better choices in food selection.  They will also learn how to sustain themselves, and save on the grocery bill.

You don’t need acres of land to garden.  If you lack land, put a few planters on your deck or patio.  You can grow tomatoes, lettuce, carrots, radishes and the list goes on in containers.  Do you currently garden?  If so, do you use containers, raised beds or row garden?  Also, check out my other backyard vegetable gardening tips before you leave.