Homeschooling Tips for Beginners

Today, I’m sharing parenting advice on homeschooling tips for beginners. Unfortunately, the Covid-19 has affected the world in a detrimental way.  Especially, our children’s education.  Having a formal classroom setting is beneficial to children from an intellectual stand point as well as socially and emotionally.  However, many parents have opted to homeschool their children rather than take a chance on sending them back to a formal school setting and getting sick.

So, we opted to homeschool my grandchildren during the last 3 months of the school year.  We made a few mistakes, but for the most part we were successful and they loved being taught at home.  I have a few tips on what we did to make the new endeavor successful.


homeschooling tips


Here are a few homeschooling tips for beginners:


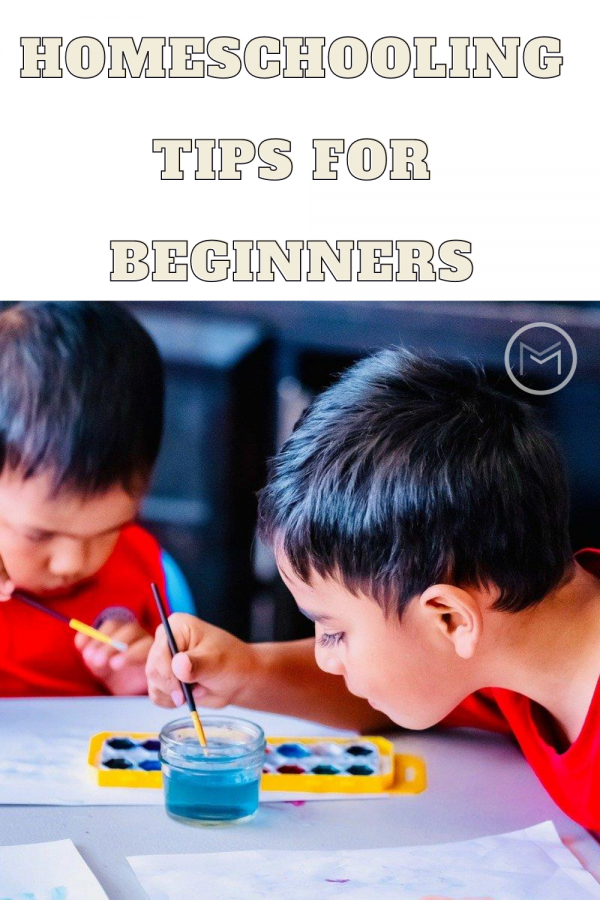
Keep Their Regular Schedule –  First, if your children attended public school previously, but you have decided to homeschool for the upcoming school year, keep their current schedule.  Get them up the same time you would normally get them up to attend school.  Have them eat breakfast, brush their teeth, wash their face and get dressed as if they are going to school.  Give them a time on which they need to be down stairs and ready to start their day.  We had them get their clothes out the night before and have their bath, teeth brushed and PJs on by 9:00 pm.

Prepare a Space for Them to Learn –  Just like we as adults need an office space to work in, kids need a comfortable environment where they can learn.  Look for classroom desks for cheap if you can.  I found several on yard sale sites.  Good Will and Salvation Army are a few other places to look too.  A coat of paint will give them new life.  If you are unable to locate classroom desks, purchase a card table.  Many come with chairs and they are great when the kids need to spread out. If that is not an option, clear the kitchen or dining room table.

Also, make sure you have good lighting and windows in the room if possible.  Turn off the electronics unless they will be used for research or on-line activities.  You want to create an environment where they can concentrate.  Pencil sharpers, highlighters, crayons, scissors, pens, notebooks, notebook paper etc. should be available.  Empty cans from dinner products make great houses for the pens, highlighters and pencils. Check out baskets or trays at your local Dollar Tree or Goodwill to hold paper and other craft products.

Purchase a chalkboard if possible.  You may be able to find one at of the on-line yard sale sites.  Brides who used them for their weddings are great sources.  These are great for working out math problems or writing the assignments where they can reference if needed.


Organize Lessons – Furthermore, get creative and think of ways that will engage your children.  Check out this post on putting together Strategic Homeschool Lessons.  Planning lessons and activities will make it easier to convey goals to your kids.  Furthermore, decide if you want to do printables, watch videos or do on-line activities for the assignments.  Print any printables out the night before.  Make sure videos work before class.

Choose Quality Lesson Plans – Check out sites that offer quality curriculums for the grades that you will be teaching.  The site should be geared toward complete homeschool curriculums.  You will want lessons in math, science, history, reading, spelling & more.  Also, look for sites that offer arts and crafts too.


homeschooling tips


Consult Other Homeschoolers – If you’re new and unsure of yourself, join a homeschooling group.  If you don’t want to join a group, consult another parent who homeschools and ask for tips.  Homeschooling is not new, there are parents who have been teaching their children at home for years.

Make Lunch Fun – Next, get as creative with lunch as you do with their lesson plans.  Review on-line menus from school and ask what their favorites meals were.  Make them.  Find ways to make sandwiches interesting if you have small children.  Have lunch outside on the patio or picnic table.  Check out these yummy carrot recipes for kids.

Include Outside Activities –  This can include walks, nature hunts,  jumping on the trampoline or just relaxing for a few minutes.  But, set a limit just like they have in school. If the weather is nice have them plant a garden, feed the birds or make a snowman if the weather is cold.  Why not make snow ice cream or find cold weather experiments to add to your science agenda.  The possibilities are endless.  A car ride can be a great activity too.

Create a Zoom Account –  Last, set up time for your kids to interact on-line with other homeschooled kids.  It doesn’t have to be for a long period of time.  Just a few minutes to break the monotony, and make sure they are interacting socially with other children.  They can play or just have a conversation.  This is a great way to remove the feeling of being isolated from other kids. If possible, coordinate with other parents on having a Zoom class.  This can be set-up for spelling, reading etc. Again, get creative.


Most importantly, make learning fun.  Nothing will distract your children faster than boredom. My daughter actually made Fridays a half day.  That really excited my little darlings.  They were able to use that time to play educational games on-line or release their stress however they wanted.  The kids loved Mrs. Clark’s, their mother, school.   Finally, I hope these homeschooling tips for beginners have been beneficial, and you will implement a few.


Best Native Plants for Pollinators

Today, I’m sharing gardening tips on native plants for pollinators.  First, check out my post on How to Attract Pollinators before you leave. Pollinators are needed to help produce flowers, fruits and vegetables.  So, it is imperative that you plant a garden that will produce nectar for bees, wasps, beetles, butterflies, hummingbirds etc.  These are the top pollinators in gardens.  As a result, you will want plants that will attract them.

Next, annuals, perennials and native plants will attract pollinators.  However, native plants are preferred.  Since they are native, they don’t require fertilizers and they adapt easily to soil conditions.  And, they require less water than annuals and perennials.  I love planting a combination of natives, annuals, and perennials.


native plants for pollinators


Here is a list of native plants for pollinators:


Eastern Red Columbine – So, this plant attracts humming birds and blooms April through May.  It it known for its beautiful red and yellow flowers.  And, it can be grown from seed.  However, it will bloom in it’s second year.  Eastern Red Columbine thrives in shade and in the sun, but must be watered.  Great for zones 3 – 8.

Black Chokeberry –  Next, this is a small to medium size shrub that grows about 3 – 4 feet and produces white flowers in April and May.  Afterwards, you will find black fruit that will grow into winter.  These berries will help feed backyard birds during cold weather.  The foliage is a bright mix of red and orange.  Great in zones 3 – 8.

Purple Milkweed –  The purple milkweed loves sun and dry soil.  It produces dark purple flowers in June and July.  The plants grows to about 2 – 3 feet, and attracts monarch butterflies.  Perfect in zones 3 – 8.


native plants


Butterfly Weed –  Also, this plant produces bright yellow, orange, and red flowers, which attracts lots of beautiful butterflies.  It plays an important role in my butterfly garden.  It likes full sun with good drainage soil.  Plants grow to about 1 – 3 feet, and blooms July – September.  Perfect for zones 4-9.

Mountain Goldenrod – This plant grows about 2 feet and produces yellow flowers that bloom July – September.  Actually, they prefer part shade and rocky soil.  The yellow flowers attract butterflies.  Perfect for zones 3 – 8.  I’m lucky, Goldenrod grows wild around my property.  As a result, I transplanted several plants this fall into my butterfly garden.  Hopefully they will survive the winter.

Smooth Aster – So, this plant grows about 2 – 4 feet, and loves full sun to part sun.  It produces blue flowers from August – September.  Great for zones 3 – 8.

Fire Pink – This plants will attract hummingbirds.  It produces crimson colored flowers and blooms May – July.  The Fire Pink loves full sun or full shade.  Looks beautiful in gardens and woodlands.  Perfect for zones 4 – 8.


native plants for pollinators


Golden Alexander – This plant is an blooms early, and is a member of the carrot family.  Most importantly, it is a host plant for the Black Swallowtail butterfly.  It prefers full sun to part shade and grows to be about 1 – 3 feet tall with a 1 – 2 foot spread.  Great for zones 4 – 8.

Hoary Skullcap – This plant loves sun, part shade to shade.  It grows 2 – 3 feet, but should be planted in a large garden so it can spread.  The plants produces purple, blue or violet flowers that bloom from June – September. Perfect for zones 4 – 9.

Rosinweed – This plant is similar to a sunflower.  It grows to be 4 – 6 feet, but usually tops out at 3 feet. It is happy in full sun to part shade.  And, it blooms from June – August, and the Goldfinch love the seed.  Great for zones 4 – 8.

Queen of the Prairie  –  This plant loves full sun with rich soil.  It produces cotton-candy pink flowers that are puffy like cotton candy.  The plants grows to about 2 – 8 feet and produces blooms from June – August.  This is perfect for Zones 3 – 7.

Purple Coneflowers –  Last, coneflowers love sun to part shade.  The purple coneflower produces pink flower and produces seeds that the Gold Finch loves in the winter.  The plants grow approximately 3 – 4 feet tall and bloom from June –  August.  Perfect for zone 3-8.

Last, I hope that you will check out each of these beautiful plants and determine if they will grow in your growing zone.   If so, purchase a few for a favorite spot in your garden.  It’s important that we add more native plants each year.


How to Attract Pollinators to Your Garden

Today, I’m sharing tips gardening tips on how to attract pollinators to your garden.  What are pollinators and why are they needed? New gardeners often have these questions.  First, lets start with what are pollinators.  Pollinators carry pollen to plants so they will product flowers/blooms.

So, it’s important to plant flowers and plants that produce nectar.  Nectar will attract pollinators, which include butterflies, bees, beetles, humming birds, wasps and moths.  These insects and birds are our top pollinators.  However, the wind is also a pollinator.  Flowers, fruits and vegetables are produced by pollinators carrying pollen from one plant to the next.  Without them, there will be no fruit or vegetables to harvest or beautiful flowers to enjoy.  As a result, we must attract pollinators to our gardens.


how to attract pollinators


How to Attract Pollinators: 


Plant Native Plants –  Plant native plants rather than annuals.  Native plants are those that grow naturally in a particular area.  Furthermore, they act has a host for butterflies and they provide support for pollinators.  Native plants require less water, fertilizer, pruning, and they require little or no pesticide.

Provide Shelter – Bumblebees need open ground and bare patches of soil to nest.  Provide an area away from your entryways.  I had Bumblebees make a nest in the shrubbery bed leading to my front door.  That was not a good thing.  Also, dead wood and tree stumps make good nesting areas.  Compost piles, brush and hedges make good nesting areas too.


how to attract pollinators


Use Different Colors in Your Garden –  Make sure your garden has a variety of color and texture.  Red, yellow, lavender, white, pink mix it up. Different sizes and shapes should be considered too.

Provide Water – Pollinators are living creatures, so you must provide water for them to survive.  Install a pond, bird bath, fountain or shallow dish with water.

Have Something Blooming at all Times – When purchasing native plants, consider their bloom times as well as planting zones.  Having a plant blooming from May to September is ideal.


Provide Flowers and Plants in Masses – Plant native plants/shrubs in masses.  Five or more is great.  If your garden area is not large enough to accommodate 5 or more, plant at least 3.

Provides Food – Our backyard birds need food, so look for plants that will help produce food for our feathered friends.  Sunflowers, asters, coneflowers produce seeds and dogwoods, cedar and holly produce berries.  Consider planting a few in your garden.

I hope these tips on how to attract pollinators were beneficial.  Give some thought on what plants would work well in your backyard.  Start with a small area, and increase your plantings yearly.  Finally, saving seed and starting new plants can be a big money saver too.


Tips on How to Deal with Grief

Today, I’m sharing tips on how to deal with grief.  Grief is a feeling of loss, which might come about due to a number of events. We most often associate it with death, but it’s not the only thing that can cause you to feel grief.  Grief can be one of the most difficult emotions to deal with. It’s not just a fleeting feeling, but is something that can last a long time.  Unfortunately, it often never completely goes away. Accepting the loss of something or someone that once played a significant part in your life is not an easy thing to do. However, there are ways for you to deal with your grief and get back to a happier place in your life.


Tips on How to Deal With Grief: 


Understanding Grief 

One important thing to consider is that grief isn’t only something that you experience after a death.  It’s also something that you might feel when you end a relationship, lose a friend, or even sell your home. You might feel grief if your pet dies or gets lost.  And,  you can feel grief when someone dies.  Even if your feelings for them are more complicated than loving them. Grief is something that you can feel in different ways and for different reasons.  Additionally, the intensity varies too.


Understand the Emotions That Come with Grief

Grief can bring with it a variety of emotions. You might wonder whether some of the things that you are feeling are “normal”.  Or, if you’re the only one who feels the way that you do. You could feel many emotions when you’re experiencing grief.  This includes everything from sadness to anger or even guilt. Some people also feel numb.  And, might be unsure when or if they are going to start feeling something else. One of the most important things that you can do is to accept your feelings, no matter how far-ranging they might be.


Talk About Your Grief

When you are grieving, keeping it to yourself isn’t usually the best idea. You might feel reluctant to share your thoughts and feelings with others.  Perhaps you feel that you will burden them with your grief. However, talking about your grief with other people is good for you.  And, it can be good for them too if they’re experiencing the same thing. You might discuss your grief with friends or relatives, or you might consider doing it with people who aren’t so close to you. You could discuss your grief with a support group, or find support online. A therapist is also an option if you want to talk about what you’re experiencing.


how to deal with grief


Remember Happy Times

Processing your grief can often make you feel weighed down by your emotions. However, even though you might be sad now, it’s also a good idea to try and remember the happy times. Whether it’s the positive times that you had in a relationship or the memories you have of a loved one who has passed.  Remembering can  help you to deal with your grief. Some people like to carry or wear something that reminds them of happy times. You might find grief help with memorial jewelry from Memorials.com. Wearing a photo or keepsake gives you a special reminder of the good things that you want to remember. You might have lost something or someone, but it’s important to remember that you had that love in the first place.


Take Care of Yourself

Caring for yourself can become difficult when you’re grieving. Grief can feel all-consuming, and even basic self-care might be hard or even seem pointless. However, by caring for yourself physically, you can help yourself to feel better emotionally. It’s also often important to care for yourself so that you can care for your family and those around you. Keep in mind that you should recognize when grief might become depression. While grief is often expected, depression is not something that you can necessarily work through on your own. You might need additional help and support to deal with depression.


Keep Busy

Staying busy often helps when you are grieving. It gives you something in your life to focus on outside of your grief. Keeping busy could mean a lot of things, from continuing to go to work, taking part in hobbies and activities. Even though it is difficult to process your grief, it’s also important to recognize that life goes on. By continuing with your life, you can start to get back to normal or create a new normal. There are many ways you might occupy your time and spend time with others to ensure you’re not isolating yourself.


Allow Others to Deal with Their Own Grief

When you’re grieving, other people that you know might be grieving too. One of the most important things to remember is that everyone grieves in their own way. You might notice that someone else is processing their grief in a different way to you.  But, that doesn’t mean that they are grieving “incorrectly”. It’s important not to dictate to anyone else how they should grieve.  And, also not to expect yourself to grieve exactly like someone else. Of course, everyone should also be careful that they are not using their grief to hurt other people.


Learn to Live with Your Grief

Sometimes grief might be something that you can process, and it might even end. However, there are times when grief is something that will always be with you. When someone you love dies, you may never really stop grieving them. However, you can learn to live with your grief.  And, it won’t be something that you feel intensely all the time. Grief changes as time goes on, and eventually, you might only feel it most on certain occasions or when you take the time to stop and think about it. You might need to find a new normal in your life.

Everyone will face grief in their life, but using our tips on how to deal with grief may make it easier. It might not be easy to deal with, but there are ways to process it.

How to Prepare for a New Baby

Today, I’m sharing parenting advice on how to prepare for a new baby.  When you discovered you had a baby on the way, you were no doubt overjoyed. But,  as the news settles in, the stresses and worries of parenthood start to creep up. There is so much to prepare for your little one’s arrival.  You wonder if there’s enough space for your new baby.  And, everything you need to be the best parents possible.  Additionally, you need to make sure your home is 100% safe for an infant. 


new baby tips


Some new parents decide to upgrade to a bigger home or a more child-friendly location.  However, it’s not always possible to do that. You may have professional or personal commitments to your current hometown, or maybe your finances can’t quite stretch to a new house.

This shouldn’t matter. It is entirely possible to turn your current home into a perfect, child-friendly property. Read on to learn some top tips to get your home in shape to welcome your little one when they arrive.

How to prepare for a new baby:

Declutter

One of the most important things you’ll need to do is to create more space. Although a newborn doesn’t take up much room, you will need space for all the new baby gifts, crib, changing table and toys.  Now is the time to declutter your home,  and get rid of anything you don’t need. Go through each room systematically and be strict about what you throw away. Old work papers, stacks of CDs and DVDs, broken furniture and clothes you no longer wear.  All of these things can go. The more you throw out, the more space you will have for the new member of the household. 

Once you have cleared your home of extraneous items, you should ensure that you maintain your newly created space.  Be aware of what you bring into your home, and don’t shop for new things unless you really need them. Your friends and family are probably going to host a baby shower for your and your new baby.  So, request things you need so you don’t end up with duplicate or unnecessary presents filling up your house.


Create a bedroom

Even if your newborn will start out sleeping in your bedroom, they will eventually need their own space. Unless you intend to move to a new home, you will need to designate a room for your new baby.  If you have more than one option, consider how much space they will need and the proximity to your bedroom.  

Now that you have designated space for a bedroom, you will need to fill it with all the things your baby could need. A crib is essential, and you’ll also need storage for clothes and toys and a changing table. 

You will want to decorate your child’s new bedroom to create a pleasant environment for them to grow up in. Paint the walls, add some child-friendly pictures, and adorn it with all the toys they could possibly want. It is a good idea to make your room gender-neutral if you don’t yet know the sex of the baby.  Even if you do know the gender, remember not all girls like pink and not all boys like spaceships and superheroes. Wait until they are older and you know their likes and dislikes before making big theme decorating choices.   You can save a lot of money by decorating yourself, but if you are able hire a decorator to bring your vision to life.


new baby tips


Purchase the Essentials 

They may be small, but babies need a lot of stuff.  How to prepare for a new baby must include bottles and formula for feeding, clothes and diapers, baby food, toys and potty training and walking products.  You will need to buy all of these before the baby arrives and find a place to house them.  You may wish to create a budget to keep track of your spending and stop yourself from going overboard. 

It can be tempting to give your wonderful new child the world, but they will be perfectly happy with the essentials and a few toys. Don’t stretch your finances unnecessarily. Your loved ones will be more than happy to buy gifts.  So, don’t be afraid to ask for some of the things you need. All these new items will take up a lot of room, so you may want to invest in some smart storage solutions to save space.


Babyproof your home

The most important step in preparing your home for a new baby is to make sure it is safe. Babies are fragile and curious.  They love exploring new places and putting strange and exciting items in their mouths. An unsafe house and a baby are a recipe for disaster. You will need to give your home a thorough going-over to ensure there is no risks. 

One of the best ways to baby proof your home is to put yourself in the perspective of your new baby. Crawl around the home, seeing what they will see, and you will quickly be able to identify any hazards you might otherwise have missed.

Any sharp items, chemicals, and medications should be kept in cabinets out of reach. If there is a chance they could open a cupboard, they should be securely locked. Small objects that present a choking hazard are easier to miss. You never know when you might drop a coin or a key or even bring in a stone from outside on your shoe. You should be vigilant with a small child around and constantly be on the lookout for objects they might want to put in their mouths.

Another major injury hazard is the staircase. As soon as your child starts crawling, you will need to install safety gates above the stairs.  Guarding their bedroom eventually is a good idea too.  You want to prevent any unplanned excursions in the night. Open windows can also be dangerous too.  Invest in some window guards, you won’t be sorry. 

Electrical outlets can pose a risk too.  Outlets provide the perfect receptacle for curious babies to stick things in.  You can buy child-safe covers to shield empty outlets, or even hire an electrician to move outlets higher up the wall and out of your child’s reach. 

Another common cause for injury in young children are sharp corners on pieces of furniture. Some tables tend to be exactly the same height as a newly-walking toddler.  They are accidents waiting to happen. Luckily you can buy soft rubber or padded corner guards to cover any sharp corners and minimize the risk.

As soon as your child starts to crawl, they will be clambering up and down furniture.  As a result, there is a risk they could tip over chairs and tables and seriously hurt themselves.  Anchor all furniture in your baby’s room to the wall to prevent this from happening.  


new baby tips


Get your fridge ready

When people ask how to prepare for a new baby, they usually don’t think about their meals. Your new baby will need to eat, but so do you.  You and your partner will both be exhausted and busy, so it’s unlikely you’ll be cooking any extravagant meals for the first few weeks.  If you have other children, they need to eat too.  So, prepare to cook nutritious yet delicious meals that you can just heat up and eat right away. This will save you time and energy that would be best spent looking after your new arrival.


Prepare to clean

Babies are notoriously messy.  So, when you’re making your list on how to prepare for a new baby include cleaning products.  Your home will eventually get stained and endure spills. Ensure your home is adequately stocked with cleaning products, and any delicate, easily-damaged items are protected or stored out of the way.

We hope that you have found our tips on how to prepare for a new baby helpful.  Awaiting the arrival of a new baby is one of the most exciting adventures you could ever have. You are bringing a new life into the world and embarking on a new journey together as parents. You want your little one to be cared for and looked after, and by preparing your home and making it child-friendly, you can make sure your baby has the best start to life possible.


Get Your Finances In Order 

One of the most expensive adventures you can undertake is to have a child.  So, getting your finances in order is an essential step to take when a new arrival is on the way! There are so many handy resources online that can help you to fix your past credit history while also improving your financial future.  As a result, it’s a good idea to do some research and find a site such as pigly.com.  It will enable you to tackle debt and plan ahead to ensure you can provide your child with everything they need. Keeping track of your accounts is essential when preparing for a baby. 

Furthermore, you need to be able to identify any underpaid wages or unrecognized transactions.  You need to look after each and every penny. Developing a savings account in preparation for your new arrival will benefit your family after you give birth.  Although you will not be working for some time, you’ll still need to fork out money for an endless supply of diapers, wipes, formula and clothes.

It can be tricky to tackle your finances, so there’s no time like the present to learn essential money management skills.  Fortunately, you can pass these skill on to the next generation.  However, try not to spend money on luxuries when prepping for a newborn.  Spending money on expensive clothes and shoes are unnecessary expenses.  What’s important is that your bundle of joy is safe and warm!   

We hope that you have found our tips on how to prepare for a new baby helpful.

How to Create an Outdoor Survival Kit

Today, I’m sharing tips on how to create an outdoor survival kit. If you love all things relating to camping and the outdoors you will love this post, and the great tips that we have.

First, you can find tons of online sources such as this one where you can learn more about survival methods.  This article has just what you will need for when you’re looking for a quick and easy guide on the basics of survival.  Additionally, you will find information on basic items that you will need to withstand any situation in the woods or outdoors when stranded.


outdoor survival kits


How to Create an Outdoor Survival Kit:


These items below will give you an idea of the basic requirements needed when going on a trip.  It can include camping, a zombie apocalypse, or any other fun thing.

A First Aid Kit

A first aid kit is a lifesaver.  We cannot control nature, but we can control some of the things we encounter while enjoying nature.  This includes snake bites, bug bites, ants, mosquitoes, hypothermia, headaches, diarrhea, poisoning, burns, and cuts to name a few. Please note that infection can occur if bites and cuts are not treated immediately and correctly. This is where having a first aid kit is crucial.  As a result, it is necessary to make sure you have the necessary items in your kit.  Make a list, and ensure your items are included before stepping out the door.


outdoor survival kit


Making a Fire

It is important to have the right equipment to make fires when camping or just enjoying the outdoors.  Black powder firearms can be useful, but make sure you practice proper gun safety when using this method.

The technique involves pushing a cotton cloth down the barrel of the gun till it touches the powder charge and firing it, away from yourself or anyone else.  Once the cloth is fired out of the gun it should be ‘lit’, at which point you pick it up and blow on it to ignite the flame. Oxygen and fuel together, produce heat.  Thus, when you blow on the cloth it already has heat and you will be providing the oxygen.

Other things you can use to light a fire is setting a match to dry grass and adding other flammable items.  Use a match to light the grass.  Next, blow on it until it ignites.  At this point you can add other flammable items that you have collected including reeds, more grass, or elements that are flammable to make it bigger.

Pinecone fire starters are great for camping trips or other outdoor activities.  You can make them prior to making your camping trip or outdoor activity, and it’s a great project to make with the kids.


Shelter or Shade

Shelter or Shade is just as important as the other components. Weather conditions can be harsh if not expected.  And, getting sick from it  is not worth it.  So, in the case where it’s raining or possibly too hot, you can build a shelter out of the things around you.  This is a crucial skill to have in any situation.  Make your shelter while it is still daylight.  You can find tips online on how to build an outdoor shelter, like this one for example https://www.outdoorlife.com/survival-shelters-15-best-designs-wilderness-shelters/.

Unfortunately, people have been known to die from animal attacks and hypothermia.  To avoid these unfortunate events, make sure the shelter is away from any hazards such as cliffs, or food sources.  Furthermore, there must be proper insulation such as a tent with a zip to block cold or the wind.  If you have more than one person, try and group under one shelter.


outdoor survival kit


Food and Water

Make sure you have enough food and water.  It’s imperative that you think long-term to ensure that you don’t run out.  Packing food items that are non-perishable such canned goods, powder form, or dry like rice and pasta will ensure food lasts longer.

If you’re not out for too long, you can pack things that give you energy such as beans, pulses, fruits, nuts, and seeds.  If you don’t have bottled water, always make sure you boil or filter any water you need before drinking it.  Don’t ever get tempted to take a sip or two of water from a lake or river. You need to avoid water-borne diseases as much as you can as they can be fatal.  Many plants found in nature can be consumed too. Such as root tubers, moss, cacti, algae, and mushrooms to name a few.  However, be sure you are picking the correct plants before consuming any.

Last, make sure you use our tips on how to Anyone can make proper use of these basic tips.  things as spelled out above. If you know a little about each one, you’re better off than the next guy!

How to Get a Good Night’s Sleep

Today, I’m sharing tips on how to get a good night’s sleep.  Sleep is supposed to come as soon as your head hits the pillow, right? Not really.  The average person spends between 10 and 20 minutes falling asleep after slipping into bed. If you find yourself wide awake for much longer than this, there’s probably a reason behind it.

Popping a pill to fall asleep is the easy solution.  However, that doesn’t do anything to get to the bottom of why you’re having trouble falling asleep.  Thankfully, there are several things you can do to encourage healthy sleep habits.

how to get a good night's sleep

Here a few tips on how to get a good night’s sleep:


Make Sure You Have the Right Mattress

Your mattress matters more than you might think.  And, no two styles are alike nor are they right for each sleeping style. If you tend to roll over onto your back or stomach or switch between the two, a firm surface is usually most comfortable.  According to My Slumber Yard, a dense hybrid like the Dream Cloud is ideal. But, a firm mattress may not solve your sleep struggles if you are most at ease on your side.  You might want to try a plush or pillowtop.  Satvaa is an affordable option if your budget is a concern.   Furthermore, both the Satvaa and the DreamCloud (along with most other mattress makers) offer a trial period.


Track Your Sleep Patterns

If changing your mattress doesn’t help, you may benefit from understanding how you sleep during the night.  There are several apps that can help you do this without having to invest in a dedicated sleep tracking device. A few of these are:

  • Sleep Time –  This is a hands-off app that, once downloaded via the Google Play or Apple Store, can give you insight into how you sleep. It tracks your movements and gives you suggestions on the best time to go to bed and wake up.
  • If you snore, you aren’t getting the most restful sleep possible. Use Snore Lab to determine if you snore and for easy-to-understand suggestions for relief based on your night time noise patterns.
  • Headspace and Calm. Both of these apps are for meditation and work to put you in a better mental state before going to sleep. Headspace offers hundreds of different guided meditations while Calm offers you the option of listening to calming stories read by the most soothing voices of our generation (including Matthew McConaughey).


how to get a good night's sleep


You can also use your phone to play soft music or white noise.  You can purchase a white noise machine to help you get to sleep if outside noise keeps you distracted. However, keep in mind that many older phones won’t have the memory or battery life to keep up with your downloads. If your device loses power or freezes up overnight, look for more capable options.

There are dozens of factors that might inhibit you from getting the rest you need. However, your mattress is a likely culprit. Tracking your patterns can help you narrow it down even further. Both of these suggestions are easy to implement and are a healthy alternative to medication-induced sleep. Remember that insomnia is a serious problem, and if you can’t find relief, visit your doctor. They can help rule out any potential medical issue that needs attention, and give you additional tips on how to get a good night’s sleep.


How to Handle Homeowner Association Disputes

Today, I’m sharing advice on how to handle homeowner association disputes.  If you decided to buy a house in a neighborhood with a homeowner’s association, it is very possible that at some point you and the HOA will end up butting heads. However, using these tips will help you handle these disputes and return to living your everyday life.


home owner association disputes


Tips to handle homeowner association disputes:


Think about the Dispute

The majority of HOA disputes arise from not paying HOA fees.  But, if the complaint comes from elsewhere you should carefully consider the nature of the dispute. Is it a noise complaint?  And, therefore likely originating from one of your neighbors? Is it a complaint about your yard or other cosmetic complaint?  This type of complaint is likely to originate from the HOA itself?

There are many different kinds of disputes that can cause your homeowner’s association to issue warnings or fines. The most common is for nonpayment of fees or nonpayment of a fine.  When those aren’t the case the dispute can become less clear cut and more muddled. Thinking about the dispute and its origin will help you decide how to handle homeowner’s association disputes.


Talk to the HOA

Often your homeowner’s association will be happy to talk to you about the dispute. This can help clarify whether it was one of your neighbors who made the complaint or if it was the HOA itself that decided to take action. In addition, you can often have them clarify the steps that could be taken beyond official reprimand or fines. Talking with your HOA is one of the first things you should do.  Having a conversation can easily stop the entire situation from escalating into legal action.


Learn your Rights

If talking with your homeowner’s association doesn’t result in clearing up the misunderstanding, you may have grounds for legal action. Therefore, the next step is to learn your rights under your jurisdiction. The majority of states have laws on the books that can protect homeowners if their HOA is going against their contract. Look up the laws in your state.  And, if further clarification is needed seek legal help.  Seeking legal help will you understand what your rights are and whether legal action is advisable for your circumstances.


File a Dispute

Essentially, a more official version of step number one is to file a dispute.  This will help to establish both a  paper trail and to give your HOA one last chance to resolve the issue without outside help. Your homeowner’s association will have a way to officially file a dispute. If you are lucky, they will address your concerns through the dispute.  And, if you aren’t so lucky you will have a paper trail that will help in any future actions you feel necessary.


Find Legal Representation

According to the Attorney Referral Service, an HOA attorney in Los Angeles, “If you feel your HOA is applying inappropriate restrictions or failing to act in the best interest of your community, it may be time to seek legal help from a real estate attorney.” When you find the right legal representative, you will be able to make a legal claim against the HOA. Hopefully, they will make them take notice and possibly comply. If they do not comply, your lawyer will be able to guide you through the court system.  This option can become expensive, but if you are in a dispute with your homeowner’s association that involves repeated or expensive fines it can be worth the money.

If you are in the middle of a dispute with your homeowner’s association, the bureaucratic process can be stressful and unclear. If you follow these tips, however, you should be able to resolve your dispute with the HOA satisfactorily and with a minimum of fuss.

How to Revamp Your Home

Today, I’m sharing home decor tips on how to revamp your home on a budget.  If your home looks as tired as you feel staring at those uninspiring walls, then perhaps it’s time for a revamp. Or maybe you just need a change? They say it’s as good as a holiday. 

Fortunately, it doesn’t have to cost a fortune to revamp your home. You can breathe new life into your living space without breaking the bank.  So, get in touch with your creativity and check out our tips on how revamp your home below.


how to revamp your home


How to Revamp Your Home:

Fresh Paint 

Your walls are a canvas of possibilities. You can repaint your entire house, or focus on a room at a time. Step out of your comfort zone and try out new paint colors, or even an accent wall in the living room. 

Alternatively, pick out an item – a chest of drawers, an old bookshelf, a kitchen table – anything, and paint it. Preferably in a contrasting color that compliments the rest of the room. It makes a world of difference, and you’ll get to decide how much to spend.


Save the Siding

Siding in need of some TLC affects the overall appearance of your house. Evaluate the extent of the damage, and see if you can replace or repair the worst parts. 

Whether you have vinyl, stucco, aluminum, or wooden siding, by fixing a few panels, you’ll get rid of that eye-sore and improve your exterior’s look. It will improve your home’s look and maintain your house in the long run.

However, if the damage is beyond redemption, then it’s worth asking a specialist to conduct a site visit. This will give you an idea of how much it’ll cost. So, either way your efforts won’t be in vain.


how to revamp your home


Refinish & Replace

Bring dull cupboards and shelves back to their former glory by applying a refinish, or opt for two-toned cabinets to introduce a burst of color into a dull space.

Give your kitchen a fresher look, by replacing that century-old appliance with a new one. Do the same for other household items like rugs, throw cushions, or even bedding.


Liven Up Living Spaces

Invite energy into a tired corner with gorgeous artwork, or a vase of fresh flowers. Lamps are fantastic choices, too.  You can easily replace a lifeless lampshade with a more modern one.

Shop around for bargains and see what other beautiful, inexpensive things you can use to spruce up a drab area.


how to revamp your home


Revamped, Refreshed, and Renewed

Giving your house a facelift doesn’t need to cost a fortune. A fresh coat of paint does wonders, while repaired siding makes a massive difference, too.  Small changes like a refinished cupboard, a replaced appliance, or a pop of color will liven things up and revamp your home – all without burning a hole in your pocket.


How to Create Tropical Container Gardens

Today, I’m sharing gardening tips on how to create tropical container gardens.  You can transform your  balcony, patio, garden or backyard into an exotic getaway.  Using simple planters or containers and a variety of tropical plants can create an exciting new look. Dramatic annuals and decorative planters provide rich foliage and astonishing blooms.  Furthermore, outdoor spaces can be transformed with little money and uses the trend toward container gardening.  Lets get started with your transformation.


tropical container gardens


How to Create Tropical Container Gardens:

The Environment

  • When people think of the tropics, their first thoughts are generally sun-kissed beaches with palm trees.  But, that’s not the whole story. Most tropical plants come from the floor of the rainforest.  They get little sun and have high levels of humidity. So, they don’t need as much sun as a cacti. And, tropical plants can live comfortably on balconies or shady backyards.  As a matter of fact, tropical plants prefer indirect sunlight.
  • Because tropical plants need high humidity, they require lots of watering. So, when using decorative planters they need to have good drainage. Choose planters with plenty of drainage holes to ensure the roots of the plants are free from standing water.
  • There is one element tropical plants need less than other plants to help them grow, and that’s phosphorus. Look for fertilizers described as NPK on the label. These types have nitrogen, phosphorus, and potassium as the primary nutrients. Iron and magnesium will help sustain the bright colors of the tropical flowers.  Plant food is recommended as well as adding Epsom salts to the soil at planting.  This will give your plants a magnesium boost.
  • Because the soil in planters and containers is above ground, it’s more exposed to heat and drying winds.  As a result, it loses moisture more readily. This is especially true in a warm weather.  So, tropical containers need to be monitored closely.  It’s imperative that the humidity level around tropical plants not fall too low.Also, the soil should be moist but not soggy.  Overwatering can cause rot and disease if the roots are allowed to stand in water for a long time. The soil in decorative planters should never be allowed to thoroughly dry out.  If so, the sides will shrink. This gap means any water will pour through the container and not reach the roots.  If this happens, push any soil that has shrunk from the edge around the pot to fill in the gaps before watering. One option to reduce evaporation, and maintain the humidity around the plant is to cover the surface with decorative mulch such as orchid bark.

Selecting a Planter or Container

With such a large variety of planters and containers to choose from, where do you start?  Many gardens use the traditional terracotta clay pots.  However, there are advantages and disadvantages for the tropical gardener.  Terracotta pots are heavier than plastic or fiberglass pots and are easily chipped or broken.  Most are more expensive too.

The style of the planter used for tropical container gardens are really a personal choice and the effect you want your tropical garden to project. The size of the containers will be limited by the space available, which will, in turn influence the size and plants  they can accommodate.

Always try and buy brand new planters for tropical plants.  Used pots may have been infected by disease or have chemical residues. If you do want to re-use planters make sure they are washed well.  Wooden containers need to be lined with plastic, so the water and soil don’t cause them to rot.

If you don’t want your planter to become a water logged, make sure there are plenty of drainage holes in the bottom. Without these holes, the organic compost will become saturated with stagnant water and kill off your tropical plants.


Designing with Plants

Wherever you’re putting your tropical plants, you need to make the design look harmonious with the surroundings.  You want to create an atmosphere you’ll be happy with. Think about what outdoor live plant displays you want the eye to focus on.  Also, think about how the other plants flow around that the center plant. Each planter needs to have a balance of plants.  You want the eye to go to the planter’s focal point. This can be accomplished with asymmetrical or symmetrical designs.

The form of the planter is dictated by the growth habit of the plants you put in it. Some plants like to grow tall, others like to hug the ground, and others want to flow over the edge of a planter. Each can be used to create an overall aesthetic for your tropical container gardens. And then there is texture, as the different types of foliage will give a different feel to a container. Broad leaves juxtaposed with linear leaves like grasses break up the eye line and bring a variation to your design. The best designs work on a variety of textures to add variance to the display. By repeat planting of the same plant in containers a rhythm is achieved. When looking at the planters admirers eyes can move from one planter to the other.

And, the final consideration when designing planters is proportion. There needs to be a balance of heights as well as plants. Garden designers have a rule that plants should not be higher than three times the height of the containers. For large and tall planters, medium to large plants with large leaves work well.  And, for short and shallow planters smaller plants with small leaves and excellent coverage.


tropical container garden


Shape, Texture, and Color

To get tropical container gardens or a garden planter to have a real exotic feel, you need to have plenty of tropical foliage. Most foliage will be green; however, you can break up the green with flowering annuals. There are lots of varieties that work well in planters such as, Vinca, Bacopa, Torenia, Verbena, Lantana, and Wax Begonia to name a few.

You can also break up the green foliage by using Caladium cultivars.  They are available in a range of foliage shapes, sizes and colors. You can choose foliage colors that compliment the flowers or contrast. Think also about the texture of the foliage as some tropical plants have shiny leaves they can draw the eye easier to the highlighted plant in the container.


Designing a Planter

The central plant in tropical container gardens should fill the crown of the planter with compact upright growth. The filler plants are more compact and are there to round out the top of the planter. Allow corner plants to grow over the edges, and allow their growth in more than one direction. Plants place at the side of the container can soften the look, and fill out the space between the corners. When thinking about the plants you’ll put in each individual planter, pick those that have similar watering, feeding, and light requirements.  It’s important that they all thrive in the chosen location.


tropical container gardens


Planter Location

We’re dealing with tropical plants, water retention is a prime consideration. Don’t put your tropical plants anywhere in your garden that is windy. The wind increases evaporation water evaporation. If you have a spot that gets anything from four to twelve hours of sun a day, you can use plants that like full sun or part shade. If the location gets only two to four hours of sun a day then you need to select plants that will accept whole or part shade. A lot of tropical plants can survive with varied light and will grow in the shade.  However, this often means they will have reduced flowering.


Fertilizer

Tropical plants are pretty much like any other and like to get regular feeds a slow-release fertilizer in the soil and water with liquid fertilizer. Add a slow-release fertilizer at planting.  Be sure to mix it thoroughly with the soil.


Maintenance

Like all gardens, tropical planters need to be maintained. It’s not just a matter of planting and forgetting. In the early stages to promote leaf growth, the plants will benefit from pinching, that’s the removal of young shoots. As the plant begins to grow, gentle trimming may be needed later in the season. As part of your watering regime, spraying with insecticidal soap or oil will keep pests and disease in check. Oh, and don’t forget the weeding!