Planting and Harvesting Garlic

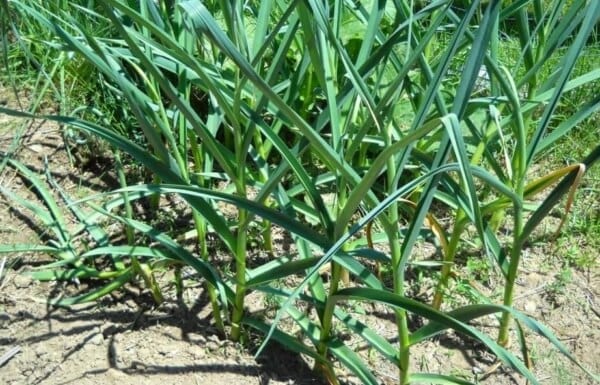
Are you wondering how to plant garlic in your backyard gardenPlanting garlic in your backyard vegetable garden will give you a reward for sauce, salsa and more.  Today, I’m sharing gardening tips on how to plant garlic in your backyard garden.  You see I planted garlic last year and had no success.  So, I decided to try again in the fall. Look at the nice healthy garlic plants that I harvested from my backyard kitchen garden below. 


planting and harvesting garlic

I planted onions in this space last year and they did great. So, I decided to amend the soil with my homemade organic compost.  My compost is leaves and kitchen scraps.  The garlic cloves loved it.


growing home grown garlic


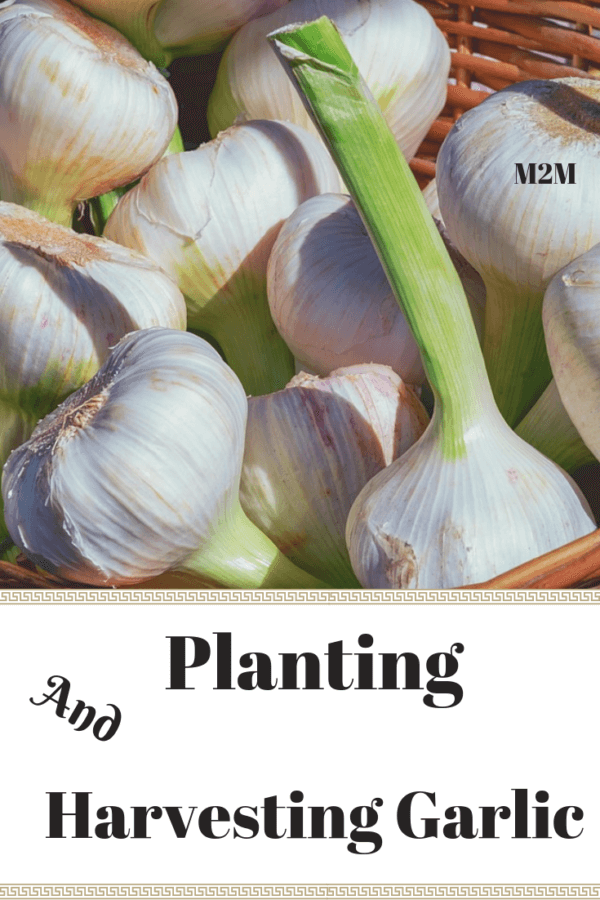
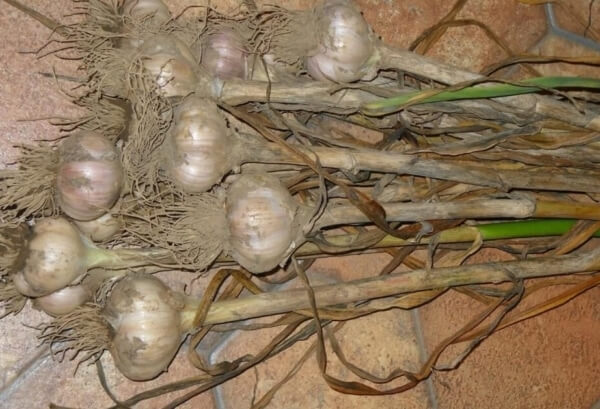
Harvesting garlic was at the top of my list this week.  The size of the bulbs were glorious!  However, harvesting garlic requires muscle.  The roots at the end of a garlic bulb run deep.  As a result, you can’t pull the bulbs out as you would an onion.  Since this was my first year planting and harvesting garlic, I didn’t realize how much muscle would be required.

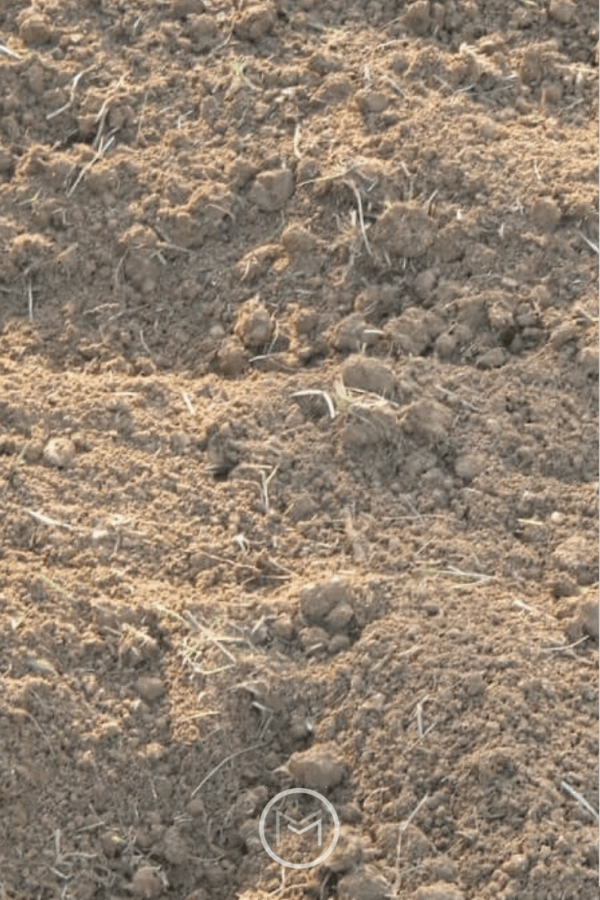
To avoid damaging the bulbs, you must remove the dirt until the entire bulb until it is exposed.  Once the bulb is exposed, it is easier to get to the bottom of the bulb.  First, I used my garden shovel and my hands to remove the dirt around the bulb. Please wear a good pair of gardening gloves to protect your hands and nails.  You will be digging!


Next, I place the shovel under the bulb and worked it until the garlic bulb became loose and I was able to pull it out.  Nice way to get an upper body work-out, trust me.  I recommend lifting weights during the winter so you can be prepared for this job in the summer!


harvesting garlic

     
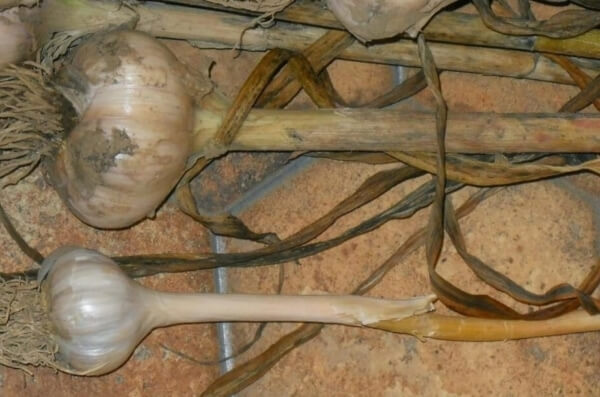
It’s amazing what can happen in 2 – 3 weeks in the garden.  Take a look at the picture directly above.  I harvested the bulb on the bottom 3 weeks before I harvested the other plants.  You can see how much smaller it is than the other cloves, but it cured beautifully.  It is actually ready to use.

Some people braid their harvest, but I’m just going to store mine in a garlic bag in a corner on the counter since it’s a small batch.  It won’t take me long to use it when I make tomato sauce.


harvesting garlic


The newly harvested bulbs will cure for 3 – 4 weeks.  Once they turn white and achieve a covering like paper on the garlic bulb, I’ll shake off the dirt.  I cut off the roots and stem with gardening shears and they’re ready to go.  Some gardeners leave their harvest in the garden to cure.  But, I brought mine in the house and allowed them to cure in the kitchen. Stay tuned for a post on what it looks like after it has cured.  Do you plant garlic? How do you allow your plants to cure?

You may also like What You Should Know Before Growing Garlic.

7 Uses For Sunflowers

Today, I’m going to share a few gardening tips on uses for sunflowers.  So, don’t throw those dried sunflowers away. First, I love the strength, grace and beauty of sunflowers in my garden.  They’re one of my favorite summer flowers.  I love sunflowers because they stand tall, erect and they’re showy.  They tower above everything else in the garden, and their bright color makes an impact.  Furthermore, there are different varieties to grace your garden and they all grow to various heights.  This particular variety is the Russian Mammoth.  It usually grows to about 10 or 11 feet.  The fence in the background is 6 foot.   So, it is truly massive.  A bee is enjoying the pollen on the sunflower below.  
sunflowers


It is true that sunflowers make a statement.  But, did you know that every part of the sunflower is beneficial?  Sunflowers are actually considered the cash crop.  There are uses for flowers that include the seeds, petals, stalk, leaves and roots.  Here are a few examples:


1.  Seeds – Humans eat the seeds raw, roasted or dried. Therefore, they are a healthy snack and a great source of protein, Vitamins A, B, E and iron.  I love the seeds raw in salads or roasted to snack on.

2.  Birdseed Use – Birdseed mixtures often contain sunflower seeds.  Furthermore, I actually leave the majority of my sunflowers in the garden for the cardinals and finches to enjoy.  You will find black oil sunflower seeds in my bird feeders during the winter.

3.  Petals – Additionally, sunflower petals can be dried and used along with other natural items for summer or fall potpourris.

Mammoth Sunflowers, sunflower variety, how to grow sunflowers


 4. Leaves – Another use is the leaves.  Also, sunflowers leaves can grow quite large and tasty.  Sunflowers leaves are often used to feed livestock or seeped to make tea.

5.  Stalks – Noteworthy, the stalks of sunflowers are strong.  I actually use some of my sunflowers stalks as a trellis for my cucumbers.  Consequently, you can cut the sunflowers off at the base and allow the stalks to dry over the winter. Next season you have a great source of poles to use as a trellis for your veggies.  You can also break them in sections, dry them, and use them in fire pits or wood stoves over the winter.


russian mammoth sunflower


6.  Roots – Next, the roots of a sunflower can grow quite deep and large.  As a result, they are used to make herbal medicine.

7.  Dried Flowers – Last, sunflowers can be dried and used in floral arrangements.  They are quite pretty in fall arrangements or on wreaths.  Some of the best flowers for dried arrangements are those that are just opening.  So, pick sunflowers before are they fully open.  They will continue to open as they dry.

Finally, I hope that you like our uses for sunflowers and you will plant a few in your garden.  It’s a great project to do with kids too.  You may also like:  How Make Bottle Greenhouses    As a matter of fact, this is how I start my sunflower seeds.

Heirloom Tomatoes & Their Characteristics

Today, I’m sharing gardening tips on heirloom tomatoes and characteristics.  First, I have my tomato plants under the grow lights, and hopefully I will be tilling the garden in a few weeks.  I believe the last frost date in Zone 6B is around May 15.  When I think of backyard vegetable gardening, heirloom tomatoes on a BLT is the first thing to come to mind.  They take up much of the space in my backyard vegetable garden. 
heirloom tomatoes


Why?  Because they have a totally different taste from store brought tomatoes and hybrid tomatoes. It’s hard to describe the flavor of a tomato, it must be experienced. I’m a visual person, so I thought you would like to see the end result of what is being planted in my garden.  Additionally, learn a few characteristics of my favorite tomatoes.  Also, I hope this information will help you make a decision on what tomatoes you want to purchase before you buy from your local garden center.

Before you select your tomato plants, decide how you want to use your tomatoes.  Do you want to use them for sandwiches slices, make sauce, paste or salsa.  Or do you want to use them in salads?  Will you canning them?  I love slicing tomatoes in the summer and just eating them with a little mayo and pepper. Yum! I also make salsa, sauce, freeze them and can my harvest, so I need a variety in my garden.


Heirloom Tomatoes and Characteristics:  


1. Brandywine Pink (HeirloomFirst, I like this tomato for its color and taste. How often do you see a pink tomato? The Brandywine Pink has a sweet taste, so I use it on sandwiches and as my go to when I want my sliced tomatoes with mayo. I also cut these in cubes for salads and tacos. I grow the Brandywine Red and Brandywine Yellow as well.

2. Hillybilly (Heirloom) –  Next, the Hillbilly originated in my home state West Virginia. The color is a mix of yellow and red. It is delicious and has a sweet taste. It slices beautifully. I also add it to fresh salsa or salads.

3. Yellow Beefsteak (Hybrid) –  So, I like the size of this tomato. It’s great for slicing.  The tomato is large and it’s great for thick slices.  Also, I add it to salads and salsa. I have a mixture of beefsteak seeds, so I don’t know if I’m going to get red, yellow, orange or green. It’s always nice to see what the end result is in the garden.

4. Brandywine Yellow (Heirloom) –  This tomato has a better taste that the
Brandywine Pink, but it doesn’t produce as many tomatoes and it’s the last tomato plant in the garden to produce fruit. If you find that you like this tomato, you may want to double the amount of plants in your garden and stalk them well. They produce fruit up to 2 pounds each. Very pretty in salads or slices.

5. Cherokee Purple (Heirloom)  – This tomato has beautiful deep burgundy color. The flavor is bold. This tomato is what home gardening is about, and no home kitchen garden is complete without at least one plant.


6.  Amish Paste (Heirloom)This is the tomato that I use for sauce. It’s a plum tomato that is meaty. I also use for salsa. Be warned, this plant grows hardy amounts of fruit that will topple your cage if not heavily stalked.


7. Better Boy (Hybrid) One of the most popular if not the most popular tomato in the garden. This is the slicer of all slicers and great on burgers. Nice medium size tomato that you can’t go wrong planting.


8.  Early Girl (Hybrid)Another kitchen garden favorite.  As result, I plant Early Girl because it produces early and it’s a great slicer.  Early Girl is perfect on burgers as well as my go to for tomatoes and mayo.


9. Paul Robeson (Heirloom) Last, this tomato is called the luxury tomato. It is named for Paul Robeson who was considered elegant, renowned, and charismatic. I think this is my favorite tomato.  I remember the first time I tasted this tomato, I fell in love.  Because the taste is indescribably delicious, it will have a place in my garden if no other makes it way in.
Heirloom tomatoes are not know for their beauty, but their taste.  The crack and have other blemishes, but the taste remains superior.  I hope that you found my list of favorite heirloom tomatoes beneficial.  You may also like:  10 Benefits of Vegetable Gardening.


How To Grow Bigger Tomatoes

Today I’m going to share with you the steps on how to grow bigger tomatoes.  Large, beefy, juicy tomatoes. You know the kind that makes you say, now this is what summer is all about.  Some of my heirloom tomatoes weigh up to 1 – 2 pounds each.  Let’s find out how you can grow them too!
Over the years, I’ve gardened by trial and error. I’ve become successful with growing tomatoes, garlic, onions, beans, peppers, cucumbers, squash, zucchini, cantaloupe, and watermelon over the years.  These items are the staple of my backyard vegetable gardening experience. 
how to grow bigger tomatoes


1.  Healthy Garden Soil –  Growing bigger tomatoes it starts with your soil.  I row garden on a 20 x 40 plot, so I till my garden and I till deeply.  Many gardeners use the lasagna method, turned soil method or raised beds because they don’t require tilling.  I proudly garden as my grandfather did.  Before the garden is tilled,  I recommend having your soil analyzed by your local County Extension Office, Agricultural Center.  They determine what nutrients are needed before planting my garden.  You can also purchase your own kit and analysis the soil yourself.  Different vegetables deplete the soil of nutrients like calcium or iron during the growing season.  Having the soil analyzed will help determine what you need to add to ensure you have a healthy garden.  Also, have the soil analyzed before adding fertilizer.      


Backyard Gardening


2Organic compost – I use organic material to grow bigger tomatoes in my garden.  Many gardeners call it Black Gold I mix the compost into the soil before placing my tomato or peppers in the hole and side dress the plant with a nice helping of the same compost.  If you don’t have organic compost,  use dried crushed eggshells, crushed calcium pills and/or Epsom Salt in the hole before planting along with a dose of manure. The eggshells, calcium pills and Epsom Salt provide calcium to your plants.

gardening


3.  Plant deeply
– Another key to growing bigger tomatoes is to remove the bottom leaves from the tomato plant. Only the top leaves should be exposed as shown above.  You want your plant to have deep roots, so the deeper you plant the better.


Natural Garden Fertilizer


4.  Provide natural fertilizer Coffee grounds are an excellent natural fertilizer for growing tomato and pepper plants. I mix a few tablespoons in with my organic compost, above, and side dress around the entire base of the plant. Coffee grounds attract earthworms.  Earthworms are great for aerating the soil, and keeps away snails and slugs which are detrimental to your plants. If you don’t have organic fertilizer, purchase Miracle Grow tomato fertilizer and spread around the base of your plants.


gardening, tomato gardening


5.  Weed Control – I use straw or leaves as a mulch.  I collect leaves in the fall to keep weeds down and to retain moisture. Keeping the weeds under control is important.  Weeds take energy away from your plant.
backyard garden paths


6.  Companion Plant – I use marigolds between my tomatoes and pepper plants. Marigolds are great for pollination, which your plant needs to produce healthy fruit.
 
backyared vegetable garden tips
7.  Proper Spacing – You will need to reach around your plants for care and harvest.  So, make sure you give each plant adequate space. I create paths between my rows by layering newspaper or flatten cardboard boxes.  There’s a Dollar General near me, and they’re happy to share their boxes.  Once I have the paths made, I cover the newspaper or cardboard boxes with leaves or straw. This also reduces the amount of time that I spend weeding too. The paths should be at least 2 – 3 feet wide.
8.  Water and fertilize regularly – Add 2 teaspoons of Epsom Salt to a gallon of water and give your plants a good drink when you initially plant and regularly thereafter.  Be sure to water at the base of your plant only, you don’t want garden soil splashing on it. You can use a spray bottle to spritz the foliage of your plants with the Epsom Salt mixture too. Also works with peppers.  I found CVS Epsom Salt on sale last season for half price, so I purchased several cartons.  It will make enough spray to last through several growing season.
I hope you find my tips on growing bigger tomatoes helpful. Try them, and you will grow bigger and juicier tomatoes too. Be sure to subscribe to my blog for additional gardening tips and posts and follow me on social media.
 
You may also like:  How To Stake and Cage Tomatoes
                                         Planting and Harvesting Garlic

Heirloom Tomatoes Versus Hybrid Tomatoes

Today, I’m sharing gardening tips on heirloom tomatoes versus hybrid tomatoes.  First, there’s nothing better than home grown tomatoes. Although my preference is  heirloom tomatoes, I also grow hybrid tomatoes.  Are you wondering what the difference is between heirloom tomatoes versus hybrid tomatoes?  Personally, I prefer heirlooms because they have a larger selection, they are more flavorful and are great for seed saving.


Heirloom tomatoes


Since gardening season is around the corner, it’s time to decide what tomatoes you want to grow.  You can grow them them on your patio or in your home garden.  I’ve put together a list of heirloom tomatoes that I’ve grown over the years.  But, do your homework and than choose a few varieties that interest you to grow in your garden.  Some tomatoes are great for slicing, some for salads, some for sauces and some for paste.  What do you want to do with your homegrown tomatoes?  Ask yourself this question before you choose.

Next, here’s a list of my favorite heirloom tomatoes:

  • Paul Robeson
  • Brandywine – Pink and Red
  • Cherokee Purple
  • Paul Robeson
  • German Johnson
  • Beefsteak
  • Black Krim
  • Hillbilly
  • Mortgage Lifter
  • Amish Paste – Meaty and great for sauce and salsa.
  • Boxcar Willie
  • Kellogg’s Breakfast
  • Delicious
  • Homestead
  • Roma
Fortunately, there are hundreds of heirloom tomatoes to choose from.  So, the above list are just a few that you can find in my backyard garden.  I try a new variety each season so my list will continue to grow.


garden tomatoes


My favorite hybrid tomatoes are:

  • Celebrity
  • Early Girl
  • Better Boy
  • Sweet 100 – My favorite in salads.
  • Big Boy


Additionally, the difference between a hybrid and heirloom tomatoes is that hybrids are a cross between two genetically different tomato varieties.  The plant produced next season could be from one or the other parent.  Heirlooms will produce the same result year after year.  As a result, I don’t save hybrid seeds.  I like to know exactly what I will be growing in my backyard vegetable garden.


There are a few disadvantages to growing heirloom tomatoes:

  • They must be heavily staked and/or caged.  The vines are vigorous and will grow wildly if not contained.
  • They are also known to crack easy and they are tender.
  • They are also not the prettiest in shape, but the colors are beautiful.
  • It takes longer to produce fruit.
  • You don’t find them on grocery store shelves.


Last, although there are disadvantages, heirloom tomatoes still win out in my backyard.

You may also like  Growing Heirloom Tomatoes

Grow Your Own: 13 Money Saving Fruits and Vegetables

A must for my backyard vegetable gardening are vegetables that I can preserve for meals and herbs for seasoning sauces and other dishes. Each season I select the top money saving fruits and vegetables that I need to plant in my kitchen gardening. Budgeting and doing things in the most efficient and frugal way is my motto.  Additionally, I also plant a few fruits that I can enjoy in the summer.   They taste so much better when they are in season.  Because I grow my own, I don’t have to purchase from the grocery store.  Which saves me money.

garden tips, gardening, money saving tips


Here’s my top 13 money saving fruits and vegetables:


  1. Tomatoes – I plant and harvest enough to preserve whole or quartered for soup.  I also make sauces for spaghetti and other pasta dishes, chili, and salsa. I also grow cherry tomatoes for salads and snacking.
  2. Peppers – I pickle and freeze them. Great in dishes, on sandwiches and on top of nachos and cheese.
  3. Zucchini – I make fresh muffins and zucchini bread.
  4. Green Beans – I freeze green beans for soup and for other side dishes during the winter.
  5. Onions – A majority of my dishes call for onions, so I preserve these for using during the winter.
  6. Garlic – Fresh garlic is great in salsa and sauces.
  7. Herbs – I dry my herbs for winter use.
  8. Potatoes – Red and Yukon Gold potatoes get plenty of use in my house.
  9. Cucumbers – Great for salads and homemade pickles.
  10. Lettuce – I grow leaf lettuce for sandwiches and salads during the summer.
  11. Strawberries – Great for jam.
  12. Watermelon – I love fresh watermelon on a hot summer day. I grow Sugar Babies.
  13. Cantaloupe –  Great breakfast fruit.


Backyard Garden Tips


So, this is a picture of one my Sugar Baby watermelons from my backyard vegetable garden.  I picked it at the peak of ripeness and chilled it for a few hours.  It was sweet and delicious.  It’s great being able to walk to your garden and pick a watermelon or cantaloupe on a hot summer day.  What does your family eat most from your kitchen garden or containers?  These are the veggies that you should plant. You will save money on your grocery store bill and they will taste much better.
 You may also like:  Kitchen Garden Sowing Schedule                         15 Ways To Save Money

How To Companion Plant In The Vegetable Garden

Companion planting is the pairing of flowers and vegetables or compatible vegetables.  It’s one of the best backyard vegetable gardening tips  I can offer.  It’s a must in my garden, so I wanted to share the flowers I use in the garden and how I pair them with vegetables.  Furthermore, December and January is a good time to start winter sowing vegetable seeds for your kitchen garden.  So, start planning your seed purchases  so you can transplant them in your garden.  March is a good time for indoor seed sowing.


Companion Planting


Next, I purchase the majority of my flowers from the local garden center off the clearance rack. Flowers don’t have to go into your garden immediately, which will allow you time to find bargains on what you want to plant. Just save a spot in your garden for them and start looking for sales around Memorial Day or the clearance racks around early or mid-June. 

Here’s my list:

  • Marigolds (scented)  – The number 1 flower in my kitchen garden. I plant a combination of scented yellow and orange marigolds with my tomatoes and throughout the garden.
  • Petunias – Great with tomatoes, cabbage, cucumbers and beans.
  • Cosmos – Great for attracting bees, which you need for pollination. I usually find a good deal on Cosmos at my local nursery.
  • Sunflowers – These are a must in my garden. I plant them to feed the Gold Finch, but they are also great for pollination. I use them as a trellis for my cucumbers too. The cucumbers will grow up and wrap themselves around the stalk of the sunflowers.  Direct sow your cucumber seeds at the base of your sunflowers when the soil is warm enough. I winter sow my sunflowers.  Also, see my post How To Make Bottle Greenhouses
  •  Sweet Pea – These are climbers and are great to plant with pole beans.
  • White Geraniums –  Great with tomatoes, corn, peppers and cabbage.  They keep Japanese Beetles away, so place them randomly in your garden.
  • Basil –  Although Basil is not considered a flower, it can planted with tomatoes.  I actually plant basil with my tomatoes plants as well as in my herb garden each season.  Using basil in my sauces and in my chili is a part of my recipes, so I must have plenty.  I also freeze it in ice trays. So, it’s a must in my garden.  I can never have enough.


garden companion planting


Likewise,  I also do companion plant with my vegetables, especially tomatoes.  In addition, planting compatible vegetables help ward off insects that can destroy one or the other plant.  Most importantly, make the most of your space and make use of your plant’s ability to help the other grow. Here’s my list:

  • Tomatoes – Plant with basil, carrots, chives, garlic, cucumbers, lettuce, onions, or peas. Do not plant cabbage, kale, collards, cauliflower, broccoli or turnips with your tomatoes.
  • Peppers – Plant with basil, cucumbers or eggplant. (See the Do not plant list above).
  • Squash – Plant with bush beans or peas.  Do not plant with potatoes.
  • Cabbage – Plant with melons, broccoli, Brussel sprouts, spinach, or tomatoes. Do not plant with sage or peppers.
  • Cucumbers – Plant with peppers or sunflowers. Do not plant with potatoes.
  • Bush Beans – Plant with or near cabbage, carrots, cauliflower, corn, cucumbers, potatoes, or strawberries.  Do not plant with garlic, onions or any vegetables in that family.
  • Garlic – Plant with cabbage or tomatoes.  Do not plant with peas or beans.


Last, you can plant your companion plants together or in the same vicinity.  As a result, consider the pairs when you’re planning your garden layout.  Also, if you have questions about this list or other gardening questions please send an email to The Mailbox using rhonda@mother2motherblog.com.

You may also like: Winter Sowing

Kitchen Garden Questions – #1

I’ve had several questions sent to The Mail Box on kitchen gardening and thought you may find the information useful:


Question – I plan to plant Kentucky Wonders this year in a raised bed,
and I don’t know how many to plant for canning purposes. Will one teepee produce
enough beans to can, or do I need to have more? (Check out my post building a bean teepee). 


Response – If you’re going to pressure can your green beans, I would suggest that you
plant bush beans instead of pole beans in your raised bed.  If you plant bush
beans you will be able to harvest enough from the bushes to fill your
canner with 6 – 7 quart jars per load. Planting pole beans gives you a gradual
harvest throughout the planting season. I’m sure you don’t want to spend time
canning 1 or 2 quarts of beans. I use pole beans because I freeze my harvest and
can put them away a quart at a time. 

 
You didn’t mention the size of your raised bed. A 4 x 4 raised bed should
hold about 32 plants if you space the seed about 6 inches apart. You may be able
to plant about 4 inches apart and get a few more plants in the bed. Using
a gallon bucket for your harvest is a good way to determine how many quarts you
will be canning.  Five gallons will yield around 18 quarts. 
 
There is a disadvantage to bush beans, you have to bend over to harvest
them. 

Question – I am tired of procrastinating with this container garden! I am ready to get
started! My plan is to purchase organic, nonGMO seeds from SeedsNow. I’ve been
doing research but I feel like I’m overthinking things and I need to just jump
in and give it a try. I think container gardening is the best start. I’m
concerned about planting a garden in my yard because my hubby uses a lot of
pesticide to control fleas and other pests. I plan to buy the following seeds:
lettuce, spinach, bell peppers, collard greens, and tomatoes. I would appreciate
any advice you can give me. I also have a few questions.
1. Should I use organic potting soil so that my veggies are truly
organic?
2. What should I plant that can grow year round?
3. Can I start planting now?

Response – Glad to hear that you’re ready to jump into container gardening. I think
you’re wise to use containers if pesticides are being used in your yard. They’ll
grow just as big and delicious in a container. Lettuce, spinach, peppers and
tomatoes grow well in containers. I’m not sure about the collard greens, but
give it a try.  I’ve been gardening for years, and I’m not always successful
with everything that I plant. Here’s a few tips: 
 
  • Use deep plastic containers for your tomatoes and peppers, and make sure
    your container is large enough for a stake. Paint buckets from Home Depot or
    Lowes work well for tomatoes and peppers. Remember you will have to drill holes
    in the bottom for drainage and come up with a staking system. If you can find a
    large, plastic flower pot with good drainage that’s even better. 
  • While choosing your tomato seeds, select the Indeterminate tomato variety.  
  • Old wash tubs, basins, flower pots, window boxes, whatever you can locate,
    will be great for lettuce and spinach.  These are cool weather crops, but
    can grown from spring until a hard frost hits in shady areas. If you have a cold
    frame, you can extend your growing season.    
  • Using organic soil in your containers is a good idea.  Do you plan to start
    you seeds inside under grow lights?  If so, I use Miracle Grow Seed Starting
    Mix.  You don’t want to use regular potting soil for this step.
  • Plant according to the zone that you live in. I’m in zone 6B, so I plant
    what will grow in this region and the planting times states for that region.  
Have questions?  Send an email to The Mail Box using rhonda@mother2motherblog.com.  I will respond.  


Vegetable Garden Planting Schedule for Zone 6B

Today, I’m sharing gardening tips on my vegetable garden planting schedule for Zone 6B.  Organization is key when I’m planning my kitchen garden. I have a short growing season, so it’s imperative that I sow my seeds timely.  I want to make sure that I give my plants adequate time to germinate, be transplanted and grow in my containers or garden.  Check out my other backyard vegetable gardening tips before you leave.

You can start sowing your seeds too.  First, I live in Zone 6B.  As a result, I work in my garden from mid-May until October. I can produce quite a few crops in that time period if I stay organized and on track. It also serves as a Check List and keeps me focused on what I will be planting during the season.


garden schedule for zone 6B

I set up my grow lights inside in February or early March.  I sow my tomatoes, peppers, herbs, melons, squash, and zucchini seeds inside.  Indoor sowing gives me a head start on the growing season.  And, starting my plants from seed also saves me money.  As you can imagine, purchasing plants from a garden center can get expensive.  My goal is to grow fresh produce at a bargain price.


Vegetable Garden Planting Schedule: 


vegetable garden sowing schedule


If you are a beginner gardener, check the planting zone for your area. You may be able to sow or plant earlier than my schedule.  So, you may have a longer growing season than I do.  Adjust the schedule according to your zone.

Also, I’m more of a summer gardener than spring.  However, I do plant lettuce which is a cool weather crop.  I’m thinking of sowing my lettuce in containers this season.  We’ll see how that goes.  I’m also going to grow carrot and radishes this season.  (Be sure to check the blog for those posts).  These are cool weather crops, and can be planted in the spring and fall. 


garden schedule for zone 6B


Collard greens will be planted in the fall this year. I like to have fresh collard greens to serve at Thanksgiving and the Christmas holidays.  And I love cauliflower in a cheese sauce.  Yum!

So, seeds should be sown indoors 6 – 8 weeks before the growing season begins.  You don’t want to start them too early because they could become too large before you get them transplanted. Furthermore, your plants could start blooming and you don’t want that to happen either. 

I will also be starting my sunflowers using the winter sowing method in the next few weeks.  You can check out my winter sowing seed starting method.  I hope that you find my vegetable garden planting  schedule beneficial. You can download it here.


How To Make Homemade Tomato Sauce

It’s homemade tomato sauce making time!  Last week-end I made my first batch, and it was delicious.  So, I’m going to tell you how to make homemade tomato sauce that your family will love.  Using tomatoes from my backyard vegetable garden, I canned 7 quarts of the best homemade tomato sauce on the east coast.  My sauce is versatile, I use for pasta dishes and mix some in my chili.  It makes the best addition to a pot of chili on a cold winter day.  
Furthermore, it’s kid approved.  My grandchildren pound on the table for it.  As a matter of fact, my daughter has requested 20 quarts for her household alone.    
how to make homemade tomato sauce
I believe the secret to great sauce is lots of garlic.  Fortunately, I grow my own garlic and fresh herbs.  It’s great being able to go to my backyard vegetable garden and harvest basil, oregano and garlic.  See those white pieces in the sauce below, that’s my home grown garlic.

Here’s my recipe for 7 quarts of homemade tomato sauce:

  • 30 lbs.  of tomatoes (I used a combination of Roma and regular beefsteak)
  • 15 gloves of garlic
  • 1 cup of white onions  (2 medium onions)
  • fresh basil, parsley, and other seasonings to taste
  • 2 cups of sugar
  • 2 small cans of tomato paste to help thicken the sauce


homemade tomato sauce


  • First, remove the skin from the tomatoes. If you have a sauce maker, now is the time to use it.  I don’t have a sauce maker, so I make my sauce like my grandmother. I remove the skin from the tomatoes by blanching them, and immediately placing them in a large bowl of ice water.  Check out my post on How to Blanche Tomatoes.
  • Next, place the skinless tomatoes into a large bowl.  Squeeze the tomatoes into small pieces. Yep, that’s my clean hands in the bowl (below) squeezing those tomatoes into pieces.  You can also use a potato smasher to squeeze the tomatoes.  Most importantly, wear gloves if you’re allergic or feel more uncomfortable sticking your hands into the tomatoes.
  • Breaking the tomatoes into pieces helps the sauce to cook down faster.  Secondly, it keeps the sauce from getting too thick. I like a little movement with my sauce. I can always thicken it later with paste depending on what dish I am preparing.
  • If you have a sauce maker, you can skip these steps.  The sauce maker removes the skin and seeds from the tomatoes.  If you don’t have a sauce maker, you can follow my steps and remove them by hand. In my opinion, they’re really not that noticeable once the sauce cooks down.


  • Place a colander into a large bowl or pan.  Place cups of the sauce mixture into the colander and press the sauce down with a spoon until the seeds and juice run out into the bowl.  The holes in the colander will be large enough for the juice and seeds to pass through.
  • To remove the seeds from the juice you will need a fine wire strainer or sieve. The strainer should allow the juice to run through, but small enough to hold the seeds.  Pour the juice into the strainer to remove the seeds.  Once you get a rhyme going, it doesn’t take long.
  • Now, add the juice back into the tomato meat and repeat until you have the majority of the seeds removed from the juice and meat of the tomatoes. You won’t be able to remove 100% of the seeds, but that’s okay,  The seeds enhance the flavor and you won’t even know they’re in the sauce. That’s why I don’t have a sauce maker, I am the sauce maker as grandma used to say!


  • Your next step, chop the garlic and onion into fine pieces. If you have a chopper use it, it will save you time. (You can also prepare the garlic and onion ahead of time.)  Cover the bottom of the stock pot with Extra Virgin Olive Oil and heat until it’s hot.  Add the garlic and onion, cook until tender, 2 -3 minutes.  Be careful not to burn it, it will ruin your sauce. Stir it constantly.  In my opinion, homemade tomato sauce is about the garlic, onions and fresh herbs. Besides the love that goes into it.  These ingredients are what separates it from the grocery store sauces.
  • Pour in the tomato mixture and bring to a boil.
  •  Once the tomato mixture is boiling point, lower the heat.
  • Next, gradually add in your paste.  I only add 1.5 cans of paste to my sauce with 2 cups of sugar.  You may like the taste of 2 cans and less sugar.  Add your ingredients gradually until you reach desired taste.  Add lots of fresh basil to the mixture.
  • Finally, simmer for 5 hours. Be sure to stir it constantly.  You want to make sure the tomato pieces, garlic and herbs don’t fall to the bottom of the pot and stick. The longer you cook it, the thicker the sauce will become. You will want to taste the sauce throughout the cooking process to determine if you want to add more herbs, sugar or additional paste to thicken it.


Also, you can freeze the sauce or can it.  Because I don’t have room in my freezer I choose to can my sauce. I prepared my jars and can the sauce according the directions included with my canner.  I placed 2 tablespoons of lemon juice and 1 teaspoon of Himalayan pink or canning salt in the bottom of my quart jars.

Next, I hot pack quart jars with the sauce and water bath them for 45 minutes.  Or, you can freeze the sauce in quart size freezer bag.  Allow the jar to sit overnight to ensure the jars seal. Once they are sealed, they are ready for the pantry.

Last, save money by freezing or canning homemade tomato sauce for the winter.


Noteworthy:  The sauce takes time so enjoy a glass of wine or play with the kids while you’re preparing.  It’s worth the work and wait.