Guest Post – Italian Chicken and Zucchini Skillet Recipe


Image-Skillet-Zucchini


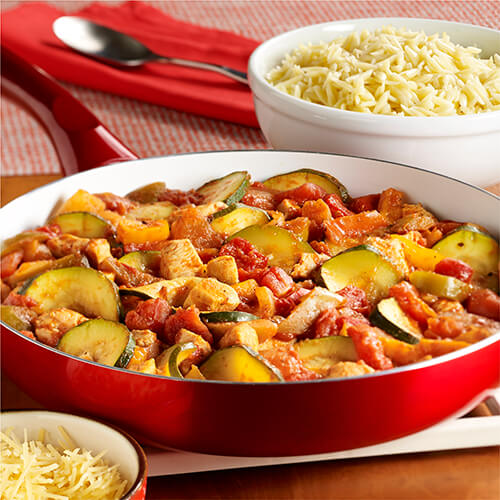
Today I bring you a delicious and healthy skillet recipe that never fails to impress. A little about myself, my name is Madina and I’m writing in partnership with Ready Set Eat. On the weekends, I like to prepare meals that I can quickly heat up during the week. One of my favorite dishes to make is Italian Chicken and Zucchini Skillet, a casserole style dish combining unique flavors of garlic, bell peppers, and tomatoes with zucchini, chicken, and pasta. Topped with extra sprinkles of Parmesan cheese it makes the ultimate comfort meal.

What you’ll need:

  • 1 cup uncooked orzo pasta
  • Organic Canola oil cooking spray
  • 1 pound of cubed boneless chicken breasts
  • 2 medium sized fresh bell peppers cut into strips
  • 1 medium diced fresh onion cut into small pieces
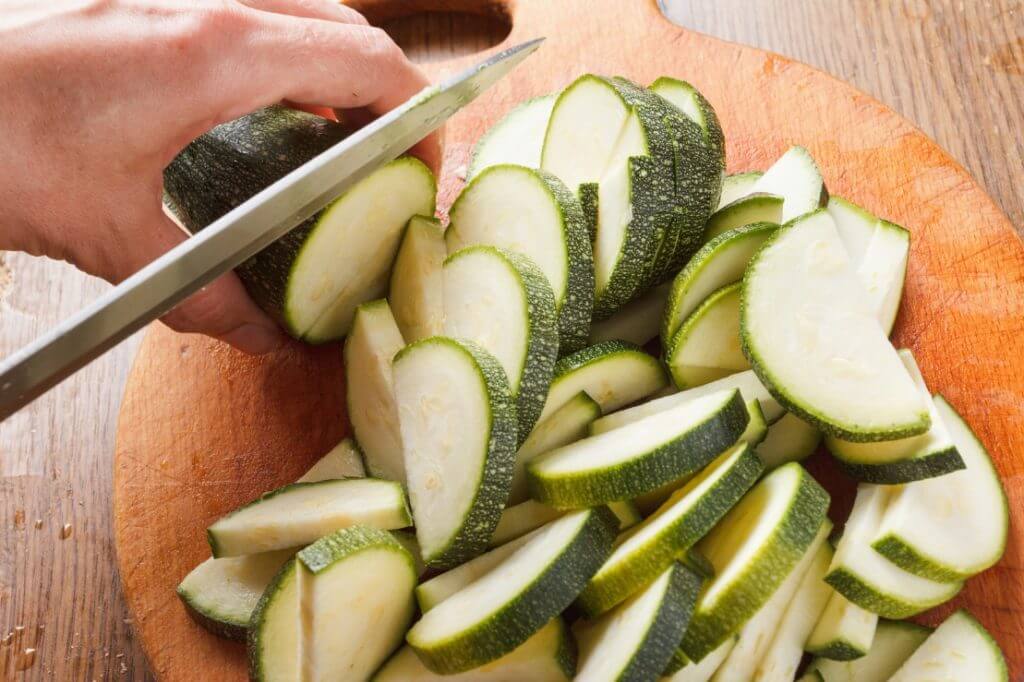
  • 2 medium zucchinis sliced into discs
  • 1 can of Hunt’s® Diced Tomatoes with Basil, Garlic and Oregano, drained
  • 1 can of Hunt’s® Tomato Sauce with Basil, Garlic and Oregano
  • Grated Parmesan cheese


Image-Skillet-Zucchini2

Source: Bravissimos

Directions:

  1. Cook pasta al dente, until it is slightly firm
  2. Spray or coat large skillet with oil
  3. Cook chicken in skillet until it is well cooked
  4. Stir in peppers, onions and zucchinis, tomatoes and sauce
  5. Bring mixture to a boil reducing heat after a few minutes
  6. Mix ingredients regularly until vegetables are soft
  7. Place veggies and chicken over a plate of orzo pasta
  8. Add generous sprinkles of parmesan and allow to melt!
  9. You can recreate this recipe and substitute the orzo pasta with slices of potatoes. Bake the skillet in the oven for around 20 minutes on low heat. You can also replace the vegetables in this recipe with any favorites of your choice.

I hope you enjoy making this easy and healthy Italian Chicken and Zucchini Skillet it saves me a lot of prep and time during the week.

Olde Westport Spice Company

chili recipes, chili


It’s chili and soup season.  Olde Westport Spice Company is a 33-year-old spice manufacturer that is still going strong. This online company operates a small plant in Goodland, Kansas, and knows a thing or two about spices, seasonings and soups. This family owned and operated company was originally founded in the Kansas City area and has stayed true to its mission of making custom spice blends for main meal dishes and appetizers as well as nearly 20 varieties of dry soups. The products are available online at www.oldewestportspice.com; at food-related craft and trade shows throughout the Midwest; and at gift and gourmet food shops. Olde Westport’s spice blends and seasonings include Italian, Cajun, Taco, Fajita, Chili, Jalapeno, Beef Sauce, Salsa, Garlic and many more. All of the products use quality ingredients for a balanced flavor that compliments meats, pastas and vegetables. The company also invented dry soup mixes that are simple and easy to make including Antonio’s Minestrone, Country-Style Creamy Potato, Chipotle Black Bean, Creamy Broccoli and Cheese, Kansas City Steak & Ale, Gold Coast Garlic Pasta Alfredo, Mesa Flats Chicken Enchilada, New Orleans Red Bean & Rice, Southwestern Tortilla, White Chili Soup and more. Olde Westport Spice and Trading Co. is owned and operated by Bill and Judy Petersen, who along with their daughter, Ann Myers, also own and run a restaurant (Westport Grill) in Goodland featuring the products. Bill first custom created all of the spices and seasonings in the kitchen of his home. Today the company has a manufacturing facility where Bill still researches and develops new recipes and dishes for future products.

CHAMPIONSHIP CHILI SPICE BLEND – This championship spice has helped chili creators win 12 state and national championships throughout the years and all over the US! But what is most important to us about our Olde Westport Chili Spice Blend is that our customers love to use it in their chili whether it’s for a national championship cook-off challenge or simply for their own family in their cozy kitchen on a cold winter’s night. We’ve heard from countless customers that our attention to detail and quality is what makes this chili spice blend stand out above the competitors. We know you might put beans in your chili or maybe you add apples and sausage or perhaps you have a special recipe that is top secret but starts with thick-cut bacon… however you concoct your chili we hope you’ll try our chili spice blend.

GOLD COAST GARLIC SHAKE – Gold Coast Garlic Shake spice blend is truly one of those special blends of garlic, herbs and spices that our customers use in sour cream dips, sprinkle over steamed vegetables, fresh vegetables from your garden, garlic mashed potatoes or steak on the grill. There are more than 50 recipes in the Olde Westport Gold Coast Garlic Cookbook that will give you lots of ideas for quick simple meals with that high-end restaurant flavor. A garlic experience you will never forget. Check out the Olde Westport web site for a few recipes and placing orders.

Enter usfamilyguide to get 10% of your purchase. Have you used Olde Westport Spices?  If so, what are your favorites?  If not, check out their selection and leave a comment on what spices you would like to try. 


Brownie Trifle Recipe

brownie trifle reipe

First, are you a dessert person?  Normally I am not.  However, when I entertain I like to have a fabulous dessert on hand.  So, finding a great trifle recipe goes to the top of my list. I’ve come to love trifles.  They’re easy to assemble and look great in Trifle dishes. This dessert ended differently from the way I originally planned.   Normally I use chocolate pudding, but time was not on my side so I skipped it.  Needless to say, I was worried about how it would turn out.  Thankfully, it turned out better than I expected.  As a result, I’m going to by-pass the pudding in this trifle recipe from this point on.

Here’s what you need:

  • 1 Trifle Bowl
  • 2 boxes of fudge style brownie mix
  • 2 containers of Cool Whip
  • Sliced Strawberries
Next, bake the brownies according to directions on the box.  However, you will need to allow them to cool completely.  I usually bake them the night before I assemble the trifle.  After the brownies have cooled, cut them into bite size squares. Layering is key to this dish. Place a layer of brownies on the bottom of the dish. Add a tablespoon of Cool Whip to the center of the brownies. Repeat this process.  Carefully spread the Cool Whip toward the edges.
Be careful with this step.  Most importantly, if the cool whip splashes against the sides of the dish it will affect the presentation.  Add more Cool Whip and spread toward the edges. Be generous with the Cool Whip. You want guest to have plenty with the brownies and strawberries.  Add sliced strawberries around the sides of the entire dish.
Add another layer of brownies, another layer of Cool Whip and strawberries. Top the dish off with Cool Whip and fresh strawberries as shown.
Last, this dish was devoured. I even had one guest say “you can keep the food, just pass me that dessert.” Make this Brownie Trifle your go to dessert. I promise, you won’t regret making this trifle recipe.  Finally, do you have a favorite dessert that you like to serve when entertaining or take to an office party?


Christmas White Trash Recipe

Today I’m sharing my Christmas White Trash recipe.  It’s one of  the items that I place in my Christmas Gift Baskets or give as tokens of appreciation for attending my holiday gatherings.  It’s also a great snack for those Hallmark Movies or curling up in front of fireplace during a winter storm. 
I’ve been making this recipe for years, and I love munching on it during the holidays. I’ve seen several different names for it, White Trash or Christmas Crunch. Whatever you decide to call it just make it. It’s a great mixture of salty and sweet, it’s so easy to make and delicious to eat.  

 White Trash Recipe


What you will need to make this recipe:

  • 9 cups of unsweetened cereal (I use Rice Chex and Cheerios)
  • 3 cups of salted party nuts (I use peanuts with sea salt)
  • 2 – 2 1/2 cups of stick pretzels
  • 1 – 2 cups of Christmas M&Ms (Optional)
  • 2-12 oz. bags of White Chocolate  (I use about 1/4 of a bag more when I add the M&Ms)
  • Wax or Parchment Paper


White Trash Recipe

Mix dry ingredients in a large mixing bowl.  Next, melt chocolate slowly in the microwave.  First, start the melting process for 1 minute and than 50 second increments until it’s melted.  Stir the chocolate thoroughly after each 50 second increment.

I do not recommend using a plastic container to melt your chocolate. From my experience, it won’t sustain the heat and the chocolate tends to scorch in them.  I recommend using Corning Ware Bowls for the job.  However, if you don’t have Corning Ware make sure that your bowl is microwavable and it will sustain the heat.


This step is important, use small bowls to mix the dry ingredients and chocolate together. I’ve found that the smaller ingredients (Cheerios and peanuts) tend to fall to the bottom of the bowl.  Mixing in smaller batches allows you to control the ingredients and ensures a more even coverage of chocolate.


Christmas White Trash


Once your ingredients have been covered with the white chocolate, spread it on the wax or parchment paper to dry and set.  I allow mine to set for at least an hour.  Once it is set, break into pieces and place in a festive bowl or airtight container.  Finally, if you are making the Christmas White Trash recipe as a gift, place it in a plastic or cellophane bag and tie with a pretty ribbon.   Also, if you’re having a holiday gathering or office party, place this mix in a festive bowl.  Sit back and enjoy your family and co-workers devouring this festive treat.  

You may also like:  11 Ways to Recycle Christmas Cards.  Be sure to check out the holiday movie lineup on Hallmark.  You’ll want to have this snack on hand.


Salmon Cake Recipe

I’m on my second challenge for the September Sapphire Even Day Blog Challenge hosted by Kimberly at Being A Wordsmith.  The goal is to post on the challenge for the even day listed throughout the month of September.  I’m accepted the challenge from Kimberly, us Sapphire girls must stick together.  Saturday’s challenge was to Share some of your favorite recipes, DIY projects or lifestyle tips.  I know I’m a little late, but my birthday was yesterday and I decided not to blog.  


I love Salmon Cakes, especially when I have fresh parsley in the garden, so I decided to share my recipe. They are delicious!  I served Salmon Cakes at a dinner party a while ago and they got rave reviews.  I made them again today.  Here’s the recipe:


  • 1 can of Pink Salmon  (It’s the only Salmon I use)
  • 2 tablespoons of butter
  • 1 chopped medium white onion
  • 2/3 cup of cracker crumbs  (I use Ritz Vegetable)
  • 2 eggs beaten
  • 1/4 cup of chopped fresh parsley
  • cooking oil 
  • Old Bay Seasoning

Drain the salmon.  Flake the meat in a medium size bowl.  Melt the butter in a large skillet over low heat so it doesn’t scorch.  Add the onions and cook until tender.  


In a medium size bowl, add the onions, cracker crumbs, eggs, parsley and flaked salmon.  Mix well (I use my hands) and shape into patties.    


Over medium heat, heat oil.  Sprinkle patties with a little Old Bay on both sides.  Cook patties in oil until brown. Turn the patties over and brown the other side.  Yummy!  If you’re a salmon lover, you won’t be disappointed.  


Homemade Salsa Canning Recipe

I decided to make a batch of salsa for the winter.  It was so delicious.  So, today I’m sharing my Homemade Salsa Canning Recipe with you.  This recipe can be eaten fresh or canned for later use.  I thought it would be a great dish during the holidays while watching movies or entertaining. Canning salsa is a big part of my  backyard vegetable gardening  projects.  


gardening, canning, salsa recipes, fresh garden recipes


I used ingredients from my garden to make this batch of salsa, but you find the same ingredients at your local grocery store or Farmer’s Market.  Farmer’s Markets in warmer climates are usually open during the holiday season and still have fresh produce.  So, take advantage of the fresh produce if you’re lucky enough to have a farmer’s market near you.

Here’s what you need:

  • 5  – 6 lbs. tomatoes skinned and chopped  (I used whatever variety I had that was ripe.  I suggest allowing them to drain in a colander after chopping to get rid of some of the water).  Roma and Amish Paste are great tomatoes to use for canning salsa.  Check out my post on How to Blanch Tomatoes.  
  • 3 cups chopped onion (I used yellow, red and white from my garden)
  • 1 1/4 cup chopped peppers (You can use a combination of Belle Peppers. I like my salsa spicy so I used a combination of chili, jalapeno, and belle)
  • 1 cup chopped cilantro
  • 2 heaping tablespoons garlic
  • 1 cup white vinegar
  • 1 tablespoon Kosher salt


  • Combine all ingredients in a large pot and bring to a boil.
  • Reduce the heat and simmer for about 10 minutes.  I like mine chunky. If you don’t like yours chunky, cook it longer.
  • Water batch for 15 minutes if you have a  canner. This recipes makes about 8 pints of salsa.  It can be served fresh, and it’s just as delicious too.  I couldn’t resist eating the salsa while I was trying to get it into the jars.  So, I only managed 7 pints.


Finally, grow your own tomatoes, peppers and onions next season.  You can use paint buckets or tubs on your patio, balcony or deck.  Either is a great way to garden if your space is limited.  Buckets and tubs are great ways to grow tomatoes and peppers during the summer.  I will doing a post on how you can start your seeds inside to give you a head start on the growing season.  I hope you enjoyed my salsa canning recipe, and you will be putting up a few pints for the winter.

You may also like: How to Pickle Peppers and Heirloom Versus Hybrid Tomatoes


Sausage and Stuffing Recipe

Skillet Sausage and Stuffing

Preparation/Cook Time: 35
Serves: 4
A mixture of sweet and hot Italian pork sausage, onion, green pepper and Pepperidge Farm® Herb Seasoned Stuffing are cooked together to make a savory skillet dish.
Ingredients
  • You will need 1 lb. sweet Italian pork sausage, cut into 1″ pieces and 1 lb. hot Italian pork sausage, cut into 1″ pieces
  • 1 1/4 cups water
  • 1 medium onion, cut into wedges
  • 1 small green pepper, cut into 2″ strips or small red pepper, cut into 2″ strips
  • 4 cups Pepperidge Farm® Herb Seasoned Stuffing
Directions:
COOK sausage in skillet until browned. Pour off fat, add water, onion and peppers. Heat to a boil. Cover and cook over low heat 5 min. or until sausage is done.  Add stuffing and mix lightly. Cover and let stand 5 min.
TIP: If you like moister stuffing, increase the water to 1 1/2 cups.
*This recipe is from the Pepperidge Farm site.