How To Shuck Corn In Your Microwave

I spent the day making tomato sauce and preparing fresh corn for the freezer.  Did you know that the easiest way to remove the silk and husk from corn on the cob is by microwave.  One of my backyard vegetable gardening tips is how to shuck corn in your microwave
I like to multi-task, so while I’m water bathing my tomato sauce I shuck corn in microwave.   The method is heaven sent.  If you have dozen of ears to prepare for your freezer, the microwave is the way to go.  It’s also a great way to prepare it for dinner when you’re short on time too.  
how to shuck corn
I spent the day making tomato sauce and preparing fresh corn for the freezer.  I decided to use the microwave to shuck corn, remove the silk and husk, while I prepared the sauce for the water bath canner.  This method is heaven sent and I wanted to share it with you.  It’s great way to prepare it for dinner when you’re short on time too or when you’re trying to juggle canning activities at the same time.
microwave corn husking
During the summer, I usually husk and prepare at least 4 dozen ears for the freezer.   I love using fresh corn in chowder, mixing it with my fresh green beans, or in soup in the winter.  So, I pack it in quart size bags, which is just the right serving size for my dishes.
Here’s how to shuck corn in your microwave:
 
Step 1 – Place 5 – 6 ears of corn in your microwave, depending on size you may be able to only fit 4 – 5.  I had 6 ears here, but I had to remove 1.  The ears were pretty large.
 
Step 2 – Heat the ears on high for 4 – 5 minutes.  If you’re going to eat it immediately, the rule is 4 minutes for each ear.  So, it would be 16 – 20 minutes total.  When I’m preserving, I use 4 minutes for the entire batch so I don’t over cook the corn.
how to shuck corn


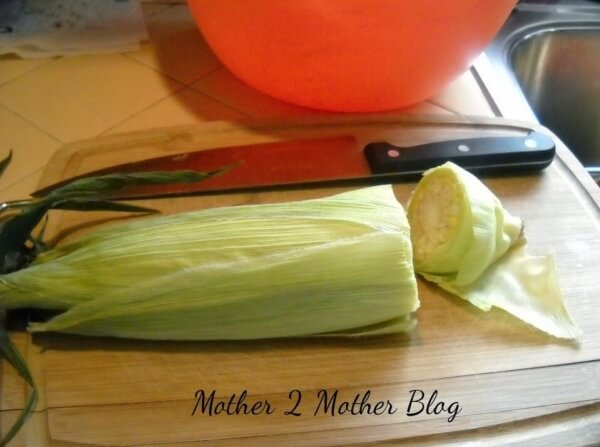
Step 3 – Remove the ears from the microwave carefully.  They will be hot.  Cut the stalk end about 2 inches from the end of the corn with a chef’s knife or whatever large, sharp knife you have on hand.  You’ll lose a few rolls of corn, but it’s a time saver.


How to shuck corn


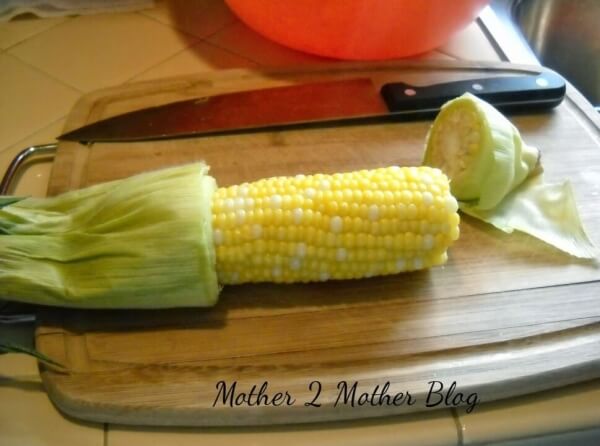
Step 4 – Squeeze the corn through the husk from the top, silk end.  The corn should slide out of the husk virtually silk free.


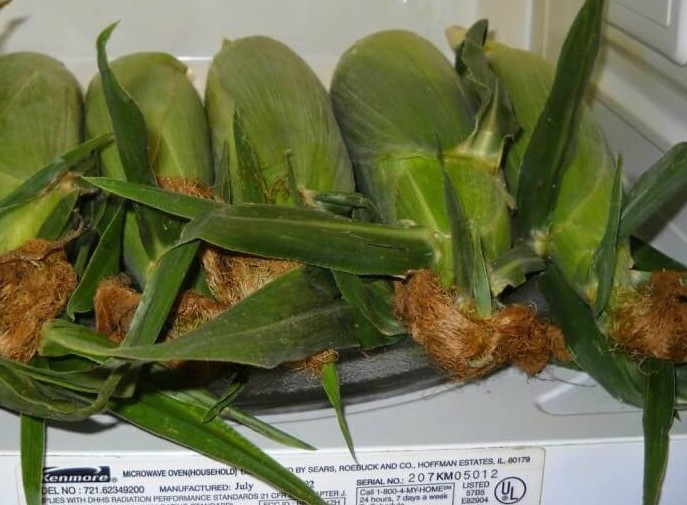
It’s the easy way to shuck corn.  I packaged 4 quarts today and will probably put up another 4 quarts later in the week.   Try purchasing fresh corn from a local farmer, it is good.  I had to stop myself from eating it so I could have enough for the freezer.  Fried corn with a little butter and red peppers is yummy!  It’s kid approved, my grandchildren love it.

If you’re a preserver or need to better utilize your time preparing dinner, this is the way to go. You may also like How To Freeze Corn.  What’s your favorite dish using corn?


Growing Cantaloupe in Your Kitchen Garden

My second favorite item on my backyard vegetable gardening list is home grown cantaloupes. My garden is winding down and I’m feeling a little sad.  So, I sooth myself when I’m closing the garden for the year by planning my garden for the next season.  I spend months deciding what I want to plant and that usually cheers me up. Yesterday, I pulled my last squash and cantaloupes. I have tons of tomatoes and green beans left.  So, I will preserve and freeze those next week-end.  I see tons of tomato sauce and salsa on the horizon.  Tomato sauce and salsa are great ways to use in the garlic, basil and oregano in the garden too.  


how to grow cantaloupes


These are Hale’s Best Cantaloupes below, which is an Heirloom seed.  Let me tell you they are delicious.  I’ll be having fresh cantaloupes for the next few days, and I can’t wait.  I started the cantaloupe plants under grow lights in mid-March and moved them into my garden in June.  If you’re wondering how to grow cantaloupes in your kitchen garden, I have the answer:

  • You can direct sow the seeds in the garden when the soil warms up.  Follow the instructions on the seed packet.
  • You can winter sow your seeds in bottle green houses.
  • Start your seed under grow lights.
  • Purchase plants from a nursery or garden.


I mulched around the plants with straw and left about 6 feet of space for them to spread. I harvested eight cantaloupe from 2 plants. Not bad for a pack of $1.00 seeds.  I’ll be saving seed from these melons to plant next year and the year after that.  Hales Best Cantaloupes are the sweetest and most delicious on the market.


I’m a frugal gardener.  I put my garden in for pennies by purchasing Heirloom seeds and than saving the seeds from year to year.  Purchasing plants from garden centers can get expensive.  Especially,  if your goal is to garden on a budget.  I choose what I want to splurge on, and groceries is not one of those things. If you plan to save seed from your garden, make sure you don’t purchase or use Hybrid seeds or plants.  You want the same characteristics of the parent plant versus inbreeding/cross breeding.  So, heirlooms are the way to go.


I planted Belle peppers, which performed nicely too.  After picking them off the plants, I usually chop and freeze my peppers if I don’t have a dish that requires them planned.  I like to get them into freezer bags as soon as I pick them off the vines. The sooner you lock in the freshness the better. Did you know that orange, red, and yellow peppers are green before they turn into these beautiful colors?  I love stuffing the colorful peppers.  They make a nice statement on the table.

So, if you want these colorful peppers, you have patience.  It takes a while for them to transition from green to the red, yellow or orange stage. Additionally, there are also male and female peppers.  Finally, check out how to determine and use male and female peppers here.


10 Reasons I Preserve My Garden Vegetables

Backyard vegetable gardening is hard work, but oh so worth it.  Today, I’m going to talk about preserving garden vegetables.  There’s nothing like fresh fruits and vegetables  that have been preserved for winter use. There’s nothing better than pulling out fresh tomatoes in the winter to make sauce and salsa.  
I add preserved tomatoes to my homemade vegetable soup in the winter.  The taste is amazing.  There’s nothing better than a bowl of homemade soup during a blizzard.  Not only do I preserve tomatoes, I preserve belle peppers, chili peppers, green beans, corn, and herbs.  Did I mention that I also grow my own garlic for my tomato sauce.  I preserve anywhere from 20 – 25 quarts of sauce each season.  My homemade tomato sauce is kid approved.  My grandchildren love it, so I share with my daughter and siblings.  

preserving garden vegetables


I just chopped 2 quarts of belle peppers for my freezer.  If you’re wondering if you can freeze belle peppers without blanching, the answer is yes.    Here’s how:

  • Wash peppers thoroughly and dry.
  • Remove the core and seeds.
  • Place peppers in a quart freezer bag. Be sure to remove the air from the bag.  To keep the peppers from freezer burn, double bag the peppers.
  • Write the date on the bag with a permanent marker.

I love using fresh belle peppers in my dishes.  The best way to preserve vegetables and fruits is to freeze them. I just place the peppers on a cookie sheet.  Place the sheet in the freezer so the pieces can freeze before placing them in the freezer bag.  However, you can just place them in a freezer bag as shown.  Just give them a good whack with a kitchen mallet to break them apart when I needed.


Backyard Vegetable Gardening


To prevent freezer burn, put the peppers in a quart size bag.  Than place the quart size bag in a gallon size freezer bag.  Make sure you get all of the air out of the bags.  Most importantly, make sure your peppers are cool and dry before you freeze them.

Gardening gives me a sense of fulfillment and preserving garden vegetables puts the icing on the cake. Being able to serve organic, fresh veggies and fruits to my family is a blessing.  Here’s why preserving garden vegetables is at the top of my list:


  1. Fresh vegetables and fruits are more flavorful than grocery store purchases.
  2. I use fresh tomatoes in chili, pasta sauce and salsa during the winter.
  3. Fresh peppers are available for omelets, meatloaves, spaghetti sauces and casseroles etc.
  4. I have fresh garlic available for spaghetti sauce and other dishes.
  5. Fresh apples and peaches available for warm cobblers during the winter.
  6. I grow organic fruits and vegetables.  The less chemicals used the better.
  7. I save hundreds of dollars on my grocery bill.
  8. My family raves about my dishes. It’s the herbs and other fresh vegetables and fruits, but don’t tell them it’s a secret.
  9. Fresh vegetables and tomatoes make the best soups on those cold winter days.
  10. Nothing like fresh herbs to toss in dishes during the winter.

Finally, preserve garden vegetables and fruits too. Planting a tomato plant on your deck or patio, and you will be able to freeze them for winter use.  Not interested in vegetables, how fruits or sunflowers.  So, preserve garden vegetables and fruits for a welcome winter treat.

You may also like:  Johnny’s Seeds.


How To Blanch Tomatoes Before Freezing

Are you wondering how to blanch tomatoes?  Today, I’m sharing gardening tips how you can blanch tomatoes in just a few easy steps. I love harvesting my garden and canning/freezing tomatoes for chili and soup in the winter  Most of the tomatoes that I grow are Heirlooms.  They’re not the best looking tomatoes, but they have a great variety and the best taste.

So, Heirloom tomatoes are at the top of backyard vegetable gardening planning.   My favorites tomatoes are Cherokee Purple and Paul Robeson.  I can’t get enough.  I love slicing them and spreading a little mayo over them with a little pepper or on a BLT.  It just doesn’t get any better than a fresh tomato from a backyard garden.


blanching tomatoes


When I harvest enough tomatoes, I get out the blanching basket and my Ball Canner. The tomatoes taste as good during the winter as they do when I pick them from the vine.  I freeze some of the tomatoes, but can the majority of them.


blanching tomatoes


Here’s a few tips on how to blanch tomatoes:  


Purchase a steamer basket for blanching tomatoes in your stockpot.  I also use it to blanch green beans and corn before freezing.  Blanching tomatoes is easy and a necessary step to remove the skin before freezing or canning.  It locks in the flavor and here’s the steps:

1.  Choose tomatoes that are not bruised or cracked.  If you don’t have a backyard garden, visit your local farmer’s market.

2.  Next, fill your stockpot half-way and bring the water to a roaring boil.  Do not fill completely, immersing the basket will cause the water to rise.

3.  Fill a large bowl with ice water.  This step is important, ice water will stop the tomatoes from cooking and cool them down enough to remove the skin.

4.  While you’re waiting for the water to boil, remove any stems and make an x on the bottom of each tomato.  Making an x on the bottom of the tomato helps loosen the skin during the cooking process.  (This step is optional.  I have blanched tomatoes without the x).

5.  Once your water is boiling, place the basket inside the stockpot for approximately 30 seconds – 1 minute. Do not cook your tomatoes longer than the 1 minute time frame.  Some of the skins on the tomatoes may start slipping off the tomatoes during the boiling process and that’s fine.  You’re going to remove the skin from the tomatoes, this is the goal.

6.  Remember, remove the basket from the stockpot after 1 minute and emerge the tomatoes into the ice water with a slotted spoon for about 5 minutes.  You can see the skin slipping off a few of the tomatoes in the picture below. You can also see that I did not remove the stem from a few tomatoes.  No harm was done.


How to Ice Blanched Tomatoes


7.  Remove the skin from the tomatoes, the skin should easily slip off the tomatoes.  I compost the skin and stems from the tomatoes.

8. At this stage I can my tomatoes.  However, you can freeze them too.  I recommend slicing large tomatoes before placing them in quart or gallon freezer bags.  Smaller tomatoes can be left whole.  If you have a sealer, now is the perfect time to bring it out.  I like to use quart bags for freezer storage.  It’s a sufficient amount for most of my dishes.

9. Write the date on the freezer bag with a permanent marker and freeze until ready to use.

10.  If your bags are sealed properly, your tomatoes should not sustain freezer burn and should be good to use through out the winter.


In the picture above, you can see the pan I use to sterilize my quart jars, lids and tops.  I also have a stockpot that I use to blanch the tomatoes and my Ball Canner.  It is made specifically for glass top stoves, and works like a charm. I’ve been using it for years to can my tomatoes, tomato sauce, salsa, pickled jalapeno peppers and more.

So, stay tuned for my canning session.  I usually put up 15 – 20 quart jars of tomatoes each season.  I use the canned jars of tomatoes in my chili, soup, salsa and other recipes.  What are you harvesting from your garden?


Leaning Tower Of Pole Beans

green bean trellis support, how to support a green bean trellis

I stepped onto my deck to take a look at the garden and thought my eyes were deceiving me.  Was the pole bean teepee trellis was leaning?  Shielding my eyes, I squinted to get a better view.  I was still unsure, so I headed toward the garden.  I found the leaning tower of pole beans.  The weight of the vines was pushing the teepee trellis forward. It looked as if it could tumble anytime.  


I had to find a quick remedy, oh what to do.  I noticed the extra t-posts leaning on the wood fencing and ran to grab one and stuck it in the ground inside the teepee.  Now how do I tie this baby to the t-post.  I notice a lone tie on the gate of the garden and ran to grab it.  My strategy pays off, I leave a few ties scattered around the garden just in case I have to tie up a plant.  I pushed the teepee back praying that it wouldn’t fall apart and tied the t-post to the back of the teepee.  


It is saved, and now stands erect.  Thankfully, it looks just like it did when I imaged it being covered with the vines and beans exploding on the plants.   

The weather in my area has been quite cool for July.  If we don’t get hotter weather soon my garden may end up being a display of greenery with no produce.  We are barely getting into the 80’s here in zone 6B.  I have tons of tomatoes, but they’re not very big and ripening slowly.  I have only harvested 1 tomato, 1 cucumber, a few squash and that has been the extent of it.  

This time of year, I’m praying for somebody, anybody to take zucchini off my hands. I have tons of cukes for pickles and salads, but not this year.  I’m now praying for 100 degree days in August so I can produce tons of fresh veggies.  

Check out this post on how to build the pole bean teepee, and be sure to incorporate this remedy into your set-up before the vines add weigh.  

Sunflowers and Finches In The Garden

I love sunflowers.  They make me happy, look at their beauty faces.   They dance in the garden and add brilliant color among the greenery.  This is my fifth year growing sunflowers, and I’m in love.  The first year, I didn’t have one seed germinate.  However, I changed my method of germinating  them, and bam!  The key is to use bottle greenhouses to germinate sunflower seeds.  Once the weather is good I transfer them to the garden.  So, today let’s discuss how to attract the American Gold Finch.  I have had great success using this method.  Check out my other sunflower gardening tips before you leave. 

sunflowers


Below are some of my favorite sunflowers varieties.  I make sure they have a place in my backyard garden every year.  The Gold Finches love my sunflowers as much as I do.  They bring beauty to my backyard.  I love sitting on my deck watching the Goldfinch feast on the sunflower seeds.  Unfortunately, the lens on my camera doesn’t capture the beauties in the garden.  I guess I shouldn’t blame the lens, I need to learn how to use my camera!


Autumn Beauty


These are Autumn Beauties.  I love their brownish yellow color.  It reminds me of fall, my favorite time of year.  I stagger my sunflower seedlings when planting them in the garden to ensure I have sunflowers for fall.  The Autumn Beauty is beautiful in fall centerpieces.


Gardening tips

          Mammoth


This variety is the Russian Mammoth.  It grows anywhere from 10 – 12+ feet tall.  The fence behind it is 6 feet.  As a result, it towers above the smaller varieties making a grand display in my backyard garden.


lemon queen sunflowers


        Lemon Queen


So, my favorite sunflower is the Lemon Queen.  It’s much smaller compared to the Mammoth.  It only grows to about 5 feet.  I plant the Mammoth between the Lemon Queen and Autumn Beauties so there can be some depth in the garden.


In a few weeks, the centers will be filled with sunflower seeds and the American Gold Finch will have a new feeder.  Right now they are enjoying the Nyjer Seed in the sock and tube feeder.


American Gold Finch


Furthermore, when the sunflowers mature, the finches will eat every seed on the stalks if I don’t remove the heads. Because they are so beautiful the majority of the time I just let them eat until their heart is content.  Take a close look at the pictures, because there’s 2 males and a female in this picture.  The female is the dull colored finch at the top.  However, the males turns the same dull color as the female in the fall/winter.  They “color up” in the spring and summer to the brilliant color shown.


Also, this feeding station is outside my bedroom window.  I have a Nyjer Thistle feeder and a seed sock at the feeding station.  The finches will come to both.  As a result, I hang both of the feeders.  Some days I may have 10 or 12 American Goldfinch feasting on the Nyjer Thistle.  So, the finches head to the seed sock first for some reason.  They will feed from the tube feeder, which is my preference for them.  Simply because of their aerobatic moves on the perches.

Finally, next year I hope to add additional varieties of sunflowers to the garden.  Do you grow sunflowers? What variety do you grow?  Grab a few packs of sunflower seeds, and use my bottle greenhouse method to germinate them for your garden.  Also, purchase the thistle and feeders.  You’ll be enjoying these beauties in your backyard too.

Guide to Companion Planting Book Review

I am now a book reviewer for Crown Publishing, a subsidiary, of Random House.  I will be reviewing various books published by their company.  I jumped at the opportunity to become a member, I love to read and I also love to have reference books around if I need to refresh my memory on a particular subject. As you know, I’m a home gardener.  I received a copy of The Mix & Match Guide to Companion Planting by Josie Jeffery to review.  This book was heaven sent, as I companion plant my kitchen garden.  


I was impressed with the book when I opened the package. The cover and binding of the book are beautiful.  It would be easy to wipe off dirt or accidental spills and the illustrations as you see are just lovely.  It’s a hardcover book with a strong binding.  You won’t have to worry about this book falling apart, it is quality.  


The book is very detailed, but not to a point where you would loose interest in the details.  For example, it gives the history of companion planting and how it is used around the world.  It provides information on soil preparation, manure, composting, and setting up rain barrels to help water your garden.  This is information that you truly need to know if you want to become a sustainable gardener and do it efficiently and at minimal cost.  I have been composting for years, added manure, have devised a method to keep weeds down, but have yet to add a rain barrel.  I hope to add a barrel this summer for next year’s use.  


Lets move to the content. I love how the book is designed.  The book is set up with 2 cards, for a lack of a better word.  One card has the name of the vegetable/flower along with information on when to plant, where it should be planted, growing tips and when to harvest.  Opposite the first card is the second card which shows a beautiful picture of the plant.  The content is set up with three sections, which is great if you want to hold your place to make notes on a particular plant, but still want to browse another section or find a particular plant in another section.  


In the back of the book is a place to make notes.  I think the books to beautiful to write in, so I would make notes elsewhere.  It also contain an index in the back of the book, which will help you find a particular page for the plant you wish to research.  


I have this book a thumbs up and 5 stars.  It’s actually one of the most beautiful and informative gardening books that I have come across, and it’s an easy read. The book retails for $17.99 in the states and $20.99 in Canada. I would encourage you to purchase a copy, especially if you’re a beginner gardener.  It’s a great reference for the advance gardener as well.  I’m grateful that I now own a copy.  


Note:  I received a copy of this book from Blogging for Books for this review.  


How To Pickle Peppers From Your Backyard Garden

 Today I’ll be showing you How to Pickle Peppers.   Do you like hot peppers on your sandwiches, nachos, in beans, salads, or dips? They’ll be as fresh months from now as they are today if you pickle them.   My daughter loves them straight from the jar.  She actually asked if I would mail her a few jars through the mail.  I declined that request, but I do take  jars when I visit her.  My daughter’s sister-in-law is a fan too.  So pickling peppers is one of my top backyard vegetable gardening tasks.  


Pickled Peppers


This batch is a combination of:

  •  Hungarian Wax
  •  Sweet Banana
  •  Chilies
  •  Jalapeno
  •  White Belle


However, any combination will work.  So, I throw whatever peppers are ripe in the garden into the bowl.  Some people prefer to use jalapeno peppers only, but I like to broaden my horizons.  I make a homemade pickling broth to cover my peppers.  You will need to prepare your canner for this recipe.  


Here’s the broth recipe for the pickled peppers:  

You may have to double the recipe depending on how many jars you will be canning:

  • 1 cup water
  • 4 cups of white vinegar
  • 1/2 cup of Kosher salt


Here’s the steps to canning the pickled peppers:

  • Bring the broth to a boil.
  • Add a teaspoon of pickling spice to the bottom of 1/2 pint sterilized jars.
  • Pack the jars with peppers and pour the pickling broth over the peppers.
  • Prepare them for a hot water bath by removing the bubbles with a plastic knife.
  • Take the knife around the jar a few times and ensure the peppers are packed tightly.  Wipe the rims of each jar with a clean cloth.  Place the sterilized lids and rims on each jar.
  • Water bath for 15 minutes.  They are delicious.


*Note – Do not use blemished peppers when canning your produce.  Make sure all of the peppers are blemish free and solid.  I hope you enjoyed the post on How to Pickle Peppers.


5 Health Reasons To Garden

Summer is around the corner and I’m looking forward to having fresh and chemical free vegetables.  Backyard Vegetable Gardening has become a part of my soul.  My grandfather was a gardener, and I guess it seeped into my heart when I visited his farmette during the summer.  There are many reasons to garden, but the health benefits alone are a good enough reason to at least have a small garden.


Backyard Gardening


I’ve been backyard gardening for several years and wanted to share the health benefits of having a kitchen garden:

1. High In Antioxidants

Garden herbs help reduce heart attacks.  Additionally, they are high in antioxidants according to Fitness Magazine. Oregano, basil, rosemary and parsley are a few of the herbs that you will find in my backyard kitchen garden.  I love using oregano and basil in my sauces, parsley on potatoes and rosemary on chicken and in stuffing dishes.

2. Exercise

Having a backyard kitchen garden provides an opportunity to get moderate exercise.  It required you to use your arms to rake and hoe, bend and stoop to plant vegetables, herbs and flowers.  Furthermore, you stretch and use muscles that you haven’t used for some time.  Personally, the first few days in my backyard garden leaves my muscles sore and helps for me get a good night’s sleep.

3.  Boosts Vitamin D

Sunshine is the best way to boost Vitamin D intake.  I could be in my garden for an hour or two several days a week.  So, I wear a sunhat and plenty of sunscreen while gardening.  Bug spray helps too.

4.  Reduces Stress

Gardening reduces the Cortisol level, which is produced when you’re feeling stressed.   Pulling weeds and nurturing your backyard garden plants can be therapeutic.  It provides an opportunity to clean your head, think about life and make future plans.


Backyard Gardening


5.  Better Nutrition

Home grown vegetables, herbs and fruits provide better nutrition and are more flavorful than most store produce.  Most importantly, my backyard garden is organic.  No harmful chemicals are used in our around my garden.


So, home grown herbs and vegetables have become an important staple in my home.  Additionally, I look forward to picking fresh lettuce, tomatoes and herbs for my dishes  And, preserving them for use during the winter.  The flavor versus what is purchased in a grocery store is beyond comparison.  I enjoy walking into my garden and retrieving peppers and tomatoes straight from the vine when I’m cooking. The fresh herbs provide a wonderful enhancement to sauces, stuffing and salads.  Fresh cucumbers straight from the vine, basil and spring water makes a refreshing drink on hot summer days.

Start planting and reap these health benefits as well as a new found flavor and perspective on fruits and vegetables.  Start with container gardening.  Plant a few herbs and tomatoes in containers, and than start planning for next year’s raised bed or roll gardens.

You may also like:

Gardening With Children

Using Eggshells In The Garden


Using the Winter Sowing Method for Seeds

Today, I’m going to share gardening tips on winter sowing vegetable seeds.   Check out my other backyard vegetable gardening tips before you leave too.  I have the winter blues!  So, I decided to start my vegetable seeds for my spring and summer garden.  Planning my garden takes the blues away and gives me a head start on growing strong, healthy veggie plants. 

For the past several years, I have started my seedlings using heat mats and grow lights.  I have about a 90% germination rate with what I sowed.  However, it takes a lot of time and space to nurture the seedlings. Using the winter sowing method eliminates the heat mats, grow lights and chances of growing leggy vegetable seedlings.  You simply place your containers in a location where they will get sunlight and rain water and let them go until spring.  


gardening tips


I decided to use the winter sowing method for the past few years.  It’s much easier than setting up the mats and grow lights.  As a result, I’ve been saving plastic liter bottles as well as  juice and milk bottles.  Anything that I can cut and punch holes in the bottom for drainage is fair game.  I started about 20 bottles over the week-end.  Tomatoes, dill, zucchini, squash, sunflowers and petunias. Yes, you can winter sow flowers too.  I love that dill and petunias reseed for several years after planting.  

I will sow a few tomatoes inside under grow lights, but I’m sold on the winter sowing method.  And, it’s doubtful that I will ever return to to a full fledged indoor sowing setup again.


winter sowing vegetable seeds


Winter Sowing Vegetable Seeds:


  • Wash your bottles in hot soapy water and rinse well.
  • Allow bottles to dry.
  • Use a box cutter to cut around the bottles.  Leave an inch on the bottle for a hinge.
  • Add drainage holes in the bottom of your bottle.  To accomplish this, I used a hot glue gun on the bottom of the milk bottles.  However, I was unsuccessful using the glue gun on the liter and juice bottles.  The glue gun wouldn’t penetrate.  So, I used the box cutter to make slits on the bottom.  You could also use a drill on the bottom.  If you have another method of punching holes, bring out your equipment and punch holes in the bottom of your bottles.


winter sowing method


Next prepare your seed starter mix:


  • Mix your seed starting mix as directed on the package.  I use warm water when mixing the soil Mix it thoroughly.  You want it wet; however, not soggy.
  • Add 2 – 3 inches of the mix to the bottom of each of the bottles or container.  I use Miracle Gro Seed Starting Mix.  I have a great germination rate each year with the mix.   I have also used Miracle Grow potting soil, and my seeds germinated as well.
  • Plant your vegetable or flower seeds according to the directions on the package.  Once you have the seed planted, wrap the bottle with duct tape.  I purchased my duct tape from the Dollar Store.
  • Mark the bottles with a permanent marker, which I also purchased from the Dollar Tree.
  • You can discard the bottle tops.  I moved the bottles and containers to my deck to ensure they get rain. Let them go until spring.  At that time you should have sprouts that will need water.  As they grow, you will have to remove the top of the bottles. Just remove the duct tape and remove the top.  You can use a pair of scissors to cut the hinge on the bottle.
  • You can place your bottles in trays for a little more organization, but it’s not necessary.  My are placed randomly on my deck.  Once I remove the tops, I organize them so I can tgrans
  • Your seedlings will already be hardened off.  Which is a step you will have to take if you start seedlings indoors.


Finally, if you are a gardener and use the winter sowing method, please share your experience.  You may also like My Winter Sow Seed List.