Great Find – Mother and Grandmother’s Bracelet


!function(d,s,id){var js,fjs=d.getElementsByTagName(s)[0],p=/^http:/.test(d.location)?’http’:’https’;if(!d.getElementById(id)){js=d.createElement(s);js.id=id;js.src=p+’://platform.twitter.com/widgets.js’;fjs.parentNode.insertBefore(js,fjs);}}(document, ‘script’, ‘twitter-wjs’);

We found the perfect gift for your mom or mother-in-law.  I designed this mother/grandmother’s bracelet at Pearls by LaurelThe center pearl is, Zarriah’s birthstone, August and the Sapphire is Xavier’s and mine, September.  I love it. 

The price is excellent, $33.90 for the 3 stones which includes shipping.  The bracelet is handmade from Swarovski pearls (not fresh water pearls) and rhinestones.  It’s also made in the USA.  You can order sizes small – XX large.  For those who have a high PH, the company offers an alternative silver component which prevents the silver from touching the skin and causing a reaction.  I would recommend measuring your wrist to ensure a proper fit.  If the size is off, the company will resize for free.  In addition to free resizing, if the bracelet breaks the replacement is free.  This company vigorously stands behind its work.   

You can design the bracelet on-line using up to 6 pearls; otherwise, you must contact the company.  The site is easy to navigate and designing the bracelet is quick and easy.  You just drag the pearl that you choose to where ever you wish to place it on the bracelet.  You can play with it until you’re satisfied with design/color placement. 

If you click on this link, Pearls by Laurel and make a purchase of more than $20.00 you will receive free shipping.  This is an elegant gift that every mother or grandmother would love.  It’s a great gift for Christmas, Mother’s Day, birthdays or just because.  If you get in a bind for a last minute gift, you can order up to December 17 for delivery by December 24.  They have Priority Mail shipping for $6.95. 
                                                                  

Calendar Gift Ideas


!function(d,s,id){var js,fjs=d.getElementsByTagName(s)[0],p=/^http:/.test(d.location)?’http’:’https’;if(!d.getElementById(id)){js=d.createElement(s);js.id=id;js.src=p+’://platform.twitter.com/widgets.js’;fjs.parentNode.insertBefore(js,fjs);}}(document, ‘script’, ‘twitter-wjs’);

2014 Calendar

I just made a calendar for one of my daughter’s Christmas gifts at Shutterfly.  I had so much fun going through pictures and finding ones that fit perfectly into each month of Xavier and Zarriah.  Although it’s not clear, this is the cover of the calendar.  The picture was taken at Zarriah’s Christening.  About 20 family members from my daughter and son-in-law’s side of the family attended.  The picture is a beautiful memory. 

This calendar will make a beautiful keepsake.  I’m thinking of making another for my office.  For January I selected a picture of Xavier playing in his first snow.  It was a great moment, January 2009.  My daughter and her family were visiting for a week-end and it snowed.  Xavier had just turned 1 the previous September.  I had a great time watching him play and trying to figure out what that white stuff was.   


How could I leave out Zarriah’s first birthday party, August 2012, and her looking at the clown.  OMG, it was hilarious.  The pictures brought back so many memories.  I’m hoping the calendar will do the same with daughter and son-in-law. 

I’ve been thinking of this calendar for years as a gift, but never made the effort to complete the calendar.  Finally in 2013 I do just that.  The Shutterfly site is easy to navigate.  To cut down on time, I would suggest that you go through your pictures and make a note of which ones you would like to use for what month.  If you’re like me, you have thousands of photos to choose from, so it can become time consuming. 

Shutterfly is currently offering free shipping.  Use Promotion Code SHIP30.  Also, new customers get 50 prints free.  The free shipping offer ends 12/23/13.  This is a great idea for your mom, a friend or yourself.  The calendar comes in 2 sizes:  8 x 11 and 12 x 12.  I choose the 8 x 11 for $21.99.  The 12 x 12 is $29.99.  They have numerous designs and layouts to choose from.  Check it out. 


Cabbage and Sausage Recipe


!function(d,s,id){var js,fjs=d.getElementsByTagName(s)[0],p=/^http:/.test(d.location)?’http’:’https’;if(!d.getElementById(id)){js=d.createElement(s);js.id=id;js.src=p+’://platform.twitter.com/widgets.js’;fjs.parentNode.insertBefore(js,fjs);}}(document, ‘script’, ‘twitter-wjs’);

cabbage recipes

I love cabbage.  If you’re a fan, here’s a recipe that you must try.  Did you know that cabbage is great for your health?  It’s actually considered to be one of the best health foods.

Besides being delicious, here a few reasons to try this recipe:  

  • Cabbage contains the least fat and the fewest calories of any vegetable
  • It helps lower cholesterol
  • It’s loaded with Vitamin C
  • It’s a great natural source of fiber
  • It’s a great source of antioxidants  
  • It’s expensive to eat 

 Now that we have the health benefits down.  Here’s the recipe: 

  • 1 stick butter or margarine
  • 1 small head of cabbage, chopped
  • 1 small onion, chopped
  • 1 pound polish sausage, sliced into round pieces (I use smoked sausage)
  • 1 (15 ounce) can diced tomatoes  (Pull out a quart of your canned home grown tomatoes and chop) 
  • 1/2 teaspoon salt
  • 1/2 teaspoon pepper
  • 1/4 of chopped green pepper
  • few drops of hot sauce (optional)
  • chopped garlic clove (optional)
Melt butter in large skillet.  Add cabbage, onion, and green pepper and cook on medium high for about 5 minutes stirring to keep from sticking to pan.  Add remaining ingredients, cover and simmer for 20 – 25 minutes.  Season to taste. 
Note:  I brown my sausage in the oven and have it ready to add to the simmering ingredients.  I found the recipe rather bland, so I added garlic.  Serve with diner rolls and apple sauce.   Makes about 8 servings.

Toddler Girls Garanimal Sets


!function(d,s,id){var js,fjs=d.getElementsByTagName(s)[0],p=/^http:/.test(d.location)?’http’:’https’;if(!d.getElementById(id)){js=d.createElement(s);js.id=id;js.src=p+’://platform.twitter.com/widgets.js’;fjs.parentNode.insertBefore(js,fjs);}}(document, ‘script’, ‘twitter-wjs’);

Garanimals Baby Girls' 2 Piece Graphic...
We found these adorable 2 piece Garanimal sets at Wal-Mart on-line.  I’ve been a big fan of Garanimals since Xavier was a baby.  I purchased these for Zarriah to knock around in on the week-ends or lazy days.  They’re great for everyday play wear and adorable enough to head to the mall or grocery store when you have to run errands. 

I have found that Garanimals hold up well on the playground, lounging around the house and through the wash.  This I’m so Sweet set include a fleece top and pants, so Zarriah will be nice and toasty this winter while playing with her Disney Princesses. 


Garanimals Baby Girls' 2 Piece Graphic...

I fell in love with the Double the Fun set too.  This set is made of fleece as well.  Both will look adorable with a pair of sneakers or flats if your heading to the mall or grocery store.  I purchased both sets for $7.76 each.  I ordered additional items, so I was able to get free shipping to my house.  I love a bargain, especially when I don’t have to pay a fortune for cloths that my little sweeties will grow out of in months. 

Great Find – Melissa and Doug Deluxe Standing Easel


!function(d,s,id){var js,fjs=d.getElementsByTagName(s)[0],p=/^http:/.test(d.location)?’http’:’https’;if(!d.getElementById(id)){js=d.createElement(s);js.id=id;js.src=p+’://platform.twitter.com/widgets.js’;fjs.parentNode.insertBefore(js,fjs);}}(document, ‘script’, ‘twitter-wjs’);

Melissa and Doug easel

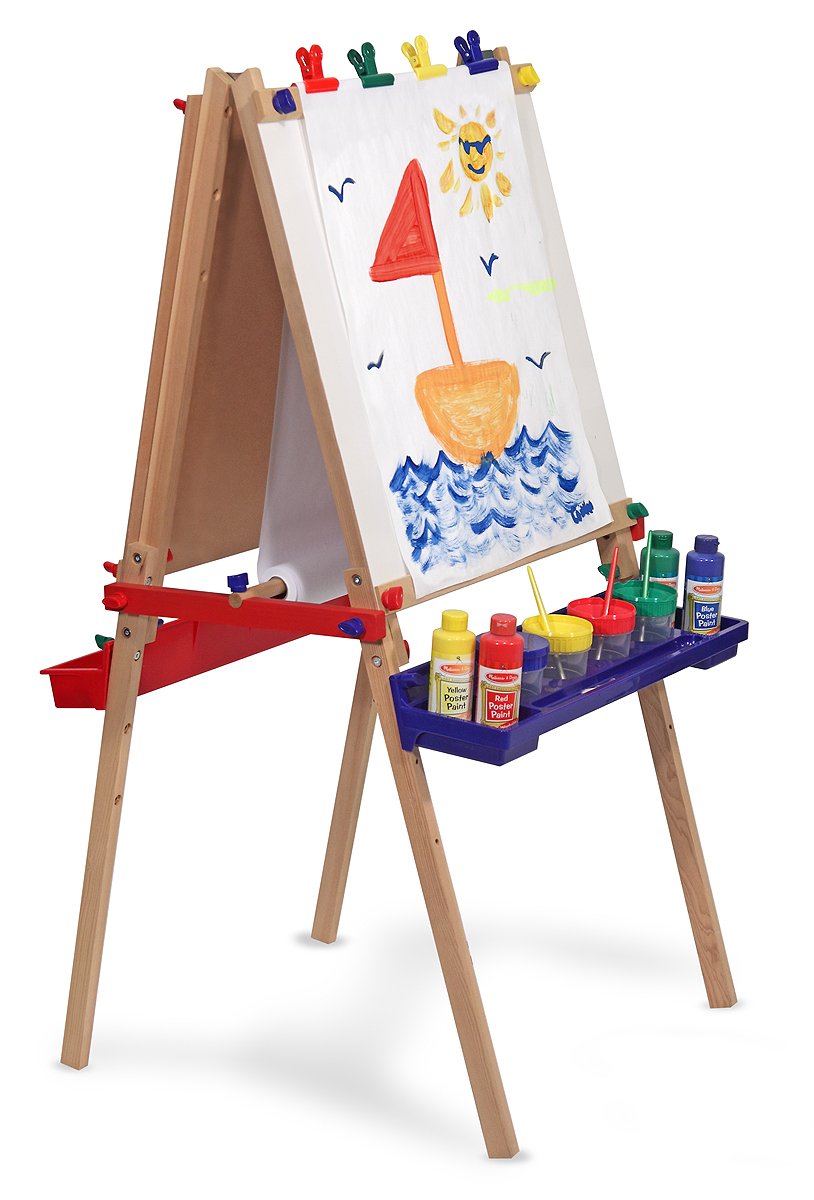
Christmas is around the corner and Mother 2 Mother is in search of great finds.  I purchased Melissa and Doug’s Deluxe Standing Easel for my little Picasso Xavier for $57.00.  As a Prime member, shipping was free.  Xavier loves to paint, so this will be a perfect gift for him.  The easel is listed as one of Amazon’s 2013 best gifts for kids.  I agree. 


The easel includes extra-large chalkboard, dry-erase board, and easy-load paper roller.  You will need to buy the accessories kit for an additional $27.00.  The kit includes: 

  • 4 Bottles of Poster Paint and 4 Spill-Proof Paint Cups
  • Easel paper roll, chalk, paint brushes, dry-erase marker and eraser

  • The easel alone usually runs around $80.00, so this is a Great Find.  If your child enjoys drawing and writing, I encourage you to check out this deal and have Santa deliver this great gift Christmas Eve.  Your child can look forward to hours of entertainment on those cold, snowy, winter days.  This item is appropriate for ages 3 and up. 

    Cheese Ball Recipes


    !function(d,s,id){var js,fjs=d.getElementsByTagName(s)[0],p=/^http:/.test(d.location)?’http’:’https’;if(!d.getElementById(id)){js=d.createElement(s);js.id=id;js.src=p+’://platform.twitter.com/widgets.js’;fjs.parentNode.insertBefore(js,fjs);}}(document, ‘script’, ‘twitter-wjs’);

    Holiday cheese ball recipes from Michelle Buffardi

    Cheese balls are back and just in time for the holidays.  I watched Access Hollywood, my first time, and they were making these adorable cheese balls which I love.  I’m a big cheese and cracker fan, especially during the holidays, so these are going on my menu this season. 

    Here’s the recipes that were used on Access Hollywood:

    Herbed Turkey
    • 8 oz. cream cheese
    • 6 oz. goat cheese
    • 1 1/2 tbsp. herbs de Provence
    • 1 garlic clove
    • 1 tsp. mustard
    • 1/4 cup slivered almonds

    Note:  I will be substituting my Chipped Beef and Green Onion cheese ball recipe instead of the herbed.  Not a big fan of goat cheese, but I love the turkey idea. 

    For decorating:

    •  dark raisin for eyes
    • 1 whole almond for nose
    • 1 small piece red pepper
    • Thin pretzel sticks for feathers
    • Dried papaya for feet (I will be using an orange pepper)
    • Chopped almonds to roll cheese ball in.  (I’m going to substitute chopped walnuts)
    Using a stand mixer or a bowl and a spatula, mix together the cream cheese, the goat cheese, the herbs de Provence, garlic, mustard and salt. Form the mixture into a ball, cover with plastic wrap, and refrigerate for at least two hours.
    Making the Turkey Cheese Ball: 
    Before serving, pinch a walnut-sized portion of cheese mixture from the ball; you will use that for the head. Re-form the remaining cheese ball and roll the ball in the almonds. Roll the remaining portion of cheese into a small ball and set it on top of larger ball – this is the turkey’s head. Cut the raisin in half and place each half on the head for the eyes. Place the almond in the middle for the beak, and arrange small piece of red pepper under the beak for the turkey’s wattle stick dried papaya slice into the bottom of the cheese ball for the feet. Last, arrange pretzel sticks on the back of the cheese ball to look like tail feathers

    Chilly Penguin

    • 16 oz. cream cheese
    • 4 oz. blue cheese
    • 2 tsp. chopped shallots
    • 1/4 tsp. coarse salt
    • Dash hot sauce
    • 1/2 cup poppy seeds, for coating
    For decorating:
    • 2 dark raisins
    • 1 almond
    • 1 carrot
    • 1 red bell pepper
    • 1 scallion
    Using a stand mixer or a bowl and spatula, mix together the cream cheese, the blue cheese, shallots, salt and hot sauce. Form the mixture into a ball and refrigerate for at least 2 hours.
    Before serving , remove a 2-inch piece of the cheese mixture, roll into a ball, and set aside, this will be the head. Re-form the remaining cheese mixture into an egg shape. Cut out a triangle shape roughly the length of your cheese ball from a sheet of wax paper. Press the wax paper into the cheese ball , with the widest part on the widest part of cheese ball. Roll the cheese ball in the poppy seeds and set the ball on a plate.
    Slowly remove the wax paper; the ball should be covered in poppy seed, except for the penguin’s breast. Set the head on top of the penguin’s body and add the raisins for the eyes and almond for the beak. Slice off 2 equal sized rounds of the carrot and arrange them on either side as earmuffs. Connect the earmuffs with the green part of the scallion. Using a vegetable peeler, peel 1 long strip off the carrot; winds this around the penguin’s neck as a scarf. Slice the remaining carrot into toes and arrange at the bottom of the penguin’s body to make its feet, or use two red bell pepper slices.


    Girls Holiday Hair Styles

    With holidays on the horizon, you and your brood have plenty
    of parties to attend, and you know what that means—picture time! This holiday
    season, it’s easy to keep your little angel looking cute, coifed and
    camera-ready with simple yet stylish hair looks from Cozy
    Friedman, author of Cozy’s Complete Guide to Girls’
    Hair
    .

    The French Braid Headband

    Besides being a great fuss free style, this braided band
    makes its own accessory. Girls can wear it with their hair hanging down in back,
    or with a ponytail. Complete this look for the holidays with fun beads or
    barrettes.


    The French Braid Headband


    Props:

    Wide-tooth comb
     
    Fine-tooth comb

    Ponytail holders

    Jaw clip

    Decorative bobby pins


    Step 1: Start with damp hair (either towel –dried or
    misted) and use a wide-tooth comb to detangle the hair.

    Step 2: Use a fine-tooth comb to draw a horizontal
    line across the crown from the top of one ear to the top of the other ear. From
    the line, comb the hair forward to the face. Pull the hair in back of the line
    into a ponytail holder or jaw clip so it stays out of your way.

    Step 3: Choose which ear you want the braid to start
    from. Tilt the head so the ear you’ve chosen is facing up toward the ceiling.
    With your child’s ear tilted up, being making the braided headband using the
    hair in front of the part.

    Step 4: Once you’ve reached the other ear, secure the
    braid with a ponytail holder. If you like, tuck it behind the ear and pin it in
    place with a few bobby pins. Remove the ponytail holder or jaw clip use in Step
    2 and style as you like. Finish by adding sparkly or decorative hairpins through
    different parts of the braid.

     
    The Heart Braid

    This is a
    must-have look for the holidays. To really make this look extra special add a
    clip to the end of the heart that coordinates your child’s holiday outfit. You
    can also use a colorful ponytail holder at the end or add decorative beads in
    the braid.


    The Heart Braid Compressed

    Props:

    Wide-tooth comb

    Fine-tooth comb

    Decorative hair clip

    Ponytail
    holders

     
    Step
    1: Starting with damp hair (either
    towel-dried or misted), use a wide-tooth comb to detangle the hair.  Then, using
    a fine-tooth comb, part the hair down the middle of the head.  Clip one side up
    right above the ear.

    Step
    2: On the other side of the part, use the
    fine comb to gather a thin section of hair from the crown.  This section should
    measure about 2 inches from the hairline to the top of the
    head.

    Step
    3: Divide this section into three, and
    begin a French braid starting at the crown and curving toward the temple, then
    toward the back of the head, like the top lobe of a heart.  You will be lifting
    hair into the braid only from this side of the part.  Leave no loose hair in
    front of the ears.

    Step
    4: When you reach the center part at the
    back of the head, secure the braid with a ponytail holder.  If the hair is very
    long, end the braid about midear; the ends will hang down the
    back.

    Step
    5: Unclip the hair on the other side of
    the part and repeat the process.  Secure with a ponytail
    holder.

    Step
    6: Join the ends of the braids together in
    the back with a decorative bow or ponytail holder to form the bottom point of
    the heart.
    Cozy Friedman is the creator of the So Cozy product line and
    founder of Cozy’s Cuts for Kids. She is an expert authority on cool,
    childhood style
    and recognizes – and celebrates – that children today are
    more style-conscious than ever. Decades ago, getting a child to take a bath was
    a challenge but now, thanks to places like Cozy’s Cuts for Kids and
    product lines such as So Cozy, children are embracing grooming from a
    very young age
    . Cozy has coined this trend the “metro mini”
    phenomenon
    and believes that encouraging it in a healthy way allows
    children to be expressive and self-confident
    .


    Cookie’s Kids PJs – Great Finds


    !function(d,s,id){var js,fjs=d.getElementsByTagName(s)[0],p=/^http:/.test(d.location)?’http’:’https’;if(!d.getElementById(id)){js=d.createElement(s);js.id=id;js.src=p+’://platform.twitter.com/widgets.js’;fjs.parentNode.insertBefore(js,fjs);}}(document, ‘script’, ‘twitter-wjs’);

    Beverly Hills Polo Club “Rider Print” Fleece Pajama Pants (Sizes 4 – 7) - CookiesKids.com
    Beverly Hills Polo Club “Star Print” Fleece Pajama Pants (Sizes 4 – 7) - CookiesKids.com

    I found these Great Finds, Polo Club pajamas, for my grandson at Cookies Kids for a bargain, $5.99.   He’s getting older now, and moving away from the Car, Sponge Bob etc. characters, so   I was looking for PJs that were warm, stylish and he could throw on with a tee shirt.  I found these fleece PJs bottoms at Cookie’s KidsMy grandchildren do not like to sleep under covers long, so their PJs must keep them warm, but not overheat them. 

    These were perfect for Xavier, especially on the week-ends when he plays video games and just relaxes with the family. 

    I purchased this pack of Hanes tee shirts along with the pajama bottoms.  I like the colors, he can wear them with the pj bottoms as well as a pair of sweat pants.    

    I couldn’t leave my granddaughter out.  She loves the Disney princesses and Dora so these pajamas were perfect for her.  These sets were $12.99 each.  She’ll get a lot of wear out of them  this winter.  I went with long sleeves for her, she shuns blankets more than her brother.   

    Hop over to Cookie’s Kids and find your bargain.  I’m inviting all of my readers to Sign up for the Treats by Cookie’s Kids .  Tell them Rhonda@gigglesnsugarkisses.com referred you.  You’ll get $10.00 off your order of $50.00 or more order and I will get $10.00 toward my next purchase of $50.00 or more.  

    Easy Homemade Vegetable Soup Recipe


    I love making soups and chili during the fall and winter months.  I adapted a soup recipe that you don’t have to spend all day in the kitchen making and it’s delicious.  Here’s what you will need:

    • 1 package of stew beef
    • 2  – 3 cartons of Swanson’s Beef broth (32 oz.) or store brand  (I have used Food Lion brand)
    • 1 quart of your whole canned tomatoes or 32 oz. from the grocery store
    • 1 package of Hanover frozen veggies or your garden veggies from your freezer
    • 2 -3 small potatoes cubed
    • 1/4 box of elbow macaroni (optional)
    • 1 cup water
    • *Note:  You can add water and beef bullion cubes to the pot to ensure you have enough broth.

    First, brown your beef in a tablespoon or 2 of butter or margarine. Next drain the beef, and remove it from the.  Cool the beef on a cutting board.  The next step is to add your tomatoes, 1 carton of Beef Broth and 1 cup of water to a stock pot and bring to a boil.  Reduce to a simmer.  (You can cut up your tomatoes before placing them in the pot if you like smaller pieces).

    Also, while the tomatoes are simmering cut the beef into bite size pieces.  Next, add the beef and additional broth to pot and simmer for 30 – 45  minutes.  Peel and cut potatoes into cubes.  Rinse and add to pot. Simmer until almost done.  (You don’t want them to be completely done or they may get mushy).

    Next, add frozen vegetables and simmer until all vegetables are tender, about 30 minutes.  Stir pot occasionally. Add 1/4 – 1/2 box of elbow macaroni and simmer until tender.  About 15 minutes.  Season to taste.

    Last, this soup gets better after it sits for a few days.  Finally, you can freeze it in mason jars or soup containers for a quick and healthy meal.  It’s Yummy!


    Boo – Happy Halloween!

    My adorable Minnie Mouse and Ninja.  Happy Halloween from my family to yours.