Attracting the Pileated Woodpecker

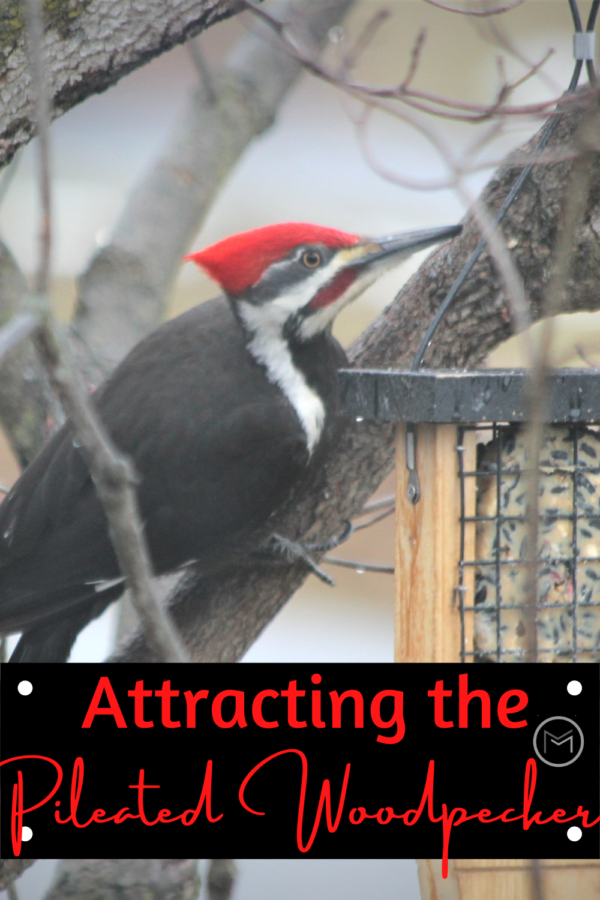
Today, I’m sharing tips backyard birding tips on Attracting the Pileated Woodpecker. The Pileated Woodpecker is the largest member of the woodpecker family.  It’s beautiful red crest comes from the Latin word Pileatus, which means capped.  

The Pileated Woodpeckers are huge birds, and absolutely beautiful.  Because they birds are so large, having large, standing trees is a must if you want to attract them to your backyard.  If you don’t have large trees on your property, having woods nearby or on an adjoining property will do.  Pileated Woodpeckers love to munch on ants, beetles, wild fruits and nuts.  They are known to pull bark off trees to feast on ants.  Furthermore, they need large trees to bore large holes for nests.  The female pileated woodpeckers selects her mate based on the best nest sight for her babies. If it’s not a large tree with nice big holes, he can forget it.  


attracting the pileated woodpecker


Although, the Pileated Woodpecker loves insects and wild fruit, they also love suet.  Yep, suet is the key to attracting the Pileated Woodpecker to your backyard. I’ve used both commercial and homemade suet cakes in my attempt to lure this big guy.  He will visit the feeder when it contains the commercial suet, but I see him 4 – 5 times a day when I offer my homemade suet. These pictures are of my big boy eating my homemade suet cake.  The female hasn’t visited so far.  You can tell the difference between the male and female by the stripes on their cheeks.  The male has a red stripe and the female black. 


Attracting the Pileated Woodpecker:  


Here’s a few of my homemade suet recipes:  

Crunchy Apple Raisin Suet Cake Recipe

Carrot Raisin Suet Cake Recipe


attracting the pileated woodpecker


Offering suet during the winter months is a great way to give our feathered friends energy and warmth. It will help them survive the cold winter months.  

Also, if your goal is attracting the pileated woodpecker to your backyard, you will need a pileated woodpecker suet cage.  If one is unavailable another large long tail suet cage will work. A long tail prop is needed so the woodpecker’s tail feathers can rest while they’re hanging on the cage.  

Whip up a batch of my homemade suet cakes, and you will have this beautiful creature devouring them in not time.  Stay tuned for additional posts on homemade suet cake recipes.

Monarch Butterfly Facts for Kids

Today, I’m sharing educational activities on Monarch Butterfly facts for kids.  So, the Monarch Butterfly is the most studied butterfly on the planet. It could be because millions of Monarchs migrate from the United States and Canada to California and Mexico yearly.  Another reason could be their brilliant orange, black, and white color that makes you wonder what kind of butterfly is it. Or, it makes you wonder where it came from or how beautiful it is enjoying the nectar from the flowers.    


monarch butterfly facts


Monarch Butterfly Facts for Kids: 


The fact sheet on the Monarch Butterfly is a great science resource.  It discusses how long the Monarch Butterfly lives, what it eats and other interesting facts.  There’s also a word search puzzle, coloring pages and butterfly math sheets.


monarch butterfly facts


Monarch Butterfly Life Cycle:


Furthermore, the Monarch Butterfly life cycle goes through 4 stages, laying the eggs, hatching into a caterpillar or larvae, spinning a chrysalis, and the metamorphosis into an adult butterfly.

Stage1 – (Eggs – The female Monarch lays between 300 and 500 eggs on milkweed.

Stage2 – (Caterpillar or Larvae) – The Monarch hatching will grow into a full size caterpillar and feed on milkweed for approximately 2 weeks.  

Stage3 –  (Chrysalis or Pupa) – During this stage, the caterpillar with hang in a J from a wad of silk and spin a jade and yellow colored chrysalis around itself.  

Stage4 – (Adult Butterfly) – The adult Monarch emerges from the chrysalis into the new world.  


Butterfly life cycle


Additionally, use the above printable to discuss the 4 stages of a Monarch Butterfly’s life, and what happens in each stage. Have students review the Monarch Butterfly Life Cycle videos below.  


Life Cycle of the Monarch Butterfly – YouTube – This video is thorough.  It goes through each of the 4 stages in detail.  It’s a great resource for older kids.  

Monarch caterpillar forming chrysalis (real time) – YouTube  – Kids will be intrigued watching the caterpillar hanging in a J shape and spinning the beautiful jade and yellow chrysalis.  This video is interesting and will hold the attention of younger children as well as older kids.  It’s a perfect addition to the Circle of Life discussion of Stage 3, the Monarch Chrysalis. 

Adult Monarch Butterfly Emerges from its Chrysalis – YouTube –  If the kids thought watching the caterpillar spinning his Chrysalis was amazing, they will love watching the butterfly emerge and get ready to take flight.  Mother nature truly is amazing.  This video is a great addition to Stage 4, the adult Monarch Butterfly. 


monarch butterfly coloring page


Don’t forget the complete the sentences activity.  It’s a great reading comprehension activity.  Finally, you can download the Monarch Butterfly activity sheets here.

Duke Ellington Black History

Today, I’m sharing kids educational resources on Duke Ellington Black HistoryEllington was born, Edward Kennedy Ellington.  Duke Ellington became known as one of the greatest jazz pianist, composers, and bandleaders of all times.  I’ve put together a fact sheet, multiply choice worksheet, matching worksheet, word search puzzle, and coloring sheet for a Black History unit.  


So, Duke Ellington was born in Washington, DC on April 29, 1899.  Both his mother and father, James Edward Ellington and Daisy Kennedy Ellington, were pianists.  Furthermore, they stayed with his material grandparents at 2129 Ida Place. Duke’s father, James Edward Ellington created blue prints for the United States Navy.  He also worked as a butler, driver, caretaker and handyman for a prominent Washington, D.C. doctor.  He worked as a part time butler during the Warren G. Harding era.

Elegant, well-mannered and a dapper dresser earned Ellington the nick name “Duke” by a childhood friend. The nickname stuck for the remainder of his life.  


Duke Ellington Black History
Duke Ellington Black History:  
  • Duke began playing the piano at age 7. Ragtime, church and classical music were influencers in Duke’s love of music. 
  • Also, he also loved baseball and sold peanuts at the Washington Senators baseball games.
  • In 1914, Ellington worked as a soda jerk at the Poodle Dog Cafe.  During that time, he wrote a composition called Soda Fountain RagSoda Fountain Rag is also known as the Poodle Dog Rag.  
  • Also, being a musician was a great way to get dates.  So, Duke started listening and imitating ragtime pianists.  A music teacher from Dunbar High School gave Ellington private harmony lessons. Additionally, he learned to read music and worked to improve his technique.
  • Duke formed the group, The Duke Serenaders.  He earned 75 cents from his first performance.  The band thrived, and as a result he performed throughout Washington, DC and Virginia.  He preferred playing for embassy and private parties.  
  • At age 19, Duke married his high school sweetheart Edna Thompson.  They had a son named Mercer Kennedy Ellington. 
  • Ellington moved to New York in 1923.  In 1924, he became the leader of his big band and began recording. 


Duke Ellington Black History


  • Duke Ellington played regularly at the Cotton Club in Harlem, NY in 1927.  He performed there for 5 years.  All Cotton Club performances were broadcast almost nightly.  By 1930, Duke Ellington and his band were famous. 
  • President Richard Nixon invited Duke Ellington to the White House for his 70th birthday.  He was presented the Presidential Medal of Freedom.
  • One of Duke Ellington’s favorite places to eat was Ben’s Chili Bowl when he was in the Washington, DC area. 
  • Duke Ellington was a genius of instrument combinations.  His music made him stand out among other composers of his time.  Ellington ranked with composers such as a George Gershwin, Cole Porter, and Irving Berlin. 
  • The piano was Duke’s favorite instrument. 
  • Duke wrote more than one thousand compositions.  His work became a standard in jazz music.
  • Duke Ellington won 12 Grammy Awards.  Additionally, he received the Life Time Achievement Award in 1966.
  • Additionally, Duke Ellington was a Freemason.  He was a member of the Masonic Lodge. 
  • In 1976, Stevie Wonder wrote the song “Sir Duke” as a tribute to Duke Ellington. 
  • Duke Ellington led his band from 1923 – 1974, 50 years. The Duke Ellington Orchestra is still in existence today.
  • The Duke Ellington School of the Arts was established in Washington, DC in 1974. 
  • In 1986, a Commemorative stamp was issued with Duke Ellington’s image. 
  • Duke Ellington’s son, Mercer Kennedy Ellington, managed the Duke Ellington Orchestra after his dad’s death.  
  • New York City May, Michael Bloomberg, declared April 29, 2009 Duke Ellington Day. 
  • Finally, Duke Ellington’s granddaughter, Mercedes Ellington, is carrying on his name.  


Duke Ellington Black History

Sadly, Duke Ellington died on May 24, 1974 as a result of pneumonia and lung cancer.  He is entombed in the Woodlawn Cemetery in the Bronx, NY.  Ellington’s last words were, “Music is how I live, why I live and how I will be remembered.”  More than 12,000 people attended his memorial service.  I hope you enjoyed my Duke Ellington Black History.  You can download the worksheets here. 

Check out Duke Ellington’s song It Don’t Mean a Thing, one of greatest hits.  

Caramel Dipping Sauce Recipe

Today, I’m sharing parenting meal tips on a caramel dipping sauce recipe.  This sauce is sure to please everyone from toddlers to teens.  Moms can never have too many go-to snack ideas. So, when your little ones come in from playing outside, finishes a day of school, or is just asking for a snack, pull out this caramel dipping sauce.

Homemade recipes are always better than store brought products.  Making your own homemade caramel dipping sauce creates the perfect addition to an ordinary afternoon snack. Even better, it’s a food that invites interaction.  Kids love dipping their fruit or crackers into a warm dish of caramel sauce. So, make them a plate of edibles that are ready to dip with some caramel sauce on the side, and let enjoy. 

Caramel dipping sauce invites a host of snack-time possibilities too.  You can dip whole apples in caramel and coat them with nuts to create homemade caramel apples. Slice them and serve.  Furthermore, arrange a large tray of apple slices, bananas, strawberries, pineapple chunks, or any other favorite fruits your kids enjoy, and drizzle caramel sauce all over the top. Caramel sauce works well with popcorn, pretzels, graham crackers, vanilla wafers, or cookies. 

Don’t leave yourself out. It’s perfect for swirling into yogurt or cottage cheese too. You could even mix some into a favorite baked good, such as brownies, pie, or tarts. The ooey-gooey, sweet flavor of the caramel is sure to be an easy sell with kids and adults alike.

Getting the texture of homemade caramel sauce can be tricky. The key to making truly creamy, dippable caramel sauce is using sweetened condensed milk. This component creates soft, spreadable caramel instead of hard, crunchy candy. By combining sweetened condensed milk with melted butter, corn syrup, and sugar on the stove, and then adding whipping cream, salt, and vanilla, you can create a caramel apple dipping sauce that your kids will love.  


caramel dipping sauce recipe


Homemade Caramel Dipping Sauce Recipe


Ingredients

  • 7 tbsp. Salted Butter
  • ¾ c. Light Corn Syrup
  • 2 c. Granulated Sugar
  • ½ c. Sweetened Condensed Milk
  • 1 ¼ c. Whipping Cream
  • ½ tsp. Salt or To Taste (optional)
  • 2 tsp. Vanilla Extract


Directions

  1. In a medium saucepan melt butter over medium heat.
  2. Add the sugar, corn syrup, and sweetened condensed milk, stirring to combine.
  3. Stir constantly until mixture turns a golden-brown color.
  4. Once mixture is golden-brown, turn off heat and slowly add the whipping cream and salt (if desired) stirring to combine. 
  5. Turn heat back up to medium/medium-high and stir until caramel bubbles. 
  6. Once caramel is bubbling, continue to heat and stir for 5 minutes to allow the caramel to thicken. 
  7. Remove caramel from heat and add vanilla extract. Stir to incorporate. 


caramel dipping sauce recipe


Notes

  1. You must constantly stir the caramel to prevent scorching the bottom. If you do scorch the bottom do not scrape it, just continue to stir the top of the caramel.
  2. Warm up whipping cream in the microwave for 30 seconds to 1 minute prior to adding to caramel to make combining with caramel easier.
  3. Right after cooking, the caramel will be thinner. At this temperature, the caramel is great as an ice cream topping, or to add to coffee or hot cocoa! Once it cools for about 30 minutes it will be the perfect dipping consistency!
  4. For a more exotic dipping sauce for the adults, you can add a couple dashes of dark rum or bourbon with the vanilla extract, or even a pinch of chili powder.


AUTHOR BIO: Samantha Kowalczyk is Director of Product Development and Key Accounts for Mrs Prindables. She leads a team responsible for the creation of new product concepts, such as Caramel Apple flavors, gifts, and confections. Kowalczyk joined Mrs Prindables in 2013 after completing her education in marketing. Her dedication to Mrs Prindables enabled her to progress to her current role.

Unique Bald Eagle Facts for Kids

Today, I’m sharing educational resources on bald eagles facts for kidsThe Bald Eagle is the national bird and symbol for the United States.  It represents freedom. 

So, Bald Eagles are not really bald.  The name “balde,” means white not without hair.  If you liked those facts, check out my list of other Unique Bald Eagle Facts for Kids below.  Use them as a part of a science unit or interesting birding facts for kids.  


bald eagle facts for kids


Bald Eagle Facts for Kids:

Bald Eagles are large; they have a wing span of 5 – 8 feet.  The female is noticeably larger than the male, and weighs in around 13 pounds.  The male weighs around 9 pounds.  However, Alaska has the biggest eagles. These majestic birds prefer to live around large bodies of water like rivers and oceans.  The Bald Eagle likes to dive for fish, but they are known to take fish from other birds.  As a result,  Benjamin Franklin did not want the Bald Eagle as the United States symbol.  He believed the species was a thieve, and didn’t earn his keep honestly. Fortunately, the Bald Eagle would remain the iconic symbol of freedom.  

Native Americans have revered the Bald Eagle long before it became a symbol for the United States.  Native Americans believe eagles have magical powers. Many tribes use them in religious ceremonies and consider them medicinal. 

The oldest Bald Eagle was 38 years old.  Unfortunately, a car killed it in 2015. St. Petersburg, FL holds the record on the largest eagle’s nest.  However, a nest was found in Vermilion, OH.  It was  shaped like a wine glass, and weighed 2 tons. The tree holding the nest was blown over, sadly. 

So, here are a few other interesting Bald Eagle facts for kids.  Print a copy and discuss them with your student/children.   


bald eagle facts for kids


Also, take some time to view the Bald Eagles on the live EagleCam sponsored by the U.S. Fish and Wildlife Service at the National Conservation Training Center in Shepherdstown, WV.  The nest is located about 75 miles from Washington, DC along the Potomac River.

Furthermore, it’s a great way for students/kids to learn about these beautiful birds from the comfort of home. They can can watch the female eagle, Bella, incubate her clutch around mid-February.  Hopefully, at the end of March or early April there will be babies.  Her mate is Smitty.  They work together to build the nest and keep the eggs warm.  The camera is on the nest 24/7, so you can schedule time regularly to observe their behavior and happenings.

Eagle’s eggs must be kept warm at all times. So, they are only off the eggs for short periods of time.  The baby eaglets will be ready to fledge, leave the nest, in 10 – 12 weeks.  So, the Eagle Cam will give the students an opportunity to watch the Bald Eagles parent their babies. Have your student write an essay on their observations of the Bald Eagles. Another day have them write an essay on what they learned from the Bald Eagle fact sheet.  


Bald Eagle Activities for Kids:  


bald eagle facts


Next, give them a challenge with my math activity.  The activity includes a combination of addition, subtraction, multiplication and division for older students. There is an addition sheet for younger students as well.


bald eagle facts


Last, have a little fun with my Bald Eagle Coloring pages.  They can watch the cam and than color the pictures.  For additional fun, make these Bald Eagle Treats:  

Patriotic Regal Eagle Cookies

Patriotic Edible Eagles


Finally, you can download the Bald Eagle activities here.  

Monarch Butterfly Life Cycle

The Stages of a Monarch Butterfly is a great way to understand the Monarch Butterfly life cycle.    Sadly, the Monarch Butterfly has declined over the years.  Milkweed is the host plant for Monarchs.  However, farmers are no planting milkweed. So, communities, home gardeners and the government are trying to help Monarchs rebound by planting milkweed.

When you see a Monarch Butterfly, you will be in awe.  Monarchs have yellow, black and white stripes.  They migrate to and from Central Mexico.  Monarchs are unable to survive cold weather, so they migrate to warmer climates.  It takes 2 months for them to complete their journey.  They travel 50 – 100 miles per day to reach their destination.

Sadly, without milkweed Monarch Butterflies are unable to lay their eggs or feed during their journey as caterpillars.


stages of a monarch butterfly


Stage 1 –  Eggs are Laid –  So, female monarch butterflies lay approximately 400 – 1200 eggs in their lifetime.  They lay their eggs exclusively on  milkweed plants.  As a result, females search for milkweed to lay their eggs. The female will taste the milkweed to ensure it’s acceptable before she starts laying her eggs. It takes approximately 4 days for an to hatch.  Once the hatchling emerges, it will eat its shell for nutrition.

Stage 2Caterpillars Emerge – Once hatched, caterpillars grow quickly and shed its skin 5 times during it’s growth cycle.


monarch butterfly life cycle


Stage 3 – Builds Chrysalis – When fully grown, a Monarch caterpillar will find a suitable place to make a chrysalis.  It will attach a wad of silk and hang from it in a J before it build its chrysalis.  The monarch butterfly chrysalis is a beautiful jade green with yellow dots.  The chrysalis below was found in one of the community gardens that I volunteer in.


monarch butterfly chrysalis


Stage 4 – Butterfly Emerges – The chrysalis will become transparent in about 10 – 14 days. You’ll be able to see the wing colors and pattern of the Monarch Butterfly forming.  At this stage, the Monarch Butter pushes it pushes its way out of the chrysalis  during mid-morning. E-close is simply the butterfly emerging.

Most importantly, the Monarch will hang from the chrysalis for approximately 2  – 3 hours allowing its wings to fill up with fluid and dry. After its wings are dry, they will take flight.


Adult butterflies will feed on nectar from blooming native plants including milkweed.  I hope that you liked my post on the Monarch Butterfly Life Cycle.  If you want to attract Monarch Butterflies, plant lots of milkweed and native plants.  This is a great project to do with your kids.  Finally, see my Native Plant List for Zone 6B. 


How to Adopt Children Facts and Tips

Adopting children is a wonderful way of creating a family. So, today I’m sharing parenting tips on how to adopt children. There are over 400,000 children in foster care so you will be giving a child a loving home. There are some things you need to know before you make the very important decision to adopt a child.  First, the adoption process is long and it can get complicated.  Second, it will play with your emotions.

Furthermore, the process can be costly too. However, becoming a parent is a wonderful thing. There are several ways to go through the adoption process.  So, you can work with an adoption agency that will take you through the foster care system or you can opt for adoption through an attorney. Going through an attorney you have two choices, either through the foster care system or you can adopt internationally. Before deciding on which option to choose let’s go through what you need to know before deciding to adopt.


how to adopt children


How to Adopt Children:


Understand Why You Are Adopting

Choosing to adopt a child is a decision that will steer the rest of your life. It is an important decision and one that should be thought through in detail. Being honest about your reasons, the impact a child will have on you and your current family should be discussed. Things to consider also include whether you wish to adopt a new-born or whether you are open to adopting an older child. What about a sibling group? What changes do you need to consider for your home or your career? Knowing the reasons for adopting and working through these questions will help you come to a decision. At the end of the day you want to be happy and you want to be able to raise happy kids


Preparation

Each respective adoptive parent will be required to complete what is known as a home study. This means a caseworker will visit, and decide whether you will be suitable for adopting a child. Your caseworker will go over the process in detail and discuss how it works. This can be lengthy, and take up to six months to complete.  Also, they will want to check out your medical records, your income, and whether you have a criminal record. 


how to adopt children


Costs

Research the costs involved in adoption. While adopting through the foster care system is free, there are associated costs. Using an attorney if you are considering adopting internationally would more than likely be the most expensive option. It is best to find inquire about costs for all avenues so you can plan what you can afford and what route you wish to go down. 


Open or Closed Adoption

The decision on whether to have contact with the birth family is a matter you also consider. The adoption can be closed where there is no contact or open where there is contact with the birth family. This can be a negotiation if this is the way you wish to go. It can also be anything from exchanging letters a few times a year or just receiving a birthday card. Knowing you have different options will be helpful as you go through the adoption process. 


How to Germinate Seeds for Your Garden

Today, I’m sharing gardening tips on how to germinate seeds for your garden.  Getting a jump start on your garden is a great thing, especially if you have a short growing season like me.  So, I’m sharing this valuable information with you today. 

So, starting my seeds early takes away the winter blues for me.  It gets me excited about the upcoming gardening season, and all of the delicious vegetables and beautiful flowers I will be nurturing.

Furthermore, if you want a successful growing season you must prepare.  Preparation starts long before you step into your garden.  So, investing a little time and energy to perform certain tasks will go a long way in making your gardening season a success.  Your first step is germinating your seeds. Lets go.


seed starting tips


How to Germinate Seeds for Your Garden:


Clean and Sterilize Containers – Sterilizing your seed starting containers before planting your seeds is imperative. If you’re using containers other than peat pots, wash them in hot, soapy water.  Rinse well, and take it a step further.  Soak them in bleach water or spray with a peroxide and water solution.  Wipe well and allow to air dry.


Use Seed Starter Mix  – There are a many seed starter mixtures on the market, so choose wisely.  There’s Jiffy, Black Gold, Miracle Gro  or make your own.


Generate Heat for Seedlings Seedlings don’t need light to germinate, but they do need heat.  I highly recommend using heat mats.  I have two mats that I use to help germinate my seeds, and I love them.  You can also set your plants on top of your refrigerator if you need additional space.


Use a Gro-Light System – You will need light to keep your seedlings from getting leggy.  Using a lighting system will help your plants to establish strong, healthy roots.  I have two of the 4 foot grow lights.  Seedlings need at least 12  – 14 hours of light per day and a rest period of 6  – 8 hours, without light.  You can set a timer to regulate your lights.  Furthermore, the lights must be kept close to the plants so they can become established and healthy.


Mark Your Seedlings – Be sure to use planter markers so you will know what you planted.


Cover Seed Starter Pots – Cover your pots with saran wrap to help keep moisture in while your seeds are germinating.  You can remove the saran wrap one the seed germinates.  I simply place a piece of saran wrap over the pot and secure it with a light rubber band.  When I see green, I remove the saran wrap.  You want to see droplets on the plastic.  That’s a sign that your pot contains the right moisture amount.  If you don’t see a mist, gently spray the top of your pot.  Once your seed germinate, remove them the heating mat and get them under the grow lights.


seed starting tips


Pot Up When Needed  – I use peat pots or pots from the nursery to start my seeds indoors.  Sometimes plastic cups.  If my plants outgrow the pots, I will transplant them to a bigger pot.  You can use a 16 ounce cups or bigger pots for this step if you have them in smaller pots.


Hardening Off Plants – Seedlings that are started indoors must be acclimated to outdoor temperatures.  See my post how to harden off your seedlings.


Seed Starter Pots for Gardeners

Today, I’m sharing gardening tips on seed starter pots for gardeners. First, I start the majority of my garden plants from seed.  I’m a frugal gardener, so I try to garden as cheaply as possible. Recycling, seed swapping, build your own is my motto.  Over the years, I have found that my biggest gardening expense were the vegetable and flower plants.  I have cut my expense tremendously, by germinating my seeds and producing my own plants.

Furthermore, it’s rewarding to plant veggies and flowers that you have grown from seed and nourished through the growing season.  For the most part, I have success with the majority of my seeds germinating.  However, there are some that don’t germinate. Gardening is trial and error. 

My attitude is, I’ll just try again next year.  Now, I have to be honest with you.  I do end up purchasing a few plants from the garden center, mostly flowers.  I love shopping the clearance tables and scooping up a few half dead bargains.  Bringing neglected plants back to life can be rewarding too.  I digress, but here’s a few container ideas for starting seeds. 


seed starter pot for gardeners


Ideas for Seed Starter Pots for Gardeners 


Winter Sowing Seed Starting Containers:

  • Milk Jugs – Gallon or half gallon will work.
  • Orange Juice Jugs – Clear orange jugs are perfect for starting seeds.
  • Gatorade Bottles – The 32 oz. bottles are perfect to house tomato seeds. Larger bottles can be used for larger plants like sunflowers.
  • 2 Liter Soda Bottles – I love using these for sunflowers, tomatoes, herbs.  They work great for single seed items.
  • Take out Chinese Containers –  These dish/trays are perfect for starting lettuce.
  • Old plastic containers – If you have storage containers that have cracked or just old and you don’t want to use them anymore, save them for you winter sowing.
  • Plastic fruit containers – These are perfect for starting lettuce, carrots, radishes and more.


seed starter pots for gardeners


Seed Starter Pots for Gardeners

Indoor Seed Starter Ideas:  


  • Eggshells – Rinse out your eggshells thoroughly.  You can store them in a container for egg carton for later use.  They are so adorable with new life in them.
  • Yogurt Cups or Fruit Cups –  I don’t eat much yogurt, but my grandkids do.  I eat lots of fruit cups though.   I’ve used them for the pass few years to start my birdhouse gourds, and they’ve worked great.  I’m sure you can use them to start tomatoes, peppers and more.
  • Sour Cream Containers – These are perfect seed starter containers too.  Tomato plants can grow a nice root ball in these containers without having to be transferred.
  • Toilet Paper Rolls – Biodegradable and perfect for germinating seeds.
  • Clear Fruit Containers – Next, I save the plastic containers that I purchase grapes or strawberries in.  Blueberry containers are good too. I like using these when I need to plant several seeds.  For example, cabbage, beets etc.
  • Newspaper Seedling Containers  – Next, recycle newspaper and make seedling pots. (See my post on making newspaper seedling pots.
  • Cardboard Milk or Juice Containers – Simply cut the top off the containers and you have a great seed starting container.
  • Plastic Cups – I save my disposal drinking cups throughout the year.  The 8 or 16 ounce cups are perfect.
  • Peat Pots – You can purchase these from the Dollar store, Lowes, Big Lots and more.
  • Pots from your local Nursery – Save pots that you purchase plants in from your local nursery.  They are perfect for starting seeds, and fit great into nursery trays.
  • Egg Cartons – Finally, save your egg cartons, they are perfect for starting your seeds and/or housing your eggshells.  A Philips Head screwdriver makes an excellent drainage hole.


Sanitizing Seed Starter Pots

So, you have your containers gathered and you’re ready to go.  Stop, you must sanitize them before use.  I use hot soapy water to remove any remaining food or liquid from the containers.  Rinse each container.  Next, spray and wipe each container with peroxide or spray with bleach. Rinse well and allow to dry.

Last, once the containers are dry you must drill holes in the bottom of each container.  This will allow water to soak into your trays.  You may be able to use a glue gun on some. For example, the plastic cups, clear fruit containers, yogurt and fruit cups.


Best Seed Starting Mix

Also, be sure to use a quality seed starting mix.  I use Miracle Gro Seed Starting Mix. 


Once you follow all of the steps, your containers are ready to be filled and used to germinate your seeds.  Good luck, and let me know if you have questions.  You may also like Starting Seeds in Eggshells


Improving Your Backyard Tips

Today, I’m sharing Tips for improving your backyard. If we want to improve our quality of life, we need to start improving our backyard, and start enjoy it.  There are many ways to improve the look of your backyard.  Possibilities include planting new plants or upgrading your garden furniture. It is very important that just as our house is harmonious and everything blends, the design in your backyard and garden should also blend.  Furthermore, it should have a uniform look and a sense of harmony. 


improving your backyard


Tips for Improving Your Backyard:


Install a Pergola

One way of improving your backyard is to install a pergola.  Installing a pergola in your backyard will increase your outdoor living space, and give you a shaded area to enjoy.  Furthermore, you can enjoy a pergola even when it’s raining.  However, it is suggested that you consider the quality of the wood before you install it.  A high-quality wooden pergola will last years with quality wood.  Additionally, it will make your backyard garden a place for entertaining guests, having your child’s birthday party, hosting a baby shower or just relaxing with family or friends. If you need to remove trees to get more light, consider a reliable tree removal service


Install a High Quality Space 

Another tip for improving your backyard is to consider different entertainment areas. You can divide your backyard into different spaces.  For example, you can use one part of your backyard for an outdoor seating area, a dining area, vegetable garden, butterfly garden, rose garden or more.  Use your imagination. If you need ideas, visit spaces of vegetation and seating.  


improving your backyard


Invest In Your Vegetation 

It is very important that we invest not only in the construction of our deck, balcony or pergola, but we must invest in our garden area.  When we design and plant our garden area, we should invest in quality flowers and other vegetation.  When our gardens does not have colorful flowers, it can be boring. We should also consider the areas in our garden that are shady or sunny.  You must purchase your plants based on sun or shade. Be sure to plant a few fruit trees and yummy vegetables.   


Invest in a Quality Garden Design 

If we want to improve our property and make it more inviting, we should not only invest in the interior design, but also in the design of the garden. Make sure that it has a sense of harmony and aesthetic beauty.  These elements will help upgrade your outdoor living experience, and raise the value of your property.